Get the fix to the boot-time error message “Invalid BOOT.INI file Booting from C:\Windows\” and other BOOT.INI problems affecting Windows XP.
Contents
About “Invalid BOOT.INI file”
The following information on this error has been compiled by NeoSmart Technologies, based on the information gathered and reported by our global network of engineers, developers, and technicians or partner organizations.
Description and Symptoms
The error messages, alerts, warnings, and symptoms below are tied to this error.
Symptom 1: Invalid BOOT.INI file
Boot.ini, a critical component of the Windows XP boot process responsible for maintaining a list of installed operating systems and what partitions they are located on, must be correctly configured for successful boot up of Windows.
In cases where boot.ini is misconfigured, incorrect, corrupted, or unreadable, the following error may be seen when attempting to start the PC:
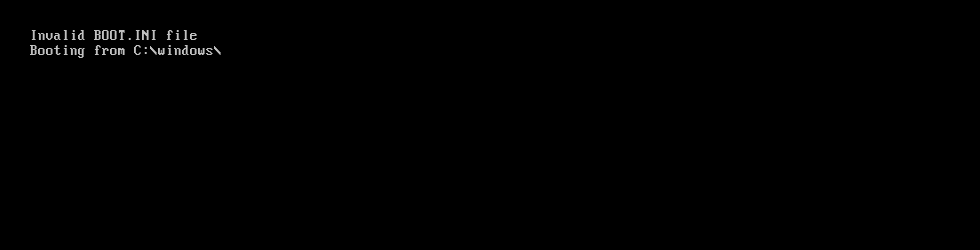
Invalid BOOT.INI file
Booting from C:\windows\
It is important to note that this error may or may not be accompanied by a complete boot failure.
If Windows is located at C:\Windows\ then this “Invalid boot.ini file” message may only flash briefly on the screen before your PC proceeds to boot into Windows XP.
Causes of this Error
This error has been known to occur as a result of one or more of the following:
Cause 1: Misconfigured boot.ini file
BOOT.INI is the configuration file for the Windows NT bootloader, NTLDR (also used by Windows XP and Windows Server 2003).
The “language” or format of the boot.ini file is standard and the same as any other .INI configuration file, with section headers in between [square brackets] and the actual configurations settings on the lines that follow.
If these rules are violated, for example the boot.ini file cannot be parsed as an INI file, the [boot loader] section is missing or misspelled, the boot.ini is empty, etc. this message can be displayed.
Cause 2: [operating systems] is blank
A correctly-structured boot.ini with the correct [boot loader] and [operating system] sections may cause this boot exception to occur at system startup if the contents of either of these two sections are empty.
Cause 3: Incorrect ARC paths
One reason why boot.ini has always been very difficult to edit and maintain is the arcane nature of the references to the Windows partitions.
While syntax like C:\Windows="Microsoft Windows" is technically valid for some versions of Windows XP and NTLDR, it is more common to see ARC paths used in boot.ini, as is described in the comprehensive boot.ini knowledgebase article.
If these ARC paths are not in the correct format (example: multi(0)disk(0)rdisk(0)partition(1)\WINDOWS) or point to an invalid or incorrect partition, this error can be displayed.
Cause 4: Boot.ini in UTF-16/UCS-2 or other non-ASCII encoding
One of the undiscovered causes of “invalid boot.ini” messages stems from the usage of double-byte Unicode encoding for the contents of the boot.ini file.
Without getting into extensive details, the encoding of a text file determines how the letters of the text file are stored on the disk in binary format. Most versions of NTLDR only support an ASCII-encoded boot.ini file.
Later versions of NTLDR shipping with updated releases of Windows XP SP2 or SP3 and Windows Server 2003 R2 can read boot.ini files encoded in UCS-2 or UTF-16 as well.
The presence of a BOM (byte order marker) in the text file will also cause NTLDR to be unable to read the boot.ini as it is saved to the disk, and the “invalid boot.ini file” error will be seen.
Cause 5: Boot.ini has been compressed
As with other critical boot files, BOOT.INI must be saved to the NTFS or FAT partition without any compression whatsoever. Unlike when Windows is booted, during the bootloading procedure a very restricted version of the NTFS or FAT32 driver is loaded, and is incapable of reading dependency files that are compressed, zipped, or fragmented.
Use of disk compression tools like DoubleSpace and DriveSpace or manually enabling file and folder compression on the boot partition can cause errors reading and loading boot.ini, resulting an a computer that will not start or boot.
Fixing “Invalid boot.ini file” on Windows
Windows Setup CD/DVD Required!
Some of the solutions below require the use of the Microsoft Windows setup CD or DVD. If your PC did not come with a Windows installation disc or if you no longer have your Windows setup media, you can use Easy Recovery Essentials for Windows instead. EasyRE will automatically find and fix many problems, and can also be used to solve this problem with the directions below.
Fix #1: Rebuild BOOT.ini via Easy Recovery Essentials
Easy Recovery Essentials’ one-click automated system repair feature incorporates full repair and reconstruction of boot.ini to resolve the “invalid boot.ini file” error, even in cases where Windows won’t boot as a result of the error.
The automated boot repair component of EasyRE will address all boot.ini-related issues, including correctly boot.ini files using the incorrect encoding and correctly identifying the appropriate ARC path for the boot.ini entries.
This will also take care of a compressed or fragmented boot.ini.
Easy Recovery Essentials is guaranteed to fix the “Invalid boot.ini file” error automatically using its built-in Automated Repair option. EasyRE is currently available for Windows XP, Vista, 7, 8, Windows 10, and Windows 11 and can be downloaded and created on any PC.
- Download Easy Recovery Essentials. Make sure to note your Windows version (XP, Vista, 7, 8, 10, or Windows 11) before you download EasyRE. This guide can help you identify what version of Windows you have installed.
- Burn the image. Follow these instructions on how to burn the bootable ISO image very carefully, as making a bootable CD can be tricky! Alternatively, these instructions explain how to create a bootable EasyRE recovery USB stick/drive.
- Boot up your PC from the Easy Recovery Essentials CD or USB you created.
- Once EasyRE is running, choose the “Automated Repair” option and click Continue.

Choose “Automated Repair” in Easy Recovery Essentials
- After EasyRE scans your computer’s drives, identify and select the drive letter for your Windows installation from the list, and then click on the Automated Repair button to begin.

Choose the drive associated with the Windows installation you’re trying to repair.
- Easy Recovery Essentials will start analyzing the selected drive for problems. EasyRE will test for and attempt to automatically correct errors with the disk, partition, bootsector, filesystem, bootloader, and registry. No intervention is required, as EasyRE’s repair is fully automated:

Easy Recovery Essentials searches for errors and makes corrections to the selected Windows installation.
- Once the process is complete, EasyRE will report its findings. Click on the Restart button to reboot your PC and test the changes.
- The “Invalid boot.ini file” error should now be fixed as your PC begins to load:


You can download Easy Recovery Essentials from here.
Fix #2: Manually attempt recreation of boot.ini
If boot.ini is incorrectly configured, does not contain the correct or expected contents, or is in a format that NTLDR cannot understand, the following steps on manually recreating boot.ini may help.
Note that these steps may not resolve “invalid boot.ini file” errors if boot.ini has been previously compressed or fragmented, in which case the above EasyRE instructions should be employed instead.
A boot.ini file is used by Windows to configure and display its operating system options. Instructions on manually recreating the boot.ini file are also available, but require a moderate level of computer expertise. The instructions below will guide you on recreating boot.ini automatically from the Windows XP setup CD.
Unable to boot into the Windows setup CD?
See our guide on setting up a PC to boot from the CD or DVD for troubleshooting and more detailed instructions.
- Insert your Windows XP CD and restart your computer.
- Press a key to boot into the CD when you see the “Press any key to boot from CD” message.
- When you arrive at the “Welcome to Setup” message, press R to start the Recovery Console.
- Type in your Administrator password; hit Enter
- The next command you need to write is below; hit Enter afterwards:
bootcfg /rebuild
The above command, bootcfg /rebuild, will scan your computer for installed Windows copies. If you have Windows XP, here are the next steps:
- Press Y if the command prompt shows a message similar to the one below:
Total Identified Windows Installs: 1

[1] C:\Windows
Add installation to boot list? (Yes/No/All)
- When you receive a message like this:
Enter Load Identifier
You are being asked to provide a name to be assigned and shown in the boot menu for the installation you picked in the previous step. Examples:
Enter Load Identifier: Windows XP Professional (Recovered)
- (Optional) When you receive a message like this:
Enter OS Load options
Type in
/fastdetectfollowed by Enter - Restart your computer.

Bootcfg utility results screen
More Information
Linked Entries
The errors below have been verified as being associated with or related to this problem:
Support Links
- Easy Recovery Essentials for Windows – our repair and recovery disk.
It’s an easy-to-use and automated diagnostics disk. It’s available for Windows 8, Windows 7 and Windows Vista. It’s also available for Windows XP and Windows Server.Read more at Windows Recovery Disks.
- The NeoSmart Support Forums, member-to-member technical support and troubleshooting.
- Get a discounted price on replacement setup and installation discs: Windows XP.
Applicable Systems
This Windows-related knowledgebase article applies to the following operating systems:
- Windows XP (all editions)
- Windows Server 2003 (all editions)