How To Remove One Operating System From A Dual Boot System And Delete The Partition

I used to dual boot with XP and Windows 10. I used EasyBCD to set it up.
XP was the default.

Years later I made Windows 10 the default and haven't booted the XP since.

Now I want to get rid of the XP partition to free up space on the SSD.
(I'll probably used Partition Wizard to join the existing Windows 10 partition with the unallocated space freed up by deleting the XP partition.)

So, first, I deleted the XP boot option using EasyBCD, but I still get the Windows Boot Manager prompt (see below).
So how do I tell Windows there's only one O/S and to boot from it? I want to do that before I delete the XP partition.

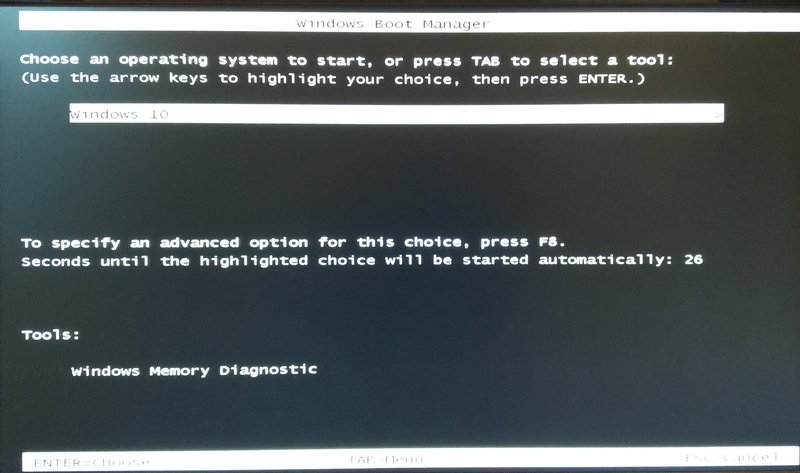
Here's the boot prompt:
boot menu 2 800.jpg
 
Assuming this is a BIOS/MBR PC (different for UEFI), check disk management status flags.

Disk Management flags have the following meanings

"boot" = "this is the system you're running"
"system" = "this is where I found the boot files for the currently running system"
"active" (on the first HDD in the BIOS boot sequence) = "this is where I started the search for the boot files"
"active" (on subsequent HDDs in the BIOS boot sequence) ="this is where I will look if I don't find something in the MBR on the first HDD"

I would guess, reading between the lines of your post, that you have a BIOS/MBR PC originally XP, on which you've subsequently dual-booted W10.
If so, it's most likely that W10 installed the boot files on the previously existing "active" partition (normal automatic behaviour for Windows Setup).

You can confirm that, while booted into W10, if it shows W10 as "boot" and XP as "system".
If the above surmise is correct, you will need to copy the boot files out of the XP partition before Windows will allow you to format it into oblivion.


When you've done that successfully and rebooted into W10, you should see that XP is no longer "system" and you can format it.

The other problem with seeing an unnecessary boot menu probably means that the BCD contains remnants of redundant (but harmless) previous entries.
The correct way to clean them out is to use EasyBCD > Backup Repair > Reset BCD.
DO NOT IGNORE EasyBCD's dire warning not to reboot your PC yet, until you've re-added an entry for W10 back into the now empty BCD and can see it there when you "view settings", pointing to the correct partition.

Alternatively you can just tick "skip the boot menu" in the Edit Boot Menu" tab, but that's a quick and dirty solution and won't have cleaned up your BCD.
 
Thank you very, very much for your reply. It's just gone 1am on my side of the planet and I'm watching Liverpool v Wolves, so will respond in more detail tomorrow.

I believe all your presumptions about how I got my PC to be dual booting are correct - BIOS/MBR PC, originally XP, added Windows 10.

I'll check the Disk Management flags tomorrow and post back.


Thanks again for your interest and reply. I'm sure this will be helpful to others who have gone this route.
 
I ran Disk Management on my dual booting Desktop PC while it was running Windows 10 and it showed the flags exactly as you predicted.
I also have an older Laptop which is also dual booting with XP and Windows 10. It went through the same "evolution" as the Desktop - i.e. it started as XP only and then had Windows 10 added to it.

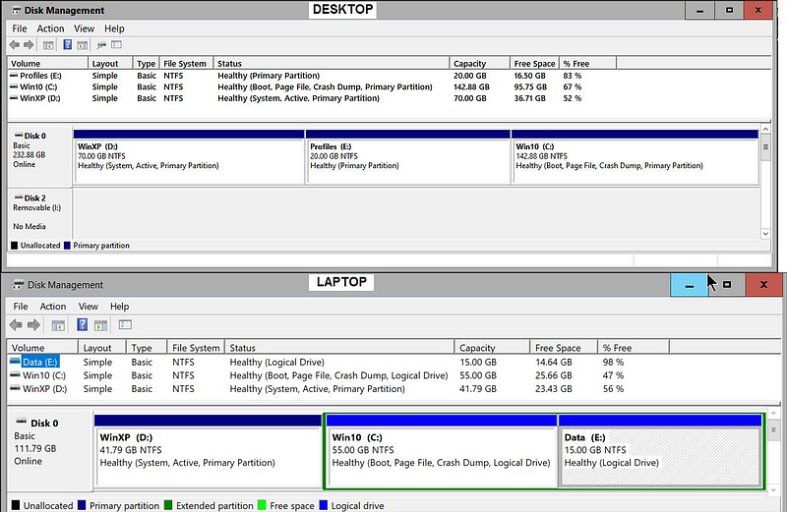
The image below shows Disk Management from both PCs .

For the Desktop:
- the XP partition flags are System, Active, Primary
- the Win10 partition flags are Boot, Page File, Crash Dump, Primary
- the Profiles partition flags are Primary (this is just a data partition)


For the Laptop:
- the XP partition flags are System, Active, Primary
- the Win10 partition flags are Boot, Page File, Crash Dump , Logical
- the Data partition flags are Logical (this is just a data partition)

What I would like to do is to perform the procedure "Changing The Boot Partition" firstly on my Laptop PC and then on my Desktop PC.
But before I do that, I have two questions:

1. The Desktop shows all partitions as "Primary", but the Laptop shows the Win10 and Data partitions as "Logical". Is that a problem?
2. I make System Images of my PCs regularly by booting from a thumb drive containing a standalone version of Acronis True Image 2017. I have, in the past, restored an image when a problem occurred that I could not fix. I always make an image of the complete system disk - all partitions. When restoring, Acronis lists all the partitions that were imaged plus "MBR and Track 0". I always include "MBR and Track 0" when I restore.
So I was thinking that if I make a System Image now and something went wrong, e.g. the computer wouldn't boot because I damaged the MBR, I could restore the PC to a working state using the last Image which would include the good MBR. Do you think this is a correct assumption?

Thanks for any advice you can give.


OK, here is the screen shot of my two PCs:

DiskManagement2SystemsPx800.JPG
 
The procedure will work fine on the PC, but you're correct about a problem on the laptop. The boot files must be in a primary partition, so before you can remove XP, you'll have to convert those logical drives to primary partitions.
A web search should throw up many free partition managers capable of such.
I don't know why the laptop was set up that way. It makes absolutely no sense. Logical drives were a later DOS workaround for HDDs big enough to merit >4 partitions (the maximum number of entries in the MBR partition table) Since you only have three, they could and should all have been created as primaries.
I don't use Acronis, but logic (and your previous experience) would suggest that to be an effective belt and braces precaution.
Don't worry about the "change boot drive" procedure. It's completely non-destructive. It copies everything necessary to the target partition without altering the source (except for flipping the "active" bit, but you can always flip that back to the status quo ante using the same free bootable partition manager you download to do the logial/primary conversion)
 
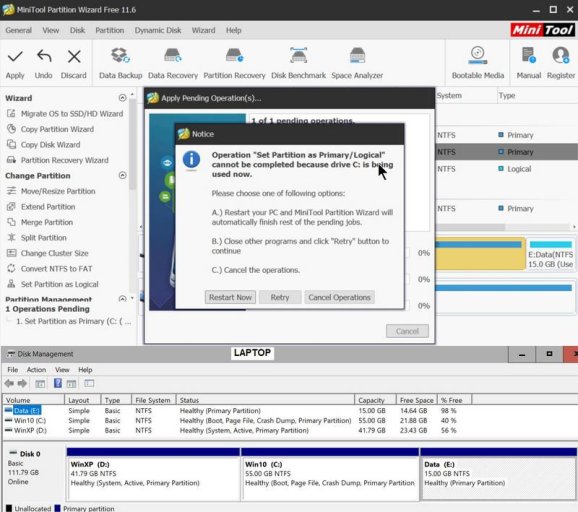
I used Partition Wizard 11 to convert the Logical Partitions to Primary. I had to run a newly installed version from within Windows as I didn't have a bootable/standalone version to boot from. (My bootable version 9 doesn't have the "Logical to Primary" function.)
So, because Windows was running, a Warning was displayed saying that the conversion would occur after a restart of the PC, which thankfully it did.

Regarding: "I don't know why the laptop was set up that way"... that was my fault! It was the first time I'd done dual booting and I can't remember whose procedure I followed - it was about 4 or 5 years ago. I also have no idea why the Desktop partitions are all Primary. Just luck, I think!

So here are the screen captures from Partition Wizard's warning and from Disk Management when all was successfully done.
I'll make another System Image before continuing with the "Changing The Boot Partition" procedure, which I'll do later - next year, in fact. Happy New Year!
Warning Restart and DiskM 800.JPG
 
I downloaded the latest EasyBCD and installed it in my Windows 10 system. (An older version was installed in my XP system.)

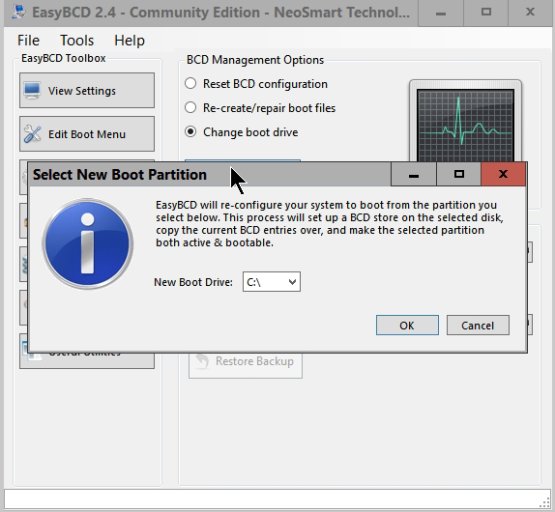
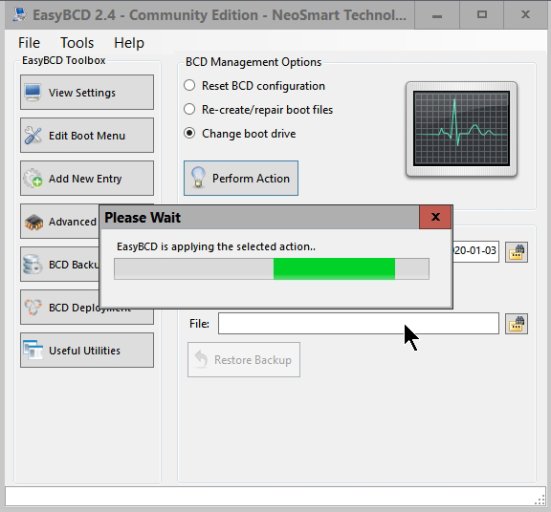
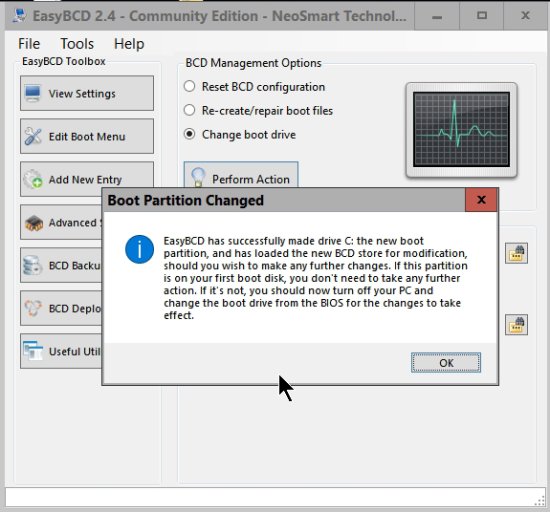
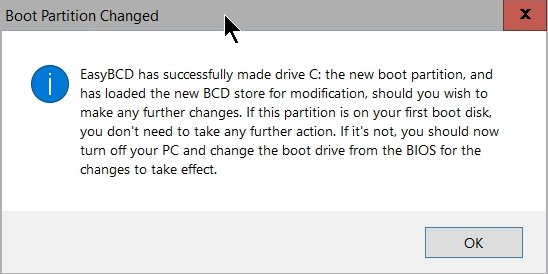
I performed the "Changing The Boot Partition" procedure which was straight forward and EasyBCD displayed a "Boot Partition Changed" message.
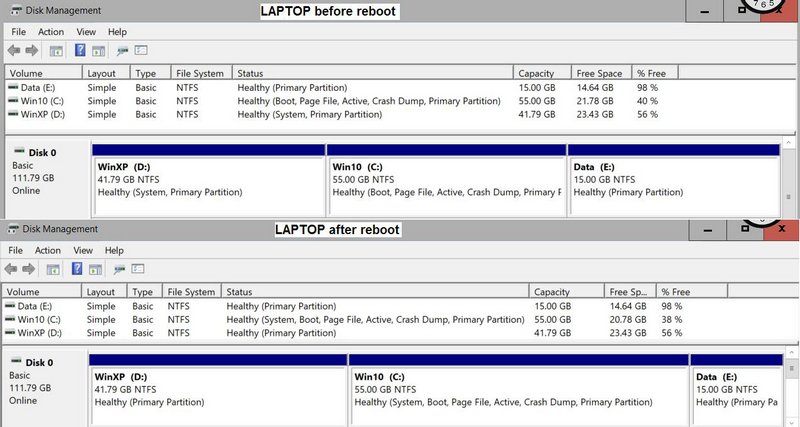
I immediately ran Disk Management to check the flags and was puzzled to see the XP partition still marked as "System" until I re-read your explanation of that flag which said it would change after I rebooted, which it did. So here are the screen captures of the EasyBCD message and Disk Management immediately after changing the boot partition and again after rebooting.
So now it's time to "EasyBCD > Backup Repair > Reset BCD" followed by re-adding "W10 back in" and checking it is there in "view settings",

EasyBCD Success2.jpgLaptopDiskManBCDBeforeandAfterRebootx800.jpgSo
 
The Laptop is nearly done. I performed the "EasyBCD > Backup Repair > Reset BCD" followed by re-adding the Windows 10 system to the bootloader and checking that it was listed in the "View settings" display. So I rebooted and the PC started Windows 10 immediately. So far so good.

But I want to make use of all the Unallocated space residing before the Windows 10 partition. So I made another System Image before booting Partition Wizard 9 standalone which has commands to extend the Windows 10 partition using the 40+ GB of Unallocated disk in front of it.

Just as well I made the System Image because the PC wouldn't boot. I can't remember the screen full of text that was displayed, but basically a particular file couldn't be found. An Acronis "Image Restore" got me back to the previous working system shown below.

If you can suggest a way of adding that 41GB to the Windows 10 partition, I would appreciate it, but I realise this is not a function of EasyBCD.

PS. I don't know where the 501 MB Recovery Partition came from.
XPgoneUnallocated.jpg
 
The UID in the BCD which describes W10 is made up of the unique disk signature of the drive and the offset of the partition from the start of the disk.
If you change the physical location of the start of the W10 partition then the BCD will need to be repaired so that the UID description is corrected to the new location.
Some partition managers will automatically correct that for you I believe, but I don't have any detailed knowledge of which ones.
Since yours doesn't seem to be one of them, you should make yourself a repair disc (Control Panel > Backup & Restore >create repair disc) if you don't already have one (or the Installation DVD for W10 will do the same if you have it).
Use your partition manager to reclaim that XP space, then boot either the DVD or the repair disc and
 
Thanks again for all your help, Terry.
Ultimately, what I decided to do was to use all the disk space AFTER the Windows partition to extend the size of the Windows partition and to use the disk space BEFORE the Windows partition as my "Data" partition.
So that involved creating a new Data partition, copying the existing files from the old Data partition to it, deleting the "Recovery" partition using Partition Wizard 9, deleting the old Data partition and then extending the Windows partition to use all of the unallocated space after it.
So Disk Management for my laptop now looks like the image below.
And after all this "practice" work on my Laptop, I'll now start to do the same to my Desktop. I don't anticipate any problems but I'll report back either way.
Laptop Final x800.JPG
 
"I don't anticipate any problems but I'll report back either way." Famous last words!
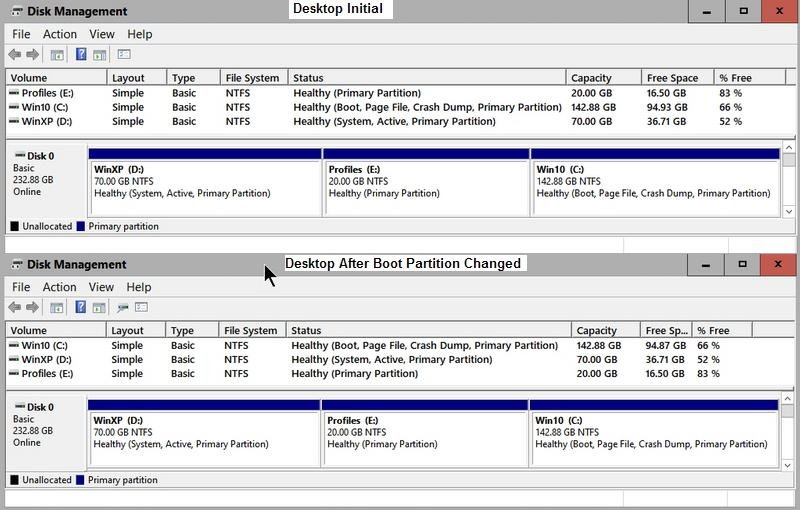
I captured the Disk Management screen of my Desktop PC initially, installed EasyBCD 2.4 and performed the "Change The Boot Partition" procedure.
All went well and I got the "Boot Partition Changed" message. So I shutdown the PC and restarted and ran Disk Management again.
But this time (i.e. compared to the Laptop) the System flag did not move!
In fact, I thought I must have done something wrong, so I did it again. No change.
The only difference in the partitions between this Desktop PC and the Laptop that I previously worked on is that the Desktop partitions are already Primary - I didn't have to change them from Logical.
So, dare I "Reset the BCD" and add back the Windows 10 system to the bootloader, or is there a problem?
I have a System Image from earlier in case of disaster, so I'm tempted to do it anyway.


Desktop Initial and After Boot Part Change.JPG
 
Before I answer your questions, I should tell you what I did after I posted my last message. As I have a complete System Image, I wasn't too worried about damaging the system - I could always restore back to the working system.


I thought if I ran the XP system, it might help fix the problem with the Change Boot Drive not working. So I ran EasyBCD 2.4 to view the boot menu settings. There was only the Windows 10 entry, so I added the XP system by specifying drive D: - the XP partition. I also changed the countdown from 0 to 20 so the menu was visible. After restarting, the boot screen showed Windows 10 and "Microsoft Windows", which I assumed was the XP system.

But, after I selected it, there was an error message displayed "Windows failed to start: Insert Windows Installation CD.... File \Windows\system32\winload.exe... file missing". But that didn't seem right. I thought XP used "ntldr". So I Googled the problem and found some clues such as here:

What I did then was to add a 3rd entry to the boot menu using EasyBCD and specify the Type as "NT/2k/XP/2k3" - which I didn't do before, Previously, I just specified the drive D. Again, EasyBCD reported that it was added OK. I viewed the settings. Puzzling that it showed drive C: for the XP system:
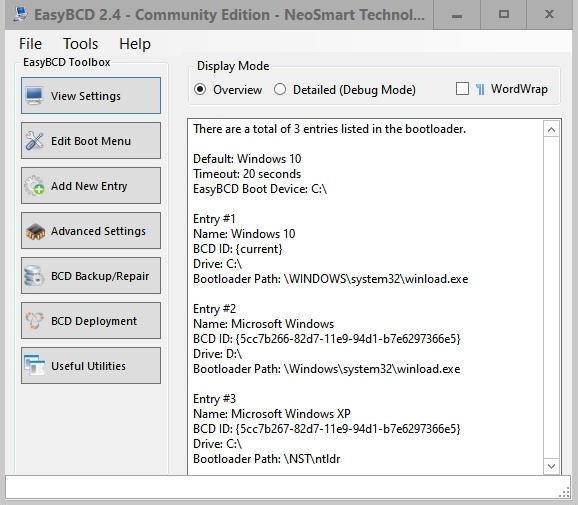
Screen Shot 01-03-20 at 02.28 PM BCD 3 Entries.JPG

I restarted the Desktop and selected Windows XP and it started OK. I then restarted back into Windows 10 and performed the Change Boot Drive procedure again:
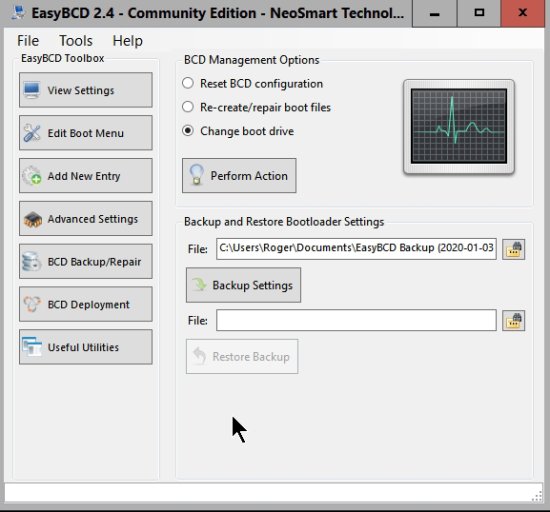
Screen Shot 01-03-20 at 04.35 PM Change boot 1.JPG
Screen Shot 01-03-20 at 04.35 PM 001 Change boot 2.JPG
Screen Shot 01-03-20 at 04.36 PM Change boot 3.JPG
Screen Shot 01-03-20 at 04.36 PM 001 Change boot 4.JPG

Here is the Disk Management before rebooting:

Screen Shot 01-03-20 at 04.38 PM After Change Boot Partition Change boot 5.JPG

And here it is after rebooting:
Screen Shot 01-03-20 at 04.42 PM DiskM After Reboot 6.JPG
So still have the XP partition flagged as System and Active.


To answer your questions:
Yes, there is a /boot folder in the root of C;. It contains the following:

Volume in drive C is Win10
Volume Serial Number is 127E-5590

Directory of C:\Boot

2020-01-03 04:36 PM 32,768 BCD
2020-01-03 04:36 PM <DIR> bg-BG
2019-10-11 02:47 PM 27,664 bootuwf.dll
2019-10-11 02:47 PM 99,856 bootvhd.dll
2020-01-03 04:36 PM <DIR> cs-CZ
2020-01-03 04:36 PM <DIR> da-DK
2020-01-03 04:36 PM <DIR> de-DE
2020-01-03 04:36 PM <DIR> el-GR
2020-01-03 04:36 PM <DIR> en-GB
2020-01-03 04:36 PM <DIR> en-US
2020-01-03 04:36 PM <DIR> es-ES
2020-01-03 04:36 PM <DIR> es-MX
2020-01-03 04:36 PM <DIR> et-EE
2020-01-03 04:36 PM <DIR> fi-FI
2020-01-03 04:36 PM <DIR> Fonts
2020-01-03 04:36 PM <DIR> fr-CA
2020-01-03 04:36 PM <DIR> fr-FR
2020-01-03 04:36 PM <DIR> hr-HR
2020-01-03 04:36 PM <DIR> hu-HU
2020-01-03 04:36 PM <DIR> it-IT
2020-01-03 04:36 PM <DIR> ja-JP
2020-01-03 04:36 PM <DIR> ko-KR
2020-01-03 04:36 PM <DIR> lt-LT
2020-01-03 04:36 PM <DIR> lv-LV
2019-09-18 02:31 PM 990,224 memtest.exe
2020-01-03 04:36 PM <DIR> nb-NO
2020-01-03 04:36 PM <DIR> nl-NL
2020-01-03 04:36 PM <DIR> pl-PL
2020-01-03 04:36 PM <DIR> pt-BR
2020-01-03 04:36 PM <DIR> pt-PT
2020-01-03 04:36 PM <DIR> qps-ploc
2020-01-03 04:36 PM <DIR> qps-plocm
2020-01-03 04:36 PM <DIR> Resources
2020-01-03 04:36 PM <DIR> ro-RO
2020-01-03 04:36 PM <DIR> ru-RU
2020-01-03 04:36 PM <DIR> sk-SK
2020-01-03 04:36 PM <DIR> sl-SI
2020-01-03 04:36 PM <DIR> sr-Latn-RS
2020-01-03 04:36 PM <DIR> sv-SE
2020-01-03 04:36 PM <DIR> tr-TR
2020-01-03 04:36 PM <DIR> uk-UA
2020-01-03 04:36 PM <DIR> zh-CN
2020-01-03 04:36 PM <DIR> zh-TW
4 File(s) 1,150,512 bytes
39 Dir(s) 106,110,308,352 bytes free


I am happy to try anything you suggest to solve this problem - even restoring the old System Image that I made before I started changing the boot menu.
Thanks again for your help.
 
If you have a bootable partition manager with which you can reverse the procedure if unsuccessful, try making W10 partition "active" using Disk Management and rebooting.
The procedure seems to have successfully created the boot files on C, but failed to flip the active bit across for some reason.
Setting it manually and then rebooting should achieve the desired result.
 
Success! The flags are flipped.
I booted Partition Wizard 9 and was able to set Win10 as Active and WinXP as Inactive. Restarted and selected Windows 10 from the boot menu. It booted OK so I ran Disk Management:

Screen Shot 01-03-20 at 10.30 PM DiskM W10 After flip flags 800.JPG
So this means I can delete the XP partition and extend the Profiles partition to use its disk space.
But before I do that I would like to boot the XP system so that I can make and keep one last System Image with dual booting working.
Unfortunately when I tried to boot the XP system using the 3rd item in the Boot Menu, the following three lines were displayed:
Invalid BOOT.INI file
Booting from C:\windows\
NTDETECT failed
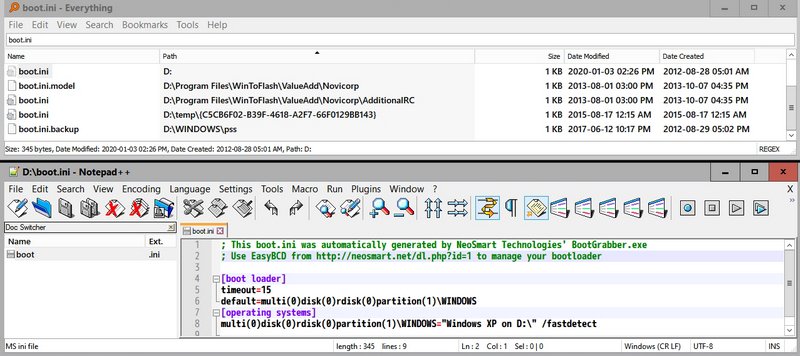
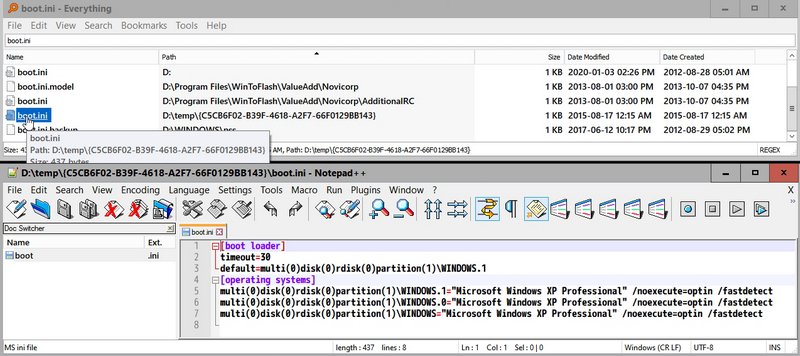
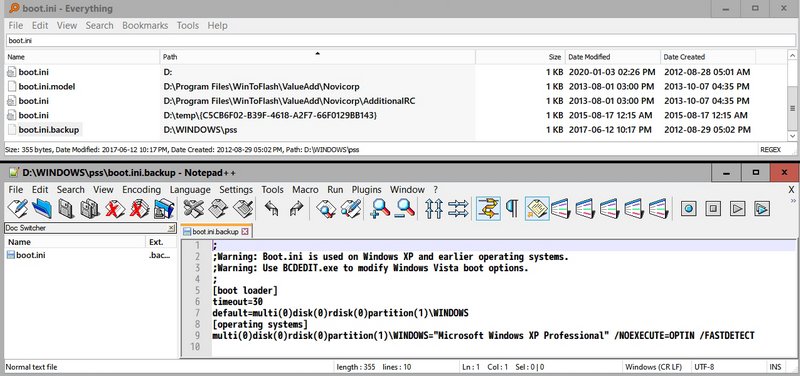
After restarting using Ctrl-Alt-Del and selecting Windows 10 from the Boot Menu, I searched for all boot.ini files. There were four found:

In D:\ (the XP system partition)
Screen Shot 01-03-20 at 10.51 PM boot.ini on D.JPG
In D:\temp\{CSC......
Screen Shot 01-03-20 at 10.52 PM boot.ini in D temp.JPG

In D:\Windows\pss (boot.ini.backup)
Screen Shot 01-03-20 at 10.53 PM boot.ini.backup.JPG

There is also a copy of boot.ini in C:\Windows\Panther\Rollback, which is identical to boot.ini.backup in D:\Windows\pss.


Do you have any ideas on what the problem could be with boot.ini?
 
Delete the XP entry from the BCD and add it again, letting EasyBCD auto-configure.
Don't change what it sets up, it didn't make any mistakes.
 
Excellent! It all works now. Thank you again for all your help. I'll save this as a System Image before deleting the XP partition and extending the Profiles partition to make use of the unallocated space.
You deserve some kind of award for helping me through this, but all I can give is lots of kudos.
 
Back
Top