This guide explains how to boot from a USB flash drive and what configurations you need to have.
If you have a new computer model (usually with Windows 8 or Windows 10) that has UEFI/EFI, make sure that you read UEFI/EFI configuration before you proceed to How to boot from a USB flash drive below.
If you’re looking to boot from a CD or DVD, follow the Booting from a CD or DVD guide instead.
Contents
How to boot from a USB flash drive
In order for your computer to boot from a USB flash drive, you need to make sure that:
- the USB flash drive is bootable
- the USB flash drive is prioritized in the Boot devices menu of your BIOS/UEFI panel. For more information, go to To access BIOS/UEFI
- on certain computer models (mostly ultrabooks) with a fast boot option, you’ll need to disable fast boot before you can boot from a USB
Instructions
Method #1 – Follow these steps to boot from a USB:
- Insert the USB flash drive. It’s recommended that you remove all other drives, memory cards, printers, scanners etc.
- Reboot the computer
- Press any key to boot from an external media, if you are prompted to do so
Method #2 – If you are not prompted with this type of message, you should be prompted to do a certain combination of keys to select a device to boot from:
- Insert the USB flash drive. As above, remove all other drives, memory cards, printers etc.
- Reboot the computer
- Access the Boot Menu.To find the combination of keys for your specific PC manufacturers, go to To access Boot Menu.
- Choose the USB item and hit Enter
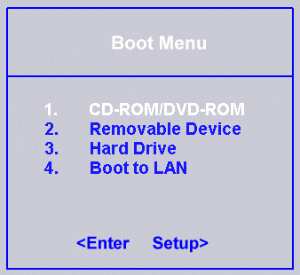
BIOS boot menu option
The Boot Menu can have different names for the external media:
1. +Removable Devices
2. +Hard Drive
3. CD-ROM Drive
Method #3 – If none of the above work, check that the BIOS/UEFI settings are correct and you can “move” the USB item at the top of the list in the Boot Device Select Menu.
With this method, you’ll be forcing your computer to always boot from a USB flash drive first and then from your hard drive. If a USB drive isn’t available, the computer will boot from the hard drive.
Usually, a “Removable Devices” or a “USB-HDD” would be the flash drive you’re looking for.
This list can look something like this:
1st Drive [SATA]
2nd Drive [USB:Flash Drive]
Depending on your computer model and BIOS version, you can hit Enter on the 1st Drive option to open the menu and select the USB drive item instead.
Doing these steps would make the list above into something like this:
1st Drive [USB:Flash Drive]
2nd Drive [SATA]
Make sure you save the changes before you exit.
Shortcut keys
Depending on the PC manufacturer, you need to press different keys or combination of keys to access the Boot Menu or the BIOS/UEFI menu.
The Boot Menu is the Windows’ menu that lets you select the device you want to boot from: HDD, USB, CD-ROM etc.
If the Boot Menu isn’t available, you can force your computer to boot from an external and removable media (such as a USB flash drive, CD or DVD) by configuring your BIOS/UEFI settings.
Newer computers models with UEFI/EFI need to have the legacy mode enabled (or disabling the secure boot). If you have computer with UEFI/EFI, go to UEFI/EFI configuration.
Your USB flash drive won’t boot if the USB flash drive isn’t bootable. Go to How to boot from a USB flash drive to see the steps you need to do.
To access Boot Menu
To access the Boot Menu, find your PC manufacturer below to see what combination of keys you need:
- Acer: Esc, F12 or F9. Most computers models from Acer should work with the F12 key.
- Asus: F8 or Esc
- Compaq: Esc or F9
- Dell: F12
- eMachines: F12
- Fujitsu: F12
- HP: Esc or F9. If Esc works, you may need to press F9 afterwards: Esc + F9.
- Lenovo: F8, F10 or F12. On computer models with the Novo button, try pressing the Novo button. Other key combinations: Fn + F11.
- Samsung: Esc or F2 or F12. Users of ultrabooks from Samsung should disable the fast boot option in BIOS/UEFI before they boot from a USB device. To disable the fast boot, go to To access BIOS/UEFI > Samsung and find the combination of keys you need to press to access this.
- VAIO: Esc, F10 or F11. On some Sony VAIO computers models you may need to press the Assist button.
- Toshiba: F12
To access BIOS/UEFI
To access the BIOS/UEFI, find your PC manufacturer below to see what combinations of key you need:
- Acer: Del or F2 key. Most models should work with the F2 key.
- Asus: Delete or Del key
- Compaq: F10
- Dell: F2
- eMachines: Tab or Del
- Fujitsu: F2
- HP: Esc, F10, F11. On certain Pavilion models, you may need to press F1 instead.
- Lenovo: F1 or F2. If your computer is a laptop from Lenovo, try searching for a small button next to the Power button instead.
- Samsung: F2. On some ultrabooks models, you may need to press F10.
- VAIO: F1, F2, F3. On models with the Assist button, press Assist.
- Toshiba: F1, F2, F12 or Esc.
UEFI/EFI configuration
Windows 8 and Windows 10 computers usually have the new UEFI/EFI that needs some configuration before you can proceed to boot from a USB flash drive.
If you’re not sure how to access UEFI/EFI, go to To access BIOS/UEFI instructions.
You need to disable the secure boot option. Alternatives names can be any of the following, depending on your computer model:
- Legacy Support. If you have Legacy Support listed, make sure it’s On or Enabled.
- Legal CSM. If you have Legacy CSM listed, make sure it’s On or Enabled.
- Launch CSM. If you have Launch CSM listed, make sure it’s On or Enabled.
- CSM. If you have CSM, make sure it’s On or Enabled.
- UEFI/Legacy Boot. If you have a UEFI/Legacy Boot option, make sure it’s selected as Both or Legacy Only.

- Boot Mode. If you have a Boot Mode option listed, make sure Legacy Support is selected.
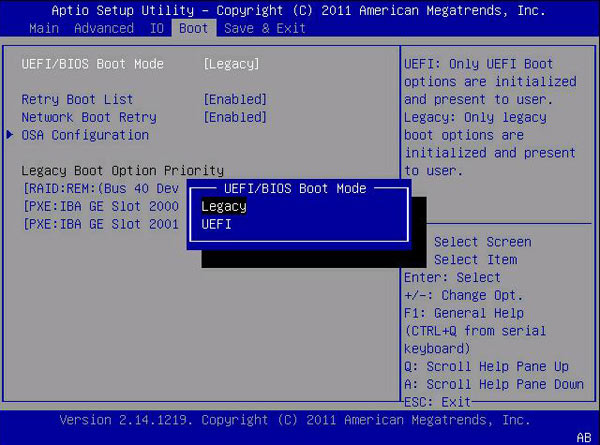
- Boot Option Filter. If you have a Boot Option Filter option listed, make sure you select Legacy too: UEFI and Legacy, Legacy First, Legacy Only

After you made the changes to disable the secure boot (or enable legacy mode), make sure you save the changes.
This is usually done by clicking the F10 key.
For more information on how to enable the legacy mode, read our guide “Enable Legacy Mode” or the “Disabling Secure Boot” guide.
Troubleshoot
HDD is visible, but not USB
If the HDD option is visible at Boot Menu, but not the USB drive, follow these tips and reboot your computer to try again:
- If your computer has multiple USB ports: plug and unplug the flash drive in different ports for each boot you do
- If your computer has USB 2.0 and USB 3.0 ports: try to use the flash drive only on the USB 2.0 port
- Make sure you installed all necessary drivers from the PC manufacturers for the Windows version you’re running
USB not booting
If the USB isn’t booting, you need to make sure:
- That the USB is bootable
- That you can either select the USB from the Boot Device list or configure BIOS/UEFI to always boot from a USB drive and then from the hard disk
On new computer models with UEFI/EFI, you also need to know:
- That legacy mode must be enabled (alternative names are: disabling secure boot)
On some ultrabooks models with a Fast Boot option:
- Disable fast boot
If you need further assistance booting from your USB, refer to the following article: Troubleshooting Boot from USB.
More Information
Support Links
- Easy Recovery Essentials for Windows – our repair and recovery disk.
It’s an easy-to-use and automated diagnostics disk. It’s available for Windows 8, Windows 7 and Windows Vista. It’s also available for Windows XP and Windows Server.Read more at Windows Recovery Disks.
- The NeoSmart Support Forums, member-to-member technical support and troubleshooting.
- Get a discounted price on replacement setup and installation discs: Windows XP, Windows Vista, Windows 7, Windows 8, Windows 10, Windows 11, Windows Server 2022.
Applicable Systems
This Windows-related knowledgebase article applies to the following operating systems:
- Windows XP (all editions)
- Windows Vista (all editions)
- Windows 7 (all editions)
- Windows 8 (all editions)
- Windows 8.1 (all editions)
- Windows 10 (all editions)
- Windows 11 (all editions)
- Windows Server 2003 (all editions)
- Windows Server 2008 (all editions)
- Windows Server 2012 (all editions)
- Windows Server 2016 (all editions)
- Windows Server 2019 (all editions)
- Windows Server 2022 (all editions)