This guide explains how to use the diskpart utility for the following Windows versions: Windows XP, Vista, 7, 8, 8.1 or 10.
Contents
What is diskpart
The diskpart utility (available in Windows 2000, XP, Vista, 7, 8, 8.1 and 10) can be used to create or delete partitions on your PC.

Command Prompt: list disk
The utility allows you to:
- Partion
- Remove partitions
- Remove formatting
- Assign and remove drive letters and mount points
- Convert disks from basic to dynamic
- Create and extend volumes
Most commands that you can perform in Disk Management (see Boot partitions) are available with diskpart. Because it’s a command line utility, you need to open Command Prompt and type diskpart.
On Windows Vista, 7, 8 and 10 systems, you can type diskpart at Run, click OK or press Enter and Command Prompt will automatically open with diskpart loaded.
When the utility is loaded, you will notice the version installed on your computer:
Microsoft DiskPart version 6.1.7600
Copyright  1999-2008 Microsoft Corporation.
On Computer: MY_COMPUTER
Commands and parameters
The diskpart tool has the following commands and parameters available:
selectcan set the focus on a specific targetselect disk– use this command to set the focus on a specific disk
Command Prompt: select disk
select partition– use the select partition command to set the focus on a specific partitionselect volume– use this command to set the focus on a specific volumedetail diskwill deliver information about the current diskdetail partitionwill deliver information about the current partitiondetail volumewill deliver information about the current volumelist disk– use list disk to get summary information about the available disks on your computerlist partition– use this command to get information about each partition available on a specific disklist volume– use list volume to get information about each volume available on the computeractive– use the active command to set the focus on the current partition to be activeassign– use assign to assign a letter or a mount point to the current active partitioncreate partition primary size=SIZE_IN_MB– use this command to create a new primary partition. TheSIZE_IN_MBis the size of the partition you want to create, in MB.create partition extended size=SIZE_IN_MB– use this command to create a new extended partition. TheSIZE_IN_MBis the size of the partition you want to create, in MB.create partition logical size=SIZE_IN_MB– use this command to create a new logical partition. TheSIZE_IN_MBis the size of the partition you want to create, in MB.delete partitionwill delete the current active partitionextendwill extend the current volumeremovewill remove a letter or a mount point from the current active partitionactive– use this to set the current volume as activeadd disk– use this command to add a mirror to the current active volumebreak disk– use this command to break the mirror addedcreate volume stripe– use this to create a stripe set volume on a specified diskcreate volume raid– use this command to create a Raid-5 volume on a specified diskdelete disk– use this command to delete a missing dynamic diskdelete partition– use this command to delete the current active partitionextend disk– use this command to extend the current volumeimportcan be used to import disks from a foreigh disk grouponlinecan be used to bring a disk or a volume online that was previously offlineremovecan be used to remove a letter or a mount point from the current active volumeretainis used to prepare a volume to be used as a boot or system volumeconvert mbrwill set the partition style of the current disk to MBRconvert gptwill set the partition style to GPTconvert dynamicwill change a basic disk into a dynamic oneconvert basicwill convert a dynamic disk (empty disk) into a basic diskexitwill exit the utilitycleanwill remove the partition or volume formatting from the current diskrescancan rescann the I/O buses and can discover new disks added to the computerhelpwill display the list of all available commands
Error Codes
You can find a list error codes to debug various errors:
- Code
0means that no errors occurred - Code
1means that a fatal exception occurred - Code
2means that the parameters you specified for a command are incorrect - Code
3means that diskpart is unable to open the specified file - Code
4means that diskpart (one of the services used by the utility) returned a failure - Code
5means a command syntax error
diskpart in Windows XP
Note that the fdisk utility found in pre-Windows XP systems is now known as diskpart on Windows XP systems.
If you can boot into Windows XP
If you can boot into your computer, you simply need to open Command Prompt to access diskpart:
- Boot into Windows XP
- Click Start
- Click Run
- Type
cmd - Press Enter or click OK
- At the Command Prompt window, type
diskpart - Press Enter
If you can’t boot into Windows XP
If you can’t boot into Windows XP to access diskpart, you have 2 options:
- Use the original CD to access Recovery Console
- Use Easy Recovery Essentials to launch Command Line
If you have the original CD:
If you can’t boot into Windows XP, but you have the original CD, you can access the Recovery Console:
- Insert the Windows XP CD
- Reboot the computer
- Press any key to boot from the CD
- At the Microsoft Setup menu, press R
- Select the operating system and enter the Administrator password, if requested
- When Command Line appears, type
diskpart - Press Enter
If you use Easy Recovery Essentials:
- Download Easy Recovery Essentials
- Burn the ISO Image. Follow our instructions on how to burn a bootable ISO image. If you’d like to have a recovery USB instead, follow our instructions on how to make a recovery USB.
- Boot Easy Recovery Essentials from the CD, DVD or USB
- Select Launch Command Line

diskpart in Windows Vista
You need to run these steps as an Administrator on Windows Vista systems.
If you can boot into Windows Vista with no errors, follow the If you can boot into Windows Vista set of instructions. Otherwise, follow If you can’t boot into Windows Vista.
If you can boot into Windows Vista
You simply need to open Command Prompt, if you can boot into Windows Vista:
- Boot into Windows Vista
- Click Start
- Type
cmd - Click Command Prompt from the search results list. You may need to right-click Command Prompt > Run as Administrator, if you are not logged in as Administrator already
- Type
diskpart - Press Enter
For the full list of diskpart commands and paremeters, go to Commands and Parameters.
If you can’t boot into Windows Vista
If you can’t boot into your system, you have the following options:
- Use the installation disc to access System Recovery Options
- Access System Recovery Options without the installation disc (if installed)
- Use Easy Recovery Essentials and access Command Line
If you have the installation disc:
If you can’t boot into Windows Vista, but you have the Windows Vista disc, follow these steps to open diskpart:
- Insert the original CD/DVD in the optical drive
- Boot your computer
- Press any key to boot from the CD/DVD
- Select your language, time and keyboard
- Click Next
- Click Repair your computer

- Select the operating system
- Click Next
- When the System Recovery Options screen appears, click Command Prompt

- Type
diskpart:diskpart
- Press Enter
For the full list of diskpart commands and paremeters, go to Commands and Parameters.
If you don’t have the installation disc:
If your Windows Vista has the System Recovery Options installed and is available at the Advanced Boot Options menu, you can run Command Prompt from there. Otherwise, see the “If you use Easy Recovery Essentials” set of instructions below.
Follow these steps below to access diskpart without the installation disc:
- Reboot the computer
- Press F8 as your computer starts to boot, but before the Windows Vista logo appears
- Select Repair Your Computer, at the Advanced Boot Options menu
If a “Repair Your Computer” option isn’t listed, System Recovery Options is not installed on your computer. Use the original installation disc or go to the “If you use Easy Recovery Essentials”set of instructions below .
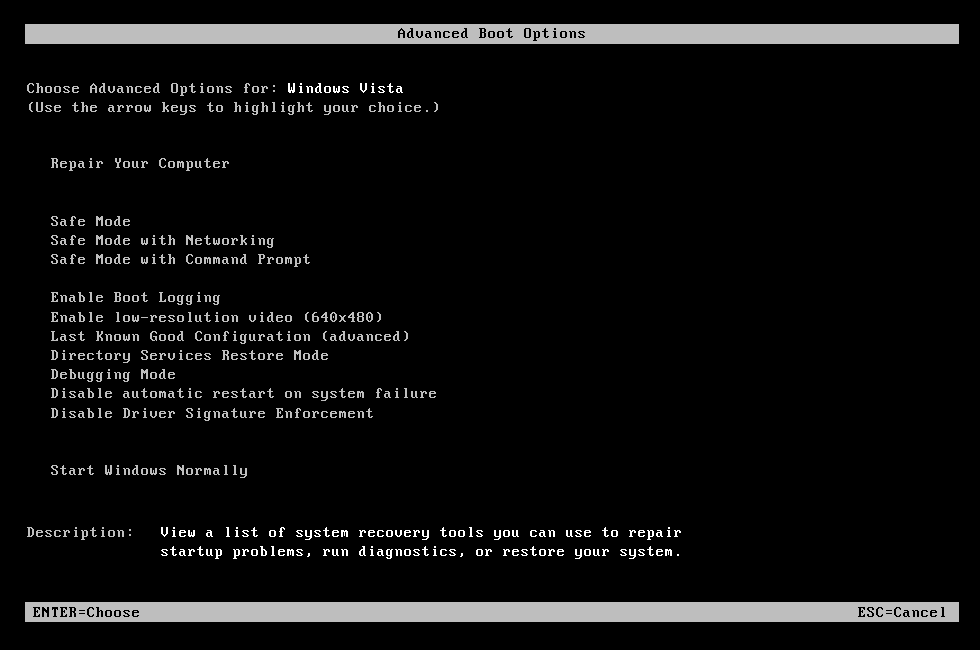
- Select Command Prompt at the System Recovery Options menu
- Type
diskpart - Press Enter
For the full list of diskpart commands and paremeters, go to Commands and Parameters.
If you use Easy Recovery Essentials:
If you don’t have the installation disc available, can’t boot into Windows Vista or you don’t have the “Repair Your Computer” option listed at the Advanced Boot Options menu, you can use Easy Recovery Essentials to access Command Prompt and load diskpart.
Follow these steps:
- Download Easy Recovery Essentials
- Burn the ISO Image. Follow our instructions on how to burn a bootable ISO image. If you’d like to have a recovery USB instead, follow our instructions on how to make a recovery USB.
- Boot Easy Recovery Essentials from the CD, DVD or USB
- Select Launch Command Line
diskpart in Windows 7
On Windows 7 systems, you can access diskpart just as you do Windows Vista systems.
Note that you need to run these steps as an Administrator on Windows 7 computers.
If you can boot into Windows 7
If you can boot into your Windows 7 system, simply open Command Prompt:
- Boot into Windows 7
- Click Start
- Type
cmd - Click Command Prompt from the search results list. Right-click on Command Prompt > Run as Administrator.
- When Command Prompt loads, type
diskpart - Press Enter
For the full list of diskpart commands and paremeters, go to Commands and Parameters.
If you can’t boot into Windows 7
Similar to Windows Vista, if you can’t boot into your system, you have the following options:
- Use the installation disc
- Boot into the Advanced Boot Options menu to access System Recovery Options
- Use Easy Recovery Essentials and access Command Line
If you have the installation disc:
If you can’t boot into Windows 7, but you have the installation disc, you can run diskpart using the disc. To do so, follow these steps:
- Insert the disc in the optical drive of your computer
- Restart the computer
- Press any key to boot from the disc
- Select your preferred language, time and keyboard
- Click Next
- Click Repair your computer at the Install Windows screen

- Select the operating system from the list
- Click Next
- Select Command Prompt

- Type diskpart
diskpart
- Press Enter
For the full list of diskpart commands and paremeters, go to Commands and Parameters.
If you don’t have the installation disc:
Usually, Windows 7 systems should have the System Recovery Options installed on the hard drive. If it’s not (follow steps below), go to the “If you use Easy Recovery Essentials” set of instructions below for an alternative to access diskpart.
Follow these steps to access diskpart without an installation disc on a Windows 7:
- Restart the computer
- Press F8 as the computer starts to boot. Press F8 before the Windows 7 logo appears.
- Select Repair Your Computer at the Advanced Boot Options screen
If Repair Your Computer is not listed, System Recovery Options is not installed on your PC. Go to If you use Easy Recovery Essentials for an alternative.

- Press Enter
- Select Command Prompt
- Type
diskpart - Press Enter
For the full list of diskpart commands and paremeters, go to Commands and Parameters.
If you use Easy Recovery Essentials:
Easy Recovery Essentials can run from any CD, DVD or USB flash drives.
To access diskpart using Easy Recovery Essentials, follow these steps:
- Download Easy Recovery Essentials
- Burn the ISO Image. Follow our instructions on how to burn a bootable ISO image. If you’d like to have a recovery USB instead, follow our instructions on how to make a recovery USB.
- Boot Easy Recovery Essentials from the CD, DVD or USB
- Select Launch Command Line
diskpart in Windows 8
If you can boot into Windows 8
If you can boot into your Windows 8 system, you simply need to open Command Prompt to access diskpart. To do so, follow these steps:
- Boot into Windows 8
- Press the
 key and C to open the charm bar
 - Type
cmd - Click Command Prompt

- When Command Prompt opens, type
diskpart - Press Enter
For the full list of diskpart commands and paremeters, go to Commands and Parameters.
If you can’t boot into Windows 8
If you can’t boot into your Windows 8, you have these options available:
- Use the original DVD or USB with Windows 8 or Windows 8.1 to access the Repair your computer option
- Boot into the System Recovery Options with Shift and F8
- Use Easy Recovery Essentials to launch Command Line
If you have the installation disc:
If you can’t boot, but you have the installation disc, follow these steps:
- Insert the Windows 8 DVD or 8.1 USB
- Restart the computer
- Press any key to boot from the media
- Click Repair your computer or press R

- Select Troubleshoot
- Select Command Prompt
- Type
diskpart - Press Enter
For the full list of diskpart commands and paremeters, go to Commands and Parameters.
If you don’t have the installation disc:
If you don’t have the installation disc, you can boot into System Recovery Options or use Easy Recovery Essentials.
To access diskpart without an official Windows 8 or Windows 8.1 disc, follow these steps:
- Reboot the system
- Press Shift and F8 very quickly
- At Choose an option, select Troubleshoot
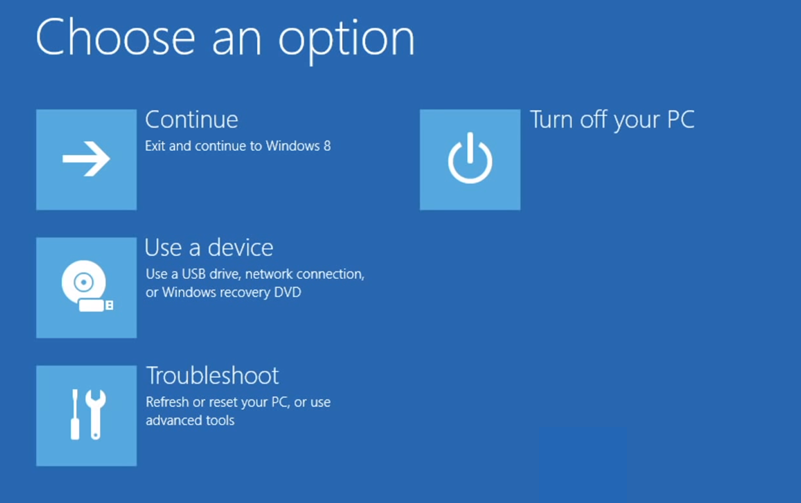
- Select Command Prompt
- Type
diskpart - Press Enter
For the full list of diskpart commands and paremeters, go to Commands and Parameters.
If you use Easy Recovery Essentials:
Easy Recovery Essentials can run from any CD, DVD or USB flash drives.
To access diskpart using Easy Recovery Essentials, follow these steps:
- Download Easy Recovery Essentials
- Burn the ISO Image. Follow our instructions on how to burn a bootable ISO image. If you’d like to have a recovery USB instead, follow our instructions on how to make a recovery USB.
- Boot Easy Recovery Essentials from the CD, DVD or USB
- Select Launch Command Line
diskpart in Windows 10
If you can boot into Windows 10
If you can boot into your Windows 10 system, you simply need to open Command Prompt to access diskpart. To do so, follow these steps:
- Boot into Windows 10
- Press the key and C to open the charm bar
- Type
cmd - Click Command Prompt

- When Command Prompt opens, type
diskpart - Press Enter
For the full list of diskpart commands and paremeters, go to Commands and Parameters.
If you can’t boot into Windows 10
If you can’t boot into your Windows 10, you have these options available:
- Use the original DVD or USB with Windows 10 to access the Repair your computer option
- Boot into the System Recovery Options with Shift and F8
- Use Easy Recovery Essentials to launch Command Line
If you have the installation disc:
If you can’t boot, but you have the installation disc, follow these steps:
- Insert the Windows 10 or USB
- Restart the computer
- Press any key to boot from the media
- Click Repair your computer or press R

- Select Troubleshoot
- Select Command Prompt
- Type
diskpart - Press Enter

For the full list of diskpart commands and paremeters, go to Commands and Parameters.
If you don’t have the installation disc:
If you don’t have the installation disc, you can boot into System Recovery Options or use Easy Recovery Essentials.
To access diskpart without an official Windows 10 media, follow these steps:
- Reboot the system
- Press Shift and F8 very quickly
- At Choose an option, select Troubleshoot

- Select Command Prompt
- Type
diskpart - Press Enter
For the full list of diskpart commands and paremeters, go to Commands and Parameters.
If you use Easy Recovery Essentials:
Easy Recovery Essentials can run from any CD, DVD or USB flash drives.
To access diskpart using Easy Recovery Essentials, follow these steps:
- Download Easy Recovery Essentials
- Burn the ISO Image. Follow our instructions on how to burn a bootable ISO image. If you’d like to have a recovery USB instead, follow our instructions on how to make a recovery USB.
- Boot Easy Recovery Essentials from the CD, DVD or USB
- Select Launch Command Line
Troubleshooting
Download diskpart
You can not download diskpart utility. This utility is a command line utility part of Windows.
To access diskpart, you have the following options:
- Use the original CD/DVD or USB of your Windows to access Recovery Console (for Windows XP) or System Recovery Options (for Windows Vista-8)
- Boot into the recovery mode of your Windows
- Use Easy Recovery Essentials, our recovery and repair disk, and open Command Line to access diskpart
Instructions on how to access diskpart if you use Easy Recovery Essentials:
- Download Easy Recovery Essentials
- Burn the ISO Image. Follow our instructions on how to burn a bootable ISO image. If you’d like to have a recovery USB instead, follow our instructions on how to make a recovery USB.
- Boot Easy Recovery Essentials from the CD, DVD or USB
- Select Launch Command Line
Instructions on how to access diskpart if you have the installation disc:
Instructions on how to access diskpart if you don’t have the installation disc:
Format USB with diskpart
To format a USB flash drive with diskpart, follow these steps:
- Open the utility by typing
diskpartin Command Prompt - Press Enter
- Once loaded, type
list disk:list disk
- Press Enter
- Determine which of the disks listed is your USB flash drive, e.g. Disk 2.
- Type
select disk 2, if #2 is the USB flash drive presented by the list disk command - Press Enter
- Type
cleanto clean the USB flash drive:clean
- Press Enter
- Type this command:
create partition primary
- Press Enter
- Type
active:active
- Press Enter
- You should now receive this confirmation message:
DiskPart marked the current partition as active.
- Type this command to format the USB flash drive:
format fs=ntfs label="MY USB DRIVE"
where
ntfsis the NTFS file system (you can also use fs=fat32) and “MY USB DRIVE” is the label given to the USB drive. - Type
assign:assign
- Press Enter
- Quit diskpart by typing
exit:exit
- Press Enter
Bootable USB with diskpart
To create a bootable USB using diskpart, follow the steps from Format USB with diskpart.
Once successfully formatted the drive, simply copy the files to the USB drive.
USB not showing in diskpart
diskpart will not list external media, e.g. USB flash drive, if you’re using Windows XP.
Windows Vista to Windows 8 systems will show the USB flash drives in diskpart.
More Information
Support Links
- Easy Recovery Essentials for Windows – our repair and recovery disk.
It’s an easy-to-use and automated diagnostics disk. It’s available for Windows 8, Windows 7 and Windows Vista. It’s also available for Windows XP and Windows Server.Read more at Windows Recovery Disks.
- The NeoSmart Support Forums, member-to-member technical support and troubleshooting.
- Get a discounted price on replacement setup and installation discs: Windows XP, Windows Vista, Windows 7, Windows 8, Windows 10.
Applicable Systems
This Windows-related knowledgebase article applies to the following operating systems:
- Windows XP (all editions)
- Windows Vista (all editions)
- Windows 7 (all editions)
- Windows 8 (all editions)
- Windows 8.1 (all editions)
- Windows 10 (all editions)
- Windows Server 2003 (all editions)
- Windows Server 2008 (all editions)
- Windows Server 2012 (all editions)