This guide shows you how to create a Windows System Repair disc that can be used to repair Windows.
This guide applies for the following Windows versions: XP, Vista 7, 8 and 10.
Contents
Create a Windows System Repair Disc
A system repair disc allows you to boot to the recovery options menu of your Windows version and help you recover and restore your system, if you don’t have the original installation disc.
You can’t install Windows with this kind of disc. To install Windows again, you need the original installation disc, the CD/DVD/USB used to install Windows.
Create disc for Windows XP
The original Windows XP installation CD itself acts your System Repair disc. There is no separate process for creating a System Repair disc as you have for Windows Vista, Windows 7, Windows 8 or Windows 10 systems.
In order to repair your computer, you need to access Recovery Console and perform various recovery commands. If these recovery commands do not work, you’ll need to reinstall Windows XP.
If you can’t boot from the installation CD because of the CD-ROM, you can use Windows XP boot disks by using your computer’s floppy disk drive to begin the process and continue with the CD. The bootable floppy disks bypasses the need for a bootable CD-ROM, but the entire process still requires you to have the installation CD available.
Follow these instructions to use your Windows XP CD to fix your computer:
- Insert the Windows XP disk in the CD drive
- Restart your computer
- Press any key if you are prompted to boot from the CD
- At the Welcome to Setup screen, press R to open Recovery Console
- Type your Administrator password
- Command Prompt should now be available
- The following commands might help fix your computer:
bootcfg /rebuild
chkdsk /r /f
fixboot
- Press Enter after each command

Windows XP Recovery Console screen
On older computer models, Recovery Console can be accessed without the installation CD by following these steps:
- Turn on your computer
- Press and hold the F8 key during boot
- Wait for the Startup Options screen to appear
- Select Recovery Console
- Hit Enter
- Enter the administrator password
- Enter the recovery commands from above
If the recovery commands mentioned above do not fix your computer, try to reinstall Windows XP using the installation CD:
By reinstalling Windows XP, you will delete all your personal files: pictures, music, movies. Backup your computer before you continue.
- Insert the installation CD and restart your computer
- At the “Press any key” screen, press any key to boot from the CD
- Press ENTER to enter the setup process
- Read and agree to the license agreement by pressing F8
- Select your current Windows XP installation from the list and then press R
- Follow the instructions to setup Windows XP again.
If you can’t boot from the CD, follow these instructions to setup a set of Windows XP boot/setup disks (bootable diskette) that can be used by your computer’s floppy disk and then continue the process by using the installation CD:
- Download the necessary setup disks that correspond to the version of Windows XP you have installed:
- Extract the files on your Desktop
- Make sure you have 6 blank disks available. You will receive this message at the first run:
This program creates the Setup boot disks for Windows XP. To create these disks, you must to provide 6 blank, formatted, high-density disks.

Please specify the floppy drive to copy the images to:
- Type the drive where your floppy disks is – example:
A:– and hit Enter - Insert the first blank disk in the floppy drive when you receive this message:
Insert one of these disks into drive drive letter. This disk will become the Windows XP Setup Boot Disk.

Press any key when you are ready.
- Continue with the process until all 6 disks are created
- Insert the first created disk in the floppy drive and restart your computer
- Boot from the disk
- Continue with the instructions to begin the process. Make sure you have the installation CD available as you’re required to have it to finish a reinstallation process.
You can also create a bootable diskette to boot into MS-DOS by following these instructions too:
- Insert a blank diskette in your computer’s floppy disk drive
- Go to My Computer
- Right click on
A:\, this is usually the drive letter that holds the diskette - Click Format
- Check the “Create an MS-DOS startup disk” option
- Click Start

Create MS-DOS startup disk option
If you don’t have the original installation disc to create the System Repair disc, download our recovery disk Easy Recovery Essentials. You can use it recover, repair or restore your computer:
- Download Easy Recovery Essentials from here
- Burn the image. Follow these instructions on how to burn the bootable ISO image very carefully, as making a bootable CD can be tricky! Alternatively, these instructions explain how to create a bootable EasyRE recovery USB stick/drive.
- Select Automated Repair
- Wait for the process to finish
You can use Easy Recovery Essentials on Windows XP computers:
- Microsoft Windows XP SP1 (Service Pack 1)
- Microsoft Windows XP SP2 (Service Pack 2)
- Microsoft Windows XP SP3 (Service Pack 3)
It’s compatible with both the Home and Professional editions of Windows XP:
- Microsoft Windows XP Home
- Microsoft Windows XP Professional
Click here to download Easy Recovery Essentials for Windows XP
Create disc for Windows Vista
Before you begin, you need to verify what version of Windows Vista you’re running. Follow these steps:
- Go to Control Panel
- Click on System
- Under the System type section, check if you run a 32-bit Windows Vista or a 64-bit Windows Vista

Windows Vista System Type
If you have Windows Vista SP1 or Windows Vista SP2, you need to replace the recdisc.exe file. Otherwise, skip these steps.
Steps to replace the recdisc.exe file, if you have a Service Pack installed:
- Copy a
recdisc.exefile from a Windows Vista with no Service Packs installed on your computer - Copy the
recdisc.exefile on the Desktop - Right-click on the
recdisc.exefile and go to Properties - Go to the General tab
- Click Unblock. If “Unblock” doesn’t exist, skip this and the next step.
- Click OK
- Open My Computer
- Go to
C:\Windows\System32\, whereC:\is your main hard drive’s letter where Windows is installed. If it’sD:\, then you will need to go toD:\Windows\System32\ - Right-click the
recdisc.exefile found in this folder (C:\Windows\System32) and make sure that you have permissions to modify the file. To verify this, right-click on the file and go to Properties. - Go back to Desktop and copy the
recdisc.exefile from the Windows Vista with no Service Packs: right-click and Copy. - Paste the file to the
C:\Windows\System32folder - Confirm that you want to replace this file
Follow these steps to create the System Repair disc for a Windows Vista system:
- Go to Start
- Type
recdisc.exe - Hit Enter
- Select your DVD drive from the Drive: list
- Click Create disc
- If the next screen mentions “Insert Windows installation disc“, it means that your system is missing necessary files to create the disc.You will need your Windows Vista installation disc at this step. If you don’t have one, go to Use Easy Recovery Essentials for Windows Vista
- Wait for the process to finish
- When the Using the system repair disc screen appears, click Close
- Click OK
- Label your discs and keep them safe!

Windows Vista – Using the system repair screen
If you’re not able to use the original installation disc to create the System Repair disc, Easy Recovery Essentials can be used to recover, repair or restore a Windows Vista system:
- Download Easy Recovery Essentials from here
- Burn the image. Follow these instructions on how to burn the bootable ISO image very carefully, as making a bootable CD can be tricky! Alternatively, these instructions explain how to create a bootable EasyRE recovery USB stick/drive.
- Select Automated Repair
- Wait for the process to finish
It supports x86 and x64 platforms and all Windows Vista editions, including the 32-bit and 64-bit editions:
- Microsoft Windows Vista Ultimate (32-bit and 64-bit editions)
- Microsoft Windows Vista Enterprise (32-bit and 64-bit editions)
- Microsoft Windows Vista Business (32-bit and 64-bit editions)
- Microsoft Windows Vista Home Premium (32-bit and 64-bit editions)
- Microsoft Windows Vista Home Basic (32-bit and 64-bit editions)
- Microsoft Windows Vista Starter (32-bit edition; Starter edition doesn’t have a 64-bit edition)
It’s compatible with any of the available Service Packs of Windows Vista:
- Microsoft Windows Vista Service Pack 1 (SP1)
- Microsoft Windows Vista Service Pack 2 (SP2)
Click here to download Easy Recovery Essentials for Microsoft Windows Vista
Create disc for Windows 7
The steps to create a System Repair disc for Windows 7:
- Boot your computer
- Log in as an administrator
- Insert a blank CD or DVD
- Go to Start
- Type
recdisc.exeand hit Enter afterwards. If the Create a system repair disc screen doesn’t appear, follow these steps:- Open Control Panel
- Go to Backup and Restore
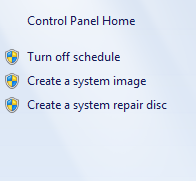
- Click on Create a system repair disc from the left

Windows 7 – Create a system repair disc item
- Select the drive from the Drive: list
- Click Create disc
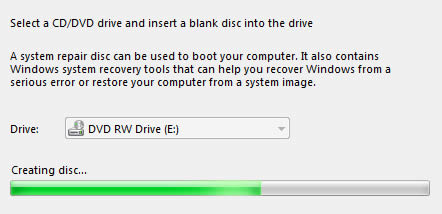
- Wait for the process to finish
- When the Using the system repair disc screen appears, click Close
- Click OK
- Label your discs

Windows 7 – Create disc progress bar
If you can’t boot into Windows 7 to create the repair disc, use Easy Recovery Essentials. You can use EasyRE to recover, repair or restore a Windows 7 system:
- Download Easy Recovery Essentials from here
- Burn the image. Follow these instructions on how to burn the bootable ISO image very carefully, as making a bootable CD can be tricky! Alternatively, these instructions explain how to create a bootable EasyRE recovery USB stick/drive.
- Select Automated Repair
- Wait for the process to finish
EasyRE supports both x86 and x64 platforms and is compatible with the full list of Windows 7 editions, including the 32-bit and the 64-bit:
- Microsoft Windows 7 Ultimate (32-bit and 64-bit editions)
- Microsoft Windows 7 Enterprise (32-bit and 64-bit editions)
- Microsoft Windows 7 Professional (32-bit and 64-bit editions)
- Microsoft Windows 7 Home Premium (32-bit and 64-bit editions)
- Microsoft Windows 7 Home Basic (32-bit and 64-bit editions)
- Microsoft Windows 7 Starter (32-bit edition) (Starter is available only in 32-bit)
It’s compatible with SP1 of Windows 7:
- Microsoft Windows 7 Service Pack 1 (SP1)
Click here to download Easy Recovery Essentials for Microsoft Windows 7
Create disc for Windows 8
You can create a System Repair disc for Windows 8 by following the steps below.
Disc as a CD/DVD
Follow these steps to create the disc on a DVD:
- Boot your computer
- Log in as an Administrator or any user account with administrative rights to the system
- After you log into Windows 8, insert a blank CD or DVD
- Unplug any USB flash drives from your system
- Press the
key and R key
- Type
recdisc - Hit Enter
- If the Create a system repair window appears, skip the following steps and go to step 15. If the Create a system repair window doesn’t appear, continue with the following steps until step 15.
- Open Control Panel
- Go to Recovery
- Click on Create a recovery drive
- If UAC (User Account Control) window appears, click Yes
- At the Create a recovery drive screen, click Next
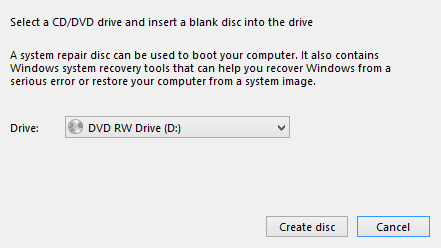
- When the Connect a USB flash drive screen appears, click on the “Create a system repair disc with a CD or DVD instead” to create the disc as a CD or DVD and not as a USB flash drive
- Select the drive of the blank CD or DVD
- Click Create disc
- Wait for the process to finish
- When the Using the system repair disc screen appears, remove your CDs/DVDs from the tray and label them accordingly

Windows 8 – Select CD for System Repair
Disc as a USB flash drive
A USB drive can be used instead of a DVD for Windows 8 users. For Windows 8.1, only a USB flash drive can be used to create the disc.
You need a USB drive with at least 256 MB in size.
Follow these steps to create the System Repair disc on Windows 8.1:
- Start Windows 8
- Press the
and R key
- Type
RecoveryDrive.exe - Hit Enter
- If the Recovery Drive window appears continue with step 6. If not, follow these steps:
- Open Control Panel
- Go to Recovery
- Click on Create a recovery drive
- Click Yes, if prompted by UAC (User Account Control)
- Click Next
- At the Create a recovery drive screen, click Next.If the “Copy contents from the recovery partition to the recovery drive” option isn’t grayed out you can also check this option which will allow the USB flash drive to be used as a factory restore and recovery USB drive for Windows 8.
- Select your USB drive from the Available drive(s) list
- Click Next
- Click Create
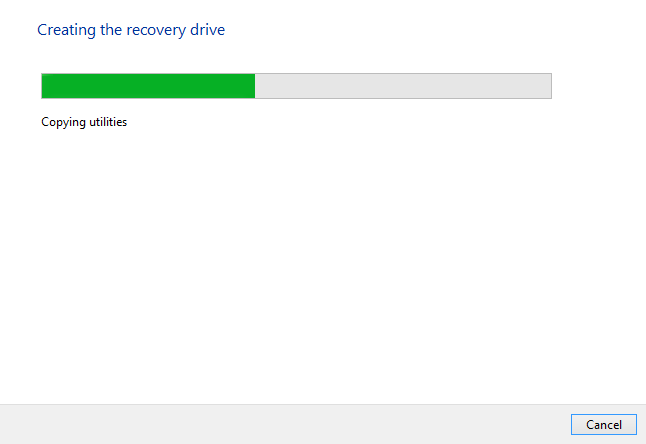
- Wait for the process to finish
- When it’s finished, click Finish

Windows 8 – Create disc progress bar
If you can’t create a System Repair disc (either as DVD or USB) for your Windows 8 or Windows 8.1 system, use Easy Recovery Essentials.
Easy Recovery Essentials supports the x86 and x64 platforms and all the Microsoft Windows 8 editions (8 and 8.1), including the 32-bit and the 64-bit editions. It can be used to recover, repair or restore your Windows 8 computer.
- Microsoft Windows 8 (32-bit and 64-bit editions)
- Microsoft Windows 8.1 (32-bit and 64-bit editions)
- Download Easy Recovery Essentials from here
- Burn the image. Follow these instructions on how to burn the bootable ISO image very carefully, as making a bootable CD can be tricky! Alternatively, these instructions explain how to create a bootable EasyRE recovery USB stick/drive.
- Select Automated Repair
- Wait for the process to finish
Click to download Easy Recovery Essentials for Microsoft Windows 8
Create disc for Windows 10
You can create a System Repair disc for Windows 10 by following the steps below.
Disc as a CD/DVD
Follow these steps to create the disc on a DVD:
- Boot your computer
- Log in as an Administrator or any user account with administrative rights to the system
- After you log into Windows 10, insert a blank CD or DVD
- Unplug any USB flash drives from your system
- Press the
key and R key
- Type
recdisc - Hit Enter
- If the Create a system repair window appears, skip the following steps and go to step 15. If the Create a system repair window doesn’t appear, continue with the following steps until step 15.
- Open Control Panel
- Go to Recovery
- Click on Create a recovery drive
- If UAC (User Account Control) window appears, click Yes
- At the Create a recovery drive screen, click Next
- When the Connect a USB flash drive screen appears, click on the “Create a system repair disc with a CD or DVD instead” to create the disc as a CD or DVD and not as a USB flash drive
- Select the drive of the blank CD or DVD
- Click Create disc
- Wait for the process to finish
- When the Using the system repair disc screen appears, remove your CDs/DVDs from the tray and label them accordingly

Windows 10 – Select CD for System Repair
Disc as a USB flash drive
A USB drive can be used instead of a DVD for Windows 10 users.
You need a USB drive with at least 256 MB in size.
Follow these steps to create the System Repair disc on Windows 10:
- Start Windows 10
- Press the
and R key
- Type
RecoveryDrive.exe - Hit Enter
- If the Recovery Drive window appears continue with step 6. If not, follow these steps:
- Open Control Panel
- Go to Recovery
- Click on Create a recovery drive
- Click Yes, if prompted by UAC (User Account Control)
- Click Next
- At the Create a recovery drive screen, click Next.If the “Copy contents from the recovery partition to the recovery drive” option isn’t grayed out you can also check this option which will allow the USB flash drive to be used as a factory restore and recovery USB drive for Windows 10.
- Select your USB drive from the Available drive(s) list
- Click Next
- Click Create
- Wait for the process to finish
- When it’s finished, click Finish

Windows 10 – Create disc progress bar
If you can’t create a System Repair disc (either as DVD or USB) for your Windows 10 system, use Easy Recovery Essentials.
Easy Recovery Essentials supports the x86 and x64 platforms and all the Microsoft Windows 10 editions, including the 32-bit and the 64-bit editions. It can be used to recover, repair or restore your Windows 10 computer.
- Download Easy Recovery Essentials from here
- Burn the image. Follow these instructions on how to burn the bootable ISO image very carefully, as making a bootable CD can be tricky! Alternatively, these instructions explain how to create a bootable EasyRE recovery USB stick/drive.
- Select Automated Repair
- Wait for the process to finish
Click to download Easy Recovery Essentials for Microsoft Windows 10
More Information
Support Links
- Easy Recovery Essentials for Windows – our repair and recovery disk.
It’s an easy-to-use and automated diagnostics disk. It’s available for Windows 8, Windows 7 and Windows Vista. It’s also available for Windows XP and Windows Server.Read more at Windows Recovery Disks.
- The NeoSmart Support Forums, member-to-member technical support and troubleshooting.
- Get a discounted price on replacement setup and installation discs: Windows XP, Windows Vista, Windows 7, Windows 8, Windows 10.
Applicable Systems
This Windows-related knowledgebase article applies to the following operating systems:
- Windows XP (all editions)
- Windows Vista (all editions)
- Windows 7 (all editions)
- Windows 8 (all editions)
- Windows 8.1 (all editions)
- Windows 10 (all editions)

