This guide will walk you through burning an ISO image to a CD or DVD with the free (and very easy to use) Active@ ISO Burner. You can use this guide to burn just about any CDs, including our Windows recovery discs (or download Easy Recovery Essentials directly from here).
Can’t get the burned CD to boot?
If you’re having trouble getting this CD to boot after burning it according to the instructions on this page, check out our guides on setting up your PC to boot from the CD/DVD correctly and troubleshooting problems booting from CD.
Contents
Getting Started
Before you continue, you’ll need a blank CD and five minutes to spare.
Are you on a Mac? The instructions below are only for Windows PCs! If you need to burn an ISO on a Mac, it’s actually a lot easier than this. Read these instructions for info on burning an ISO image to a CD on a Mac.
Download and Install
First some written instructions on how to install Active ISO Burner, followed with images for those that need some visual clarifications:
- Download a (free) copy of Active@ ISO Burner here.
- Double-click on the .exe file you downloaded and follow the on-screen instructions to continue setup.
- When setup is done, open “Active@ ISO Burner” from the Windows start menu and continue with the next steps below, or just check the “Run Active@ ISO Burner” checkbox on the last page of setup to have it start automatically.
Burning an ISO Image
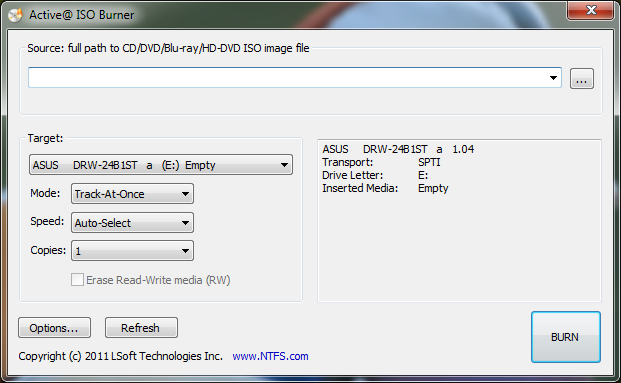
Run Active@ ISO Burner
Now to get started burning your ISO file. Launch Active@ ISO Burner from the Windows start menu and it will automatically open to the main burning window. Active@ ISO Burner is a very straightforward no-frills program for burning CDs, and the dialog has only burning option for what you need:
Open the Browse File Dialog
Click the three dots following the large text box at the top of the screen (…) to open a file dialog. Use this dialog to select the ISO image you’d like to burn, as shown in the next image:
Select the File
From the open file dialog, we need to choose the file we want to burn to the DVD.
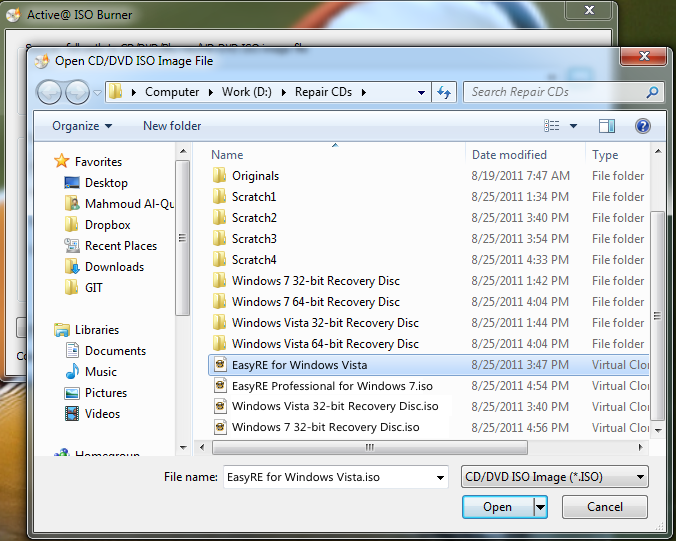
Important Note: the file names in the picture below are examples only. The file you want to select may have a different name, for example “Easy Recovery Essentials for Windows XP.iso” instead of “Windows Vista 32-bit Recovery Disc.iso”
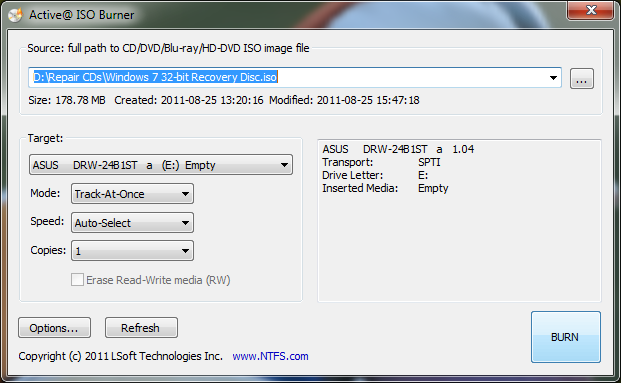
Now after selecting the file and pressing “Open”, the window will update to display your selection:
Burn Away!
At this point, all what’s left is to press the large button in the bottom-right corner labeled “BURN” and the software will then convert your ISO image into a bootable CD.
The software will go through the motions and when it lets you know its done, you can eject the disc from the drive and close the software.
Troubleshooting
If the ActiveISO software gives you any errors or the resulting CD is not correctly burned/bootable/usable, read on for possible resolution options.
If you experience any error messages during the CD burning process, try the following in the order below:
- Retry the burn at the slowest speed (either 1x or 2x). CD burning can be a whimsical and frail operation, burning at the slowest speed possible usually resolves most issues.
- If you’re attempting to write the ISO image to a CD-RW (erasable, rewritable CD), try again with a regular single-use CD-R.
- If you’re burning to a DVD±R, try burning to a CD-R instead. If you’re burning to a CD-R and your PC supports writing to DVD discs, trying burning to a DVD±R disc instead.1
- Try the burn with a different brand of CD-R media, some of the cheaper brands are not fully compatible with all CD-writing software.
- Try using a different program to burn the CD and see if it gives you a different error message. For example, follow our guide on burning CDs with ImgBurn instead.
- Try the burn from a different PC, if you have access to one.
Finishing Up
Congratulations, you’re all done. That wasn’t so hard now, was it?
You have successfully burned an ISO file to disc with Active@ ISO Burner: the disc is now ready for use. If it’s our Windows recovery CD, you can boot from this CD and continue with the instructions here.
If you’ve followed the above instructions but still can’t get your PC to boot from the CD, check out our guides on setting up your PC to boot from the CD/DVD correctly and troubleshooting problems booting from CD.
-
An optical drive that supports both CD and DVD discs actually contains two separate lasers, one for each. In such combo drives, especially in laptops, it is common for one of the read/write lasers to fail, leaving only the other working. ↩