This guide details how you can test if your hard-disk is failing or it’s corrupted. You can follow these steps to check the status of your HDD for the following Windows versions: XP, Vista, 7, 8, 8.1 and 10.
To test if your HDD or SSD drive has failed, use the SMART (S.M.A.R.T.) utility that’s already included on the HDD/SSD drive.
S.M.A.R.T. stands for Self-Monitoring, Analysis and Reporting Technology. It’s a monitoring system utility already included on the HDD or SSD drive of your computer and it can gauge your computer’s drive reliability.
Contents
Check HDD/SSD failures with EasyRE
Using the Automated Repair feature from Easy Recovery Essentials (our recovery and repair disc) you can gauge the health of your HDD/SSD in just a few clicks.
The Automated Repair process will report any issues found with your HDD or RAM:
- Download Easy Recovery Essentials
- Burn the ISO Image. Follow our instructions on how to burn a bootable ISO image. If you’d like to have a recovery USB instead, follow our instructions on how to make a recovery USB.
- Boot into Easy Recovery Essentials
- Select Automated Repair
- Click Continue and wait for the Automated Repair process to finish. Automated Repair process will report any issues found with your hard disk or RAM memory:

To download Easy Recovery Essentials, click here.
Check HDD/SSD failures with wmic
Windows Setup CD/DVD Required!
Some of the solutions below require the use of the Microsoft Windows setup CD or DVD. If your PC did not come with a Windows installation disc or if you no longer have your Windows setup media, you can use Easy Recovery Essentials for Windows instead. EasyRE will automatically find and fix many problems, and can also be used to solve this problem with the directions below.
You can also run the wmic and diskdrive commands from Command Prompt to test the status of your hard-disk.
To do so, follow these steps:
- Insert the Windows installation media (DVD or USB)
- Boot from the media
- At the Welcome screen, click Repair your computer to access Command Prompt

Windows Vista Repair Your Computer Menu
- Open Command Prompt
- Type:
wmic
- Press Enter
- Type:
diskdrive get status
- Press Enter
- If
diskdrive get statuscommand output isOK, your HDD/SSD is healthy.
Check HDD/SSD failures with chkdsk
From My Computer
You can right-click on Computer to run the chkdsk utility.
For Windows XP, Vista or 7, follow these steps:
- Boot into your Windows
- Click Start
- Go to Computer
- Right-click on the main drive you want to check
- Click Properties
- At the Tools tab, click Get started at the Error-checking section
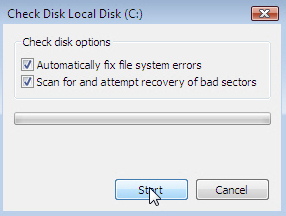
- Check the Automatically fix file system errors checkbox
- Click Start
For Windows 8, follow these steps:
- Boot into Windows 8 or Windows 8.1
- Go to Computer
- Select the drive you want to check, e.g.
C:\ - Click Properties
- Click Tools
- Click Check at the Error checking section
- Click Scan Drive. Click to scan the drive regardless if you receive this message from chkdsk:
You don't need to scan this drive

We haven't found any errors on this drive. You can still scan the drive for errors if you want.
Scan Drive
From installation media
Windows Setup CD/DVD Required!
Some of the solutions below require the use of the Microsoft Windows setup CD or DVD. If your PC did not come with a Windows installation disc or if you no longer have your Windows setup media, you can use Easy Recovery Essentials for Windows instead. EasyRE will automatically find and fix many problems, and can also be used to solve this problem with the directions below.
If you can’t boot into your Windows version to follow the steps from Run chkdsk from My Computer, use your Windows installation media to run chkdsk directly from Command Prompt.
For Windows XP computers, follow these steps:
- Insert the Windows XP installation CD and boot from it (press any key at the “Press any key” screen)
- At the Windows Options screen, press R to open Recovery Console
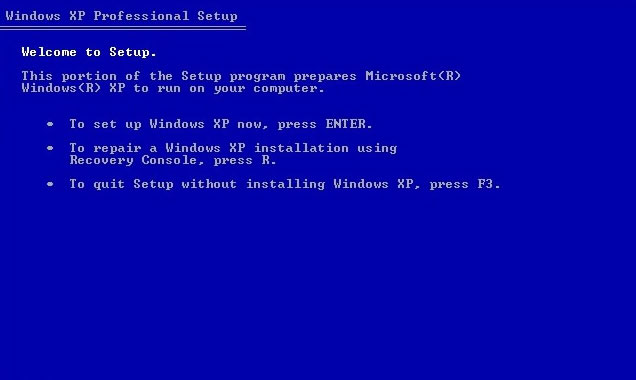
Windows XP Press R for Recovery Console
- When Command Prompt is open, type this command:
chkdsk C: /r
Replace
C:with the letter of the drive where your Windows XP is installed on. - Press Enter
For Windows Vista or Windows 7 computers, follow these steps:
- Insert the Windows installation media: DVD or USB
- Restart the computer and boot from the media
- At the Welcome screen, click Repair your computer

Install Now (Windows 7)
- At System Recovery Options, click Command Prompt
- When Command Prompt is open, type this command:
chkdsk c: /r
Replace
C:with the letter of the drive where your Windows Vista or Windows 7 is installed. - Press Enter
For Windows 8 and Windows 10 computers, follow these steps:
- Insert the installation media: DVD or USB
- Boot from the media by restarting your computer
- Choose your keyboard, language, time and click Next
- Click Repair your computer

Windows 8 Repair Your Computer Menu
- At Choose an option, click Troubleshoot
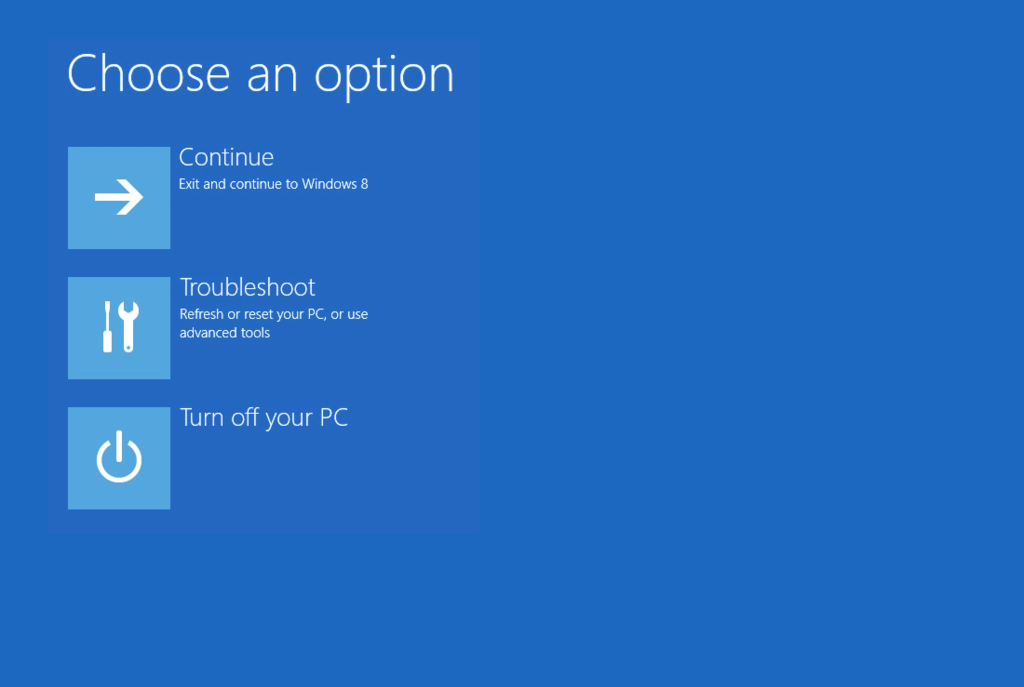
Troubleshoot in Windows 8 recovery options screen
- Click Advanced options
- Click Command Prompt
- When Command Prompt is open, type this command:
chkdsk C: /f /x /r
Replace
C:with the letter of the drive where your Windows or Windows 8.1 is installed on. - Press Enter
More Information
Linked Entries
Support Links
- Easy Recovery Essentials for Windows – our repair and recovery disk.
It’s an easy-to-use and automated diagnostics disk. It’s available for Windows 8, Windows 7 and Windows Vista. It’s also available for Windows XP and Windows Server.Read more at Windows Recovery Disks.
- The NeoSmart Support Forums, member-to-member technical support and troubleshooting.
- Get a discounted price on replacement setup and installation discs: Windows XP, Windows Vista, Windows 7, Windows 8, Windows 10.
Applicable Systems
This Windows-related knowledgebase article applies to the following operating systems:
- Windows XP (all editions)
- Windows Vista (all editions)
- Windows 7 (all editions)
- Windows 8 (all editions)
- Windows 8.1 (all editions)
- Windows 10 (all editions)