Learn how to convert a GPT disk to a MBR disk on a Windows system using Disk Management, Command Prompt or Easy Recovery Essentials.
Easy Recovery Essentials can automatically convert a GPT disk to a MBR disk.
Contents
Difference between GPT and MBR
GPT (or GUID Partition Table) is the updated version of the MBR table scheme that’s available on computers with UEFI/EFI installed (not BIOS).
GPT may also be used on some computers that have BIOS installed and not UEFI/EFI. These type of disks have the following advantages:
- It can have to 128 partitions vs. 4 partitions on a MBR disk
- A single partition can have up to 256TB vs. 2TB maximum allowed space on a MBR disk
GPT disks can be read by the following Windows versions:
- Windows XP 64-bit
- Windows Vista
- Windows 7
- Windows 8
- Windows Server 2003 and Server 2008
These disks can also be used to boot Windows from, but only the 64-bit Windows versions will boot from GPT: Windows 8, Windows 8.1, Windows 7, Windows Vista and Windows Server editions.
Note that you can boot Windows from GPT only if your computer has UEFI/EFI installed.
MBR disks are supported by all Windows versions. Removable disks, such as USB drives, can’t be converted to GPT. These removable disks are set as a MBR.
Convert GPT to MBR using Disk Management
To convert a GPT disk to MBR using the Disk Management utility, follow these instructions.
These instructions apply for these Windows versions: Windows Vista, Windows 7 and Windows 8 or 8.1. Disk Management is installed by default and it’s available on your Windows computer.
- Boot into your Windows (Vista, 7 or 8)
- Click Start
- Go to Control Panel
- Click Administrative Tools
- Click Computer Management
- On the left menu, click Storage > Disk Management
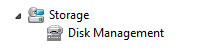
Select Disk Management from Storage
- Right-click on each partition from the disk you want to convert from GPT. You must delete all partitions from the disk before you begin the converting process from GPT.
To do so, click Delete Volume on each partition until the entire disk has unallocated space.
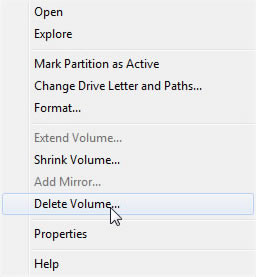
Delete Volume
- Right-click on the disk and click Convert to MBR Disk
- Once the process is done, you can now create partitions on the new disk as you wish
- Close Disk Management when done
Convert GPT to MBR using Command Prompt
If you’re not able to boot into Windows (Vista, 7 or 8) to run Disk Management and perform the converting process, you can also use Command Prompt (either from the original installation disc/USB or via Command Prompt from Easy Recovery Essentials).
You can perform these steps either by booting into Windows and running Command Prompt from Start > Run > cmd or by using the original installation disc to open Command Prompt, if you can’t access Windows.
To do so, follow these steps:
- Insert the Windows installation disc and restart your computer
- Boot from the disc by pressing any key at the “Press any key” screen
- Go to System Recovery Options

Windows Vista System Recovery Options

Windows 7 System Recovery Options Screen
- Click Command Prompt
- Type:
diskpart
- Press Enter
- Type:
list disk
- Press Enter
- Remember the number of the disk (example:
2) you want to convert. - Type:
select disk 2
Where
2is the number of the disk that’s going to be converted. - Press Enter
- Type:
clean
- Press Enter
- Type:
convert mbr
- Press Enter
- Disk #2 is now being converted
- You can type
exitand hit Enter in Command Prompt to exit or continue setting up partitions on the new MBR disk.
To create new partitions using Command Prompt, follow these instructions:
- Type:
create partition primary
- Press Enter
- Type:
list volume
- Press Enter
- Type:
format fs=ntfs
- Press Enter
- Type:
exit
- Press Enter
Make sure the new volume is selected (look for the * on the left side) before you format the partition
If you don’t have access to a Command Prompt to run diskpart, use Command Prompt from Easy Recovery Essentials:
- Download Easy Recovery Essentials
- Burn the ISO Image. Follow our instructions on how to burn a bootable ISO image. If you’d like to have a recovery USB instead, follow our instructions on how to make a recovery USB.
- Boot Easy Recovery Essentials from the CD, DVD or USB
- Select Launch Command Line

To download Easy Recovery Essentials, click here.
More Information
Linked Entries
Support Links
- Easy Recovery Essentials for Windows – our repair and recovery disk.
It’s an easy-to-use and automated diagnostics disk. It’s available for Windows 8, Windows 7 and Windows Vista. It’s also available for Windows XP and Windows Server.Read more at Windows Recovery Disks.
- The NeoSmart Support Forums, member-to-member technical support and troubleshooting.
- Get a discounted price on replacement setup and installation discs: Windows 7, Windows 8.
Applicable Systems
This Windows-related knowledgebase article applies to the following operating systems:
- Windows 7 (all editions)
- Windows 8 (all editions)
- Windows 8.1 (all editions)