Get the fix for the error Corrupt user profile on Windows 10, Windows 11, Windows XP, Windows Vista, Windows 7, and Windows 8.
Contents
About “Corrupt user profile”
The following information on this error has been compiled by NeoSmart Technologies, based on the information gathered and reported by our global network of engineers, developers, and technicians or partner organizations.
Description and Symptoms
The error messages, alerts, warnings, and symptoms below are tied to this error.
Symptom 1: “User profile cannot be loaded” error screen on startup
If you received the error message that your user profile is corrupted, the fix is to create a new user and copy the files from your current user to the new account.

User Profile Service error screen
The error message is:
The User Profile Service failed the logon.

 User profile cannot be loaded.
Causes of this Error
This error has been known to occur as a result of one of the following causes:
Cause 1: The user profile is corrupt or missing
Failed Windows Updates or Automatic Updates to Windows that involve an upgrade of critical system files (especially service pack installations) that update the user profile may result in this error.
Cause 2: File system integrity compromised
The hard drive’s file system may become damaged because of disk write errors, power outages or virus attacks. If that’s the case, the operating system cannot load the user profile to boot properly and the loading process is halted.
Fix Corrupt User Profile in Windows XP
To fix a corrupted user profile on a Windows XP computer, follow these steps:
- Boot into your Windows XP computer as an Administrator or any other user (
Another_Username.). If you’re not able to log in as an Administrator, go to Cannot log in / No other user account available. - Go to Control Panel
- Click User Accounts
- Click Create A New Account
- Type a name for this new account (example:
New_Username) - Click Next
- Make sure the account is Administrator
- Click Create Account
- Restart the computer and logon with the new account you’ve just created (
New_Username) - Once logged in and the account is setup, restart the computer
- Login with the first account you used before you created the new account (
Another_Username) - Right-click on My Computer
- Select Properties
- Go to Advanced
- Click Settings at the User Profiles section
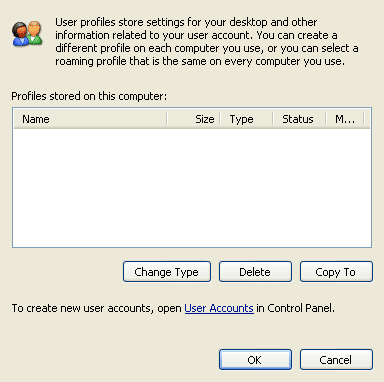
User Profiles in Windows XP
- Select the corrupted account
- Click Copy To
- Click Browse and browse the Documents and Settings folder of the new account you created just now.
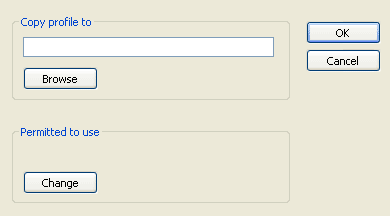
Copy User Profile in Windows XP
- Click Yes to confirm that the files of this account will be deleted and that the new files will be copied
- Once this operation is done, restart the computer
- Login with the new username,
New_Username
If the above method didn’t copy the files successfully, you can also copy the files manually:
- Boot into Windows XP as an Administrator or any other user except the corrupted user (
CORRUPT_USERNAME). If you’re not able to do so, go to Cannot log in / No other user account available. - Click Start
- Click Control Panel
- Click User Accounts
- At the Pick a task section, click Create a new account
- Type a name (example:
NEW_USERNAME) - Click Next
- Select an account type (make sure it would be part of Administrator group)
- Click Create Account
- Open Windows Explorer or My Computer
- Click Tools > Folder Options > View
- Click Show hidden files and folders
- Uncheck Hide protected operating system files
- Click OK
- Go to
C:\Documents and Settings\CORRUPT_USERNAME, whereCORRUPT_USERNAMEis the corrupted username - Select all files from this folder, except:
- Ntuser.dat
- Ntuser.dat.log
- Ntuser.ini
- Right-click on these files (make sure the above files aren’t being copied), click Copy
- Go to
C:\Documents and Settings\NEW_USERNAME, whereNEW_USERNAMEis the username you’ve recently created - Find an empty space to right-click and click Paste
- Restart the computer and logon as the new username (
NEW_USERNAME)
Fix Corrupt User Profile in Windows Vista
Fix #1: Create a new Windows Vista account
To fix a corrupted user profile on a Windows Vista system, follow these instructions:
- Boot into your system as an Administrator. If you’re not able to do so, go to Cannot log in / No other user account available.
- Go to Control Panel > User Accounts (or Control Panel > Accounts and Family Safety > User Accounts)
- Click Manage another account
- Click Create a new account
- Type a name and choose a type for this account
- Click Create Account
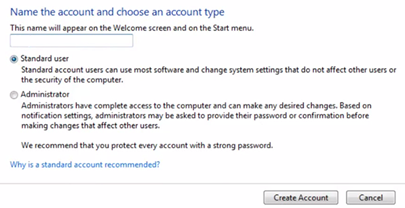
Choose Account Type for New User in Windows Vista/7
- Open the File Explorer (any folder or My Computer)
- Click Organize
- Click Folder Options (or Folder and search options)
- Go to View
- Check the Show hidden files and folders option
- Uncheck Hide extensions for known file types to see the file extensions
- Uncheck Hide protected operating system files
- Click Apply and then click OK
- Log out then log in with the new account for the first time. It sets up the account. Log out
- Log in the the other administrator account you used to create the new account
- Go to
C:\Users\OLD_USERNAME, whereC:\the letter of the drive where your Windows Vista is installed andOLD_USERNAMEis the username of the corrupted profile - While you are this folder –
OLD_USERNAME– copy all files, but except these ones: Ntuser.data, Ntuser.data.log, Ntuser.ini - To copy the files, select the files and the right-click > Copy
- Go to
C:\User\NEW_USERNAME, whereNEW_USERNAMEis the new username - Paste all files in this folder,
NEW_USERNAME. To paste the files, right-click on a empty zone and click Paste. - Restart the computer
- Login with the username you recently created
Fix #2: Registry Editor
The steps to fix a corrupt user profile via the Registry Editor are the same as those for Windows 7.
Fix #3: Download Fix it 50446
Microsoft released the Fix it #50446 tool that can automatically fix this type of error without going through the all the steps listed here.
Fix it #50446 is only available for Windows Vista and Windows 7.
Go to http://go.microsoft.com/?linkid=9734641 to download this tool.
Fix Corrupt User Profile in Windows 7
Fix #1: Create a new Windows 7 account
To fix a corrupted user profile on a Windows 7 computer, follow these steps:
- Boot into your Windows 7 system with another use or with the Administrator account. If you’re not able to do so, go to Cannot log in / No other user account available.
- Go to Control Panel
- Go to User Accounts (or Accounts and Family Safety > User Accounts)
- Click Manage another account
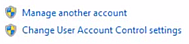
Manage another account in Windows Vista/7
- Click Create a new account to create a new account on your computer
Create a new account in Windows Vista/7
- Type a name and choose an account type
- Click Create Account
Choose Account Type for New User in Windows Vista/7
- Open File Explorer or My Computer
- Click Tools. If you don’t see the Tools item at the top of the window, press the Alt key.
- Click Folder Options
- Go to the View tab
- Check the Show hidden files and folders option
- Uncheck Hide extensions for known file types to see the file extensions
- Uncheck the Hide protected operating system files option
- Click Apply
- Click OK
- Logout and log in with the new account for the first time. When the setup is finished then log out.
- Log in with the other administrator account you used to create the new account.
- Go to
C:\Users\OLD_USERNAME, whereC:\is where your Windows 7 is installed andOLD_USERNAMEis the username that has the corrupted profile error - From this folder –
OLD_USERNAME– select all files, but except: Ntuser.data, Ntuser.data.log, Ntuser.ini - Right-click on these files (except the files mentioned above) and click Copy
- Go to
C:\User\NEW_USERNAME, whereNEW_USERNAMEis the username you created as new - Paste all files in this folder,
NEW_USERNAME - Restart the computer and login with the new username you’ve created
Fix #2: Registry Editor
- Login as an Administrator. If you’re not able to do so, go to Cannot log in / No other user account available.
- Open the Registry Editor and navigate to this key:
HKEY_LOCAL_MACHINE\SOFTWARE\Microsoft\Windows NT\CurrentVersion\ProfileList
- Find the S-1 folder with
.bakextension under the ProfileList folder, on the left pane - At the ProfileImagePath value, on the right pane, find if the path is correct:
C:\Users\MY_USERNAME - Go to the
C:\Usersfolder and check that the folder name of the corrupted username is the same as the one in the ProfileImagePath:MY_USERNAME. If it’s not, rename it. - Go back to the Registry Editor and check if the folder name with the
.bakextension has a duplicate folder, with the same name but without the.bakextension. Example:S-1-5-23232 S-1-5-23232.bak
If you have 2 folders with the same name (1 without .bak, 1 with .bak), follow these instructions: Rename the folder with
.bakextension to be without.bakand vice versa: the without.bakfolder to have.bakafterwards. To do that, follow these steps:- Rename the
.bakfolder to.backup - Rename the folder without
.bakto.bak - Rename the
.backupfolder name to have no extension
If you have only 1 folder name with a
.bakextension, follow these steps:- Remove
.bakto only leave the folder name: S-1-5-23232
- Rename the
- Now go to the folder without
.bakand find aRefCountitem. The RefCount value should be0. To edit it, double click on RefCount and edit the Value data field to be0. If you don’t have a RefCount item, create it:- Right-click on an empty zone on the right and click New
- Click DWORD (32 bit) Value
- Type
RefCount - Press Enter
- Click OK
- Go the same folder without
.bakand find a State item - The State value should be
0. If it’s not, edit it:- Double-click on State
- Enter
0at the Value data field - Click OK
If you don’t have a State item, create it:
- Right-click on an empty zone in the right pane and click New
- Click DWORD (32 bit) Value
- Type
State - Press Enter
- Close the Registry Editor
- Restart the computer
- Login to your computer with the corrupt user account
Fix #3: Download Fix it 50446
Microsoft released the Fix it # 50446 tool that can automatically fix this type of error without going through the all the steps listed here.
Fix it #50446 is only available for Windows Vista and Windows 7.
Go to http://go.microsoft.com/?linkid=9734641 to download this file.
Fix Corrupt User Profile in Windows 8, 8.1 or Windows 10
Fix #1: Registry Editor
Another method is to attempt a repair of the user profile through the Registry Editor by replacing the profile with a good backup.
To do so, follow these steps:
- Login as an Administrator on your Windows 8, 8.1 or 10 system. If you’re not able to do so, go to Cannot log in / No other user account available.
- Press the
 and R keys to open the Registry Editor
 - Click OK
- Navigate to this key:
HKEY_LOCAL_MACHINE\SOFTWARE\Microsoft\Windows NT\CurrentVersion\ProfileList
- At the ProfileList folders, you’ll see folder names that start with S-1
- Go to the folder that has a
.bakextension - Check the ProfileImagePath value from the right side at the Data column. It should be something like this:
C:\Users\MY_USERNAME
Where
MY_USERNAMEis the username of your account. - Go to
C:\Usersand check that the folder name of the corrupted username is the same as the one in the ProfileImagePath: MY_USERNAME. If it’s not and the folder name isMYUSERNAME2rather than the value shown in ProfileImagePath, rename it toMY_USERNAME. - At the ProfileList folders, check if the folder name with the
.bakextension has another folder above it with the same name, but without the.bakextension. Example:S-1-5-23232 S-1-5-23232.bak
If you have 2 folders with the same name (1 without
.bak, 1 with.bak), follow these instructions:- Go to the folder without
.bak, right-click and click Rename - Add
.backupat the end of its name: S-1-5-23232.backup - Go to the folder with
.bak, right-click and click Rename - Remove the
.bakand press Enter - Go to the folder with
.backup, right-click and click Rename - Rename
.backupto.bak
The purpose of these instructions is to move the
.bakextension to the folder without.bakand vice versa. You won’t be able to do that without a .backup extension so you don’t overwrite the folders. If you only have 1 folder name with.bakextension, follow these instructions:- Right-click on the folder name, S-1-5-23232.bak, click Rename
- Remove
.bakto only leave its name: S-1-5-23232 - Press Enter
- Go to the folder without
- Go to folder without
.bak, find a RefCount item. If you don’t have a RefCount item, create it by following these steps:- Right-click on an empty zone on the right
- Click New
- Click DWORD (32 bit) Value
- Type
RefCount - Press Enter
- The RefCount value should be
0. To edit it, double click on RefCount and edit the Value data field to be0 - Click OK
- On the same folder without
.bak, find a State item - The State value should be
0. If it’s not, edit it:- Double-click on State
- Enter
0at the Value data field - Click OK
If you don’t have a State item, create it:
- Right-click on an empty zone in the right pane
- Click Next
- Click DWORD (32 bit) Value
- Type
State - Press Enter
- Close the Registry Editor
- Restart the computer
Once the PC has restarted, continue with these steps:
- Login with the corrupt account
Troubleshooting
Cannot log in / No other user account available
If you can’t log into your computer because the only user available is the corrupt user profile, you can log in as an Administrator.
If the Administrator user isn’t available at the Welcome screen, you can enable it via Command Prompt:
- Restart your computer
- Press F8 before the Windows logo appears
- Select Safe Mode or Safe Mode with Command Prompt. If you selected Safe Mode and can log into the computer, go to Start and open Command Prompt from there.
- When Command Prompt loads, type this command:
net user administrator /active:yes
- Press Enter
- Restart the computer with the following:
shutdown -r -t 0
More Information
Support Links
- Easy Recovery Essentials for Windows – our repair and recovery disk.
It’s an easy-to-use and automated diagnostics disk. It’s available for Windows 8, Windows 7 and Windows Vista. It’s also available for Windows XP and Windows Server.Read more at Windows Recovery Disks.
- The NeoSmart Support Forums, member-to-member technical support and troubleshooting.
- Get a discounted price on replacement setup and installation discs: Windows XP, Windows Vista, Windows 7, Windows 8, Windows 10, Windows 11.
Applicable Systems
This Windows-related knowledgebase article applies to the following operating systems:
- Windows XP (all editions)
- Windows Vista (all editions)
- Windows 7 (all editions)
- Windows 8 (all editions)
- Windows 8.1 (all editions)
- Windows 10 (all editions)
- Windows 11 (all editions)