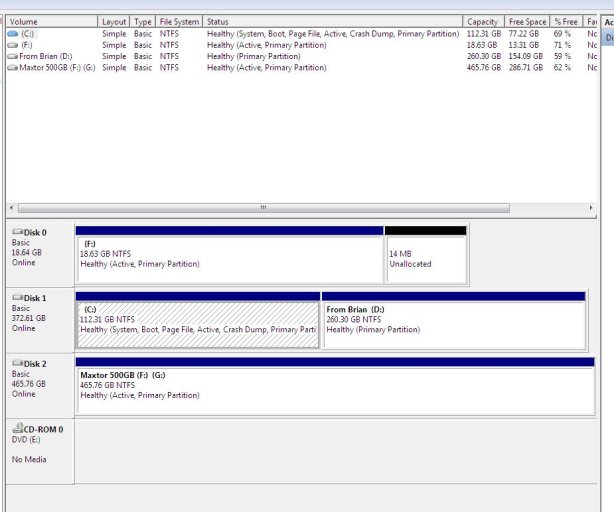
I think it would be best to reverse the order of the two internal hard disks so that Windows 7 is on hard disk zero. I think if you just swap the two data cables you should be able to accomplish this.
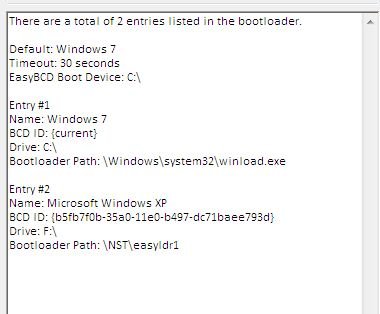
I did a test of today with a second hard disk and successfully booted Windows XP on the second hard disk. I have Windows 7 and many other OS’s on my 1 GB hard disk and Windows XP on an 18 GB IDE disk from 1997. Adding the entry to boot into the Windows XP on the second hard drive in Easy BCD was a snap. The only difference between doing the automatic selection of the drive is that I had to manually assign a drive letter. I didn’t try the automatic driver Simon as I already have two Windows XP’s on hard drive zero.
Here are the steps to install Windows XP on a second hard disk. Assuming you are installing Windows XP onto the 18 GB hard disk, follow the following steps.
01: Install Easy BCD in Windows 7. Start Easy BCD. Under “boot loader set up” click on write MBR. Under “BCD backup repair” select the radio button for “re-create/repair boot files”.
02: Physically disconnect both the power and data wires for the other two disks that you are installing Windows XP to. Make sure that you still have a power wire going to the CD-ROM/DVD burner.
03: Wipe the 18 GB hard disk with Darik's Boot And Nuke or a similar program.
Darik's Boot And Nuke
http://en.wikipedia.org/wiki/Darik%27s_Boot_and_Nuke
Click where it says “DBAN 2.2.6 Beta for CD-R and DVD-R media”.
http://www.dban.org/download
04: In the BIOS set the system to failsafe defaults. Then change the boot order so that it boots CD-ROM first and hard disk second and third.
05: Load a Windows XP CD install disk preferably with service pack three slipstreamed into it into the CD-ROM/DVD burner and reboot. Note that you will need at least service pack one slipstreamed into the disk to deal with hard disks bigger than 128 MB. Note that you can still technically install Windows XP on a hard drives bigger 128 GB by making sure that the partition or partitions that you are installing Windows XP to, combined, do not exceed 128 GB. In other words leave the rest of the hard drive empty of partitions.
06: At the partitioning screen make a 100 MB partition. Then make a partition taking up the rest of the hard disk. When it asks you where he wants all the operating system to, select the large partition. When it asks what type of formatting you want to do to select NTFS full format. Do not, repeat do not, use a third-party program to do the partitioning ahead of time. Also note that you cannot format the 100 megabyte small partition. Don’t worry about it. After Windows XP copies its files to the hard desk it will reboot the computer. If the installation is going successfully it will bypass the CD that should still be in the CD/DVD burner and continue the installation process. Continue the installation and complete it. Do a reboot to make sure that you can boot into Windows XP. You’ll know when you are at this completed stage when the OS asks you to take a tour of Windows XP. It will also complain about your security settings.
07: Power the system off. Reconnect the hard disk data cables and power cables. Power on the system and enter the BIOS. Don’t make any changes in the BIOS. Insert a Ubuntu install disk in the CD-ROM/DVD burner and boot into Ubuntu live mode. Run the GParted partition editor. From the pull down arrow at the far upper right select the third disk. The first partition should have its boot flag set to active. Left click on that partition. Right-click. Select manage flags. In the box to the left of where it says boot, left click once so that the checkmark is removed. Remove the disk and reboot. You should now boot back into Windows 7.
08: Start It the Windows Explorer a.k.a. file manager. Find the disk letter of the second partition on the disk where you installed Windows XP. From the list of disk letters two should not have names. These are the two on the hard disk which you have installed Windows XP to. One is the 100 MB partition and the other is the larger one. The larger one is the one you want. Note it’s drive letter.
Start Easy BCD. Click on add new entry. Under type select “Windows NT/2K/XP/2K3”. To the left of the checkbox were says automatically detect correct disk deselect the check mark. Above that were says disk letter select the drive letter you determined in the prior step.
See the bottom of the following for a pictorial on how to add the Windows XP entry to Easy BCD.
http://neosmart.net/wiki/display/EBCD/Windows+XP
This is a special note. Easy BCD by default only displays six operating system choices. If you have more OS’s press the down key to get to them.
Note if for any reason you can’t boot back into Windows 7, use a Windows 7 recovery CD to repair the boot.


