Steps for removing Win Vista from dual boot and keeping Win 7

sdankar

Member
Gurus,

I am just a user of computer and not a tech guru like you guys. I need your help in resolving my problem.
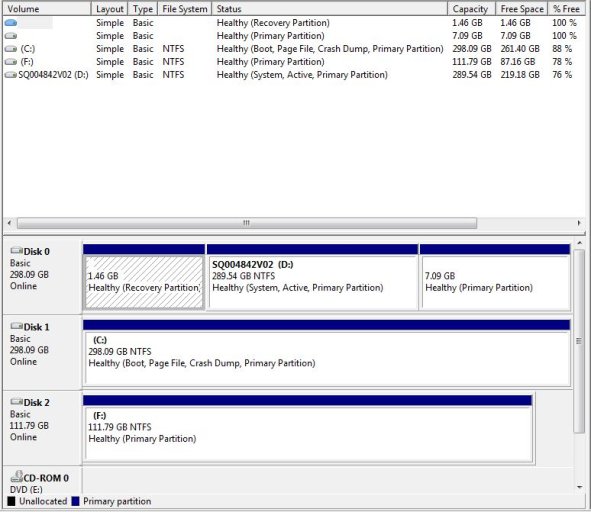
I have a Toshiba Laptop which came with pre-installed Win Vista Home Premium 32 Bit. It has two physical Hard Drive 320 GB each. Recently, I installed Win 7 Ultimate 64 Bit. Now laptop has become a dual boot machine. C drive has Win 7 and D drive has Win Vista. The snap shot of disks information from Disk Management is shown in the attachment.
The snap shot is from Win 7 boot. As you see, the boot drive is D drive.

My goals are

1. To make C drive as system and Win 7
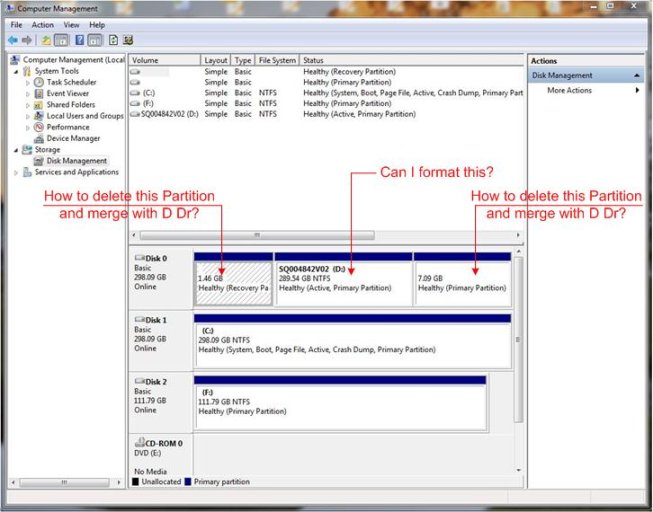
2. Delete Win Vista and all the partitions present (as shown in the snap shot) from D drive so that I can use entire D drive just for storage.

I have downloaded EasyBCD 2 Beta 93 from your web site. Could you guys please instruct me in steps how to achieve my objective.

Thanks & Regards,
 

Attachments

  • Disk.JPG
    Disk.JPG
    93.1 KB · Views: 12
BCD Install/Repair
Change boot drive
point it at C:
Change the BIOS to boot from the other HDD
 
Hello Terry60,

Thanks for the reply. I followed your instructions and change the BIOS setup to boot from other HDD as Win 7 is installed in other physical HDD. I notice the boot folder has been created in C Drive Win 7. But, still it gives me option to boot from either Win 7 or Vista when computer starts. I want to completely get rid of Visa presently installed on D Drive so that I can use it as storage deive. Please advise.

Thanks,

Sanjay
 
Just use EasyBCD 2.0 "edit boot menu" to remove the Vista entry from the BCD and in future there will be no menu presented.
Now you're booting from W7 you can go ahead and format Vista and reuse the space any way you like.
 
Thanks Terry. Got rid of Vista Boot option. Now, I have two partitions in D Drive and one normal data location (please see the attached file). The first partition I guess is by Toshiba for called Recovery Partition of size 1.46 GB of original Vista, 2nd is Primary Partition of size 7.09 GB - I guess this would have been created by Vista and contained all the boot info prior to moving to C Dr. 3rd is called D Dr with a size of 289.54 GB.

I would want to merge the at least the latter two to make one partition containing the present D Dr and 7.09 GB portion and call it D Dr.

For 1.49 GB partition, could you suggest to keep it or merge as well and make one partition for entire HDD? I am not sure, I would be able to do recovery ever to original Vista after all this changes.

Also, is it possible to back up the system portion of Win 7 of present C Dr. on D Dr. for future Win 7 recovery? If yes, how?

Thanks,

Sanjay
 

Attachments

  • Win 7 Disk Mgt Snap Shot 04_11_10.jpg
    Win 7 Disk Mgt Snap Shot 04_11_10.jpg
    66.5 KB · Views: 12
You should leave the recovery partition alone unless you have discs (not ours) which can reinstall Windows. Mount that third partition with a drive letter to verify nothings on it thats important. Once you've done that you can delete that partition, right click on the second partition (D: drive) and extend it with the free space.
 
kairozamorro,

The recovery partition1.46 GB is of Toshiba which came pre-created with this notebook. It should have factory installed vista back up. If I select tThe 3rd partition 7.09 GB in Disk Management and right click, I only get either delete or help option. How do I mount the 3rd partition witha drive letter?

As far as the recovery partition, I did create recovery disks long ago when this notebook first came. Can I delete this too?
 
You can delete the last partition (the other options are greyed because it doesn't have a Windows recognized file system).
Because you've got your recovery disks already made, you're safe to delete them all and reformat the entire HDD as one partition, or any other configuration you want.
If you're going to format the entire disk, take the opportunity, as it's an old HDD, to do a "full" not a "quick" format.
It will take much longer but it will remove from use any slightly dodgy areas of the surface, and give you a fresh start with the HDD in as reliable state as possible.
 
Last edited:
Back
Top