Get the fix to “0xc0000021A: error for Windows XP, Vista, 7, 8, 8.1, 10 or Windows 11 operating systems.
Contents
About the “0xc000021A” error
The following information on this error has been compiled by NeoSmart Technologies, based on the information gathered and reported by our global network of engineers, developers, and technicians or partner organizations.
Description and Symptoms
The error messages, alerts, warnings, and symptoms below are tied to this error.
Symptom 1: 0xc000021A error screen
The 0xC000021A error is a Blue Screen of Death or BSoD error (related: Blue Screen of Death guide) that occurs when a Windows user-mode subsystem is compromised.
Description
Windows user-mode subsystems are: WinLogon or Client Server-Run Time Subsystem (CSRSS). These 2 sub-systems are mandatory for Windows to operate.
If these are compromised, Windows stops running and will show this error.
The error message that can appear on your screen is usually this:
STOP: c000021a {Fatal System Error}
The Windows SubSystem system process terminated unexpectedly with a status of 0xc0000005.
The system has been shut down.
The 0xC000021A error is also known as:
- STOP 0xC000021A
- STATUS_SYSTEM_PROCESS_TERMINATED (Status System Process Terminated)
- HALT: c000021a {Fatal System Error}
- STOP c000021a
This is how 0xC000021A appears on a Windows XP system (also for Windows Vista or Windows 7 systems):

Under Windows 8, Windows 8.1, Windows 10, and Windows 11, the blue screen and error message would appear as a variation of the following screenshot. The text might differ slightly, but with the same error code:

Causes of this Error
This error has been known to occur as a result of one or more of the following:
Cause 1: Misconfigured software or driver
The most common cause of this error is a certain key piece of software or system driver that is malfuncioning.
Cause 2: System registry is damaged
Another possible cause for this error is damaged system registry. This may happen because of disk read/write errors, power outages or virus attacks.
Fixing “0xc000021A” on Windows
Easy Recovery Essentials is guaranteed to fix the “0xC000021A” error automatically using its built-in Automated Repair option. EasyRE is currently available for Windows XP, Vista, 7, 8, Windows 10, and Windows 11 and can be downloaded and created on any PC.
- Download Easy Recovery Essentials. Make sure to note your Windows version (XP, Vista, 7, 8, 10, or Windows 11) before you download EasyRE. This guide can help you identify what version of Windows you have installed.
- Burn the image. Follow these instructions on how to burn the bootable ISO image very carefully, as making a bootable CD can be tricky! Alternatively, these instructions explain how to create a bootable EasyRE recovery USB stick/drive.
- Boot up your PC from the Easy Recovery Essentials CD or USB you created.
- Once EasyRE is running, choose the “Automated Repair” option and click Continue.

Choose “Automated Repair” in Easy Recovery Essentials
- After EasyRE scans your computer’s drives, identify and select the drive letter for your Windows installation from the list, and then click on the Automated Repair button to begin.

Choose the drive associated with the Windows installation you’re trying to repair.
- Easy Recovery Essentials will start analyzing the selected drive for problems. EasyRE will test for and attempt to automatically correct errors with the disk, partition, bootsector, filesystem, bootloader, and registry. No intervention is required, as EasyRE’s repair is fully automated:

Easy Recovery Essentials searches for errors and makes corrections to the selected Windows installation.
- Once the process is complete, EasyRE will report its findings. Click on the Restart button to reboot your PC and test the changes.
- The “0xC000021A” error should now be fixed as your PC begins to load:


You can download Easy Recovery Essentials from here.
Fix 0xC000021A on Windows XP
Fix #1: Boot into Last Known Good Configuration
If you boot your Windows XP system into the Last Known Good Configuration mode, it forces your computer to use a previously saved Windows Registry version: the last time when your computer successfully boot with no errors.
The Last Known Good Configuration mode might be a quick fix for the 0xC000021A error.
To boot your computer into this mode, follow these steps:
- Restart the computer
- Wait for the computer to complete the POST process (system information appearing on your screen)
- Quickly press the F8 key repeatedly until you see a list of boot options available
- Choose Last Known Good Configuration (your most recent settings that worked)
- Press Enter
- Wait for your computer boot into this mode

Windows XP Advanced Options Menu
Fix #2: Uninstall previously installed software or driver
If the error appeared recently after you installed a new piece of software or hardware driver, or any kind of new installation to your Windows XP system, boot into Safe Mode and uninstall it.
Contact the manufacturer or check online for an update version of that software or driver that is compatible with Windows XP.
To boot Windows XP into Safe Mode, follow these steps:
If you’re not able to boot into Safe Mode, go to Fix 0xC000021A with Easy Recovery Essentials to fix this error automatically using Easy Recovery Essentials. You can run EasyRE from any CD, DVD or USB drive.
- Reboot the computer
- Press the F8 key before the Windows XP logo appears
- At the Windows Advanced Options menu, select Safe Mode
- Press Enter

For more information on Safe Mode, go to our guide on Safe Mode.
Fix #3: Run System Restore
If System Restore was turned on for your computer, you can try and restore the system to an earlier restore point.
To do so, follow these steps to run System Restore in Safe Mode on a Windows XP system:
- Restart the computer
- Press and F8 key to boot into Windows Advanced Options Menu
- Using the arrow keys, select Safe mode with Command Prompt
- Hit Enter
- Login as Administrator
- When Command Prompt Appears, type the following command and press Enter:
%systemroot%\system32\restore\rstrui.exe
- Follow the instructions on the screen to restore your computer to an earlier time
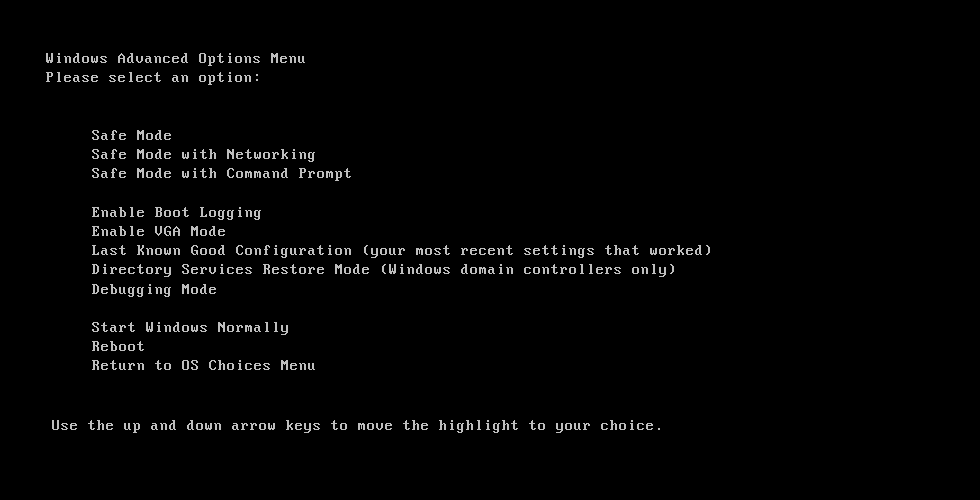
Windows XP Advanced Options Menu
For more information on System Restore, go to our guide on System Restore for Windows XP.
Fix #4: Other tips
If none of the above tips are working for your computer, consider the following tips you can try:
- Reinstall Windows XP using the original installation disc. If you don’t have the original disc, go to Fix 0xC000021A with Easy Recovery Essentials.
- Install all the Service Packs available for your Windows XP. If you have Windows XP with no Service Packs, install them.
Fix 0xC000021A on Windows Vista and 7
Fix #1: Uninstall previously installed software or driver
If you recently installed a new software or driver on your system, boot into Safe Mode and uninstall it.
- Restart the computer and press the F8 key before the Windows Vista or Windows 7 logo appears
- At the Advanced Boot Options menu, select Safe Mode and press Enter
Fix #2: Use Startup Repair
Your original Windows Vista or Windows 7 installation disc (DVD) contains the Startup Repair utility that you can run and try to fix the 0xC000021A error.
To run Startup Repair on a Windows Vista or 7 system, follow these steps:
- Boot from the DVD, the original DVD with Windows Vista or 7
If you don’t have the original DVD, go to Fix 0xC000021A with Easy Recovery Essentials. EasyRE can automatically fix this error.
- Click any key to boot from the DVD
- At the Welcome screen, click Repair your computerThe Welcome screen in Windows Vista:
 The Welcome screen in Windows 7:
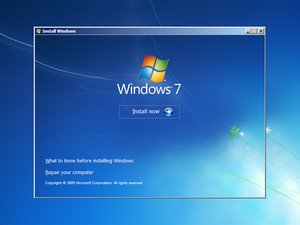
- Choose your operating system
- Click Next
- At the System Recovery Options screen, click Startup RepairThe System Recovery Options screen on a Windows Vista:
 The System Recovery Options on a Windows 7:
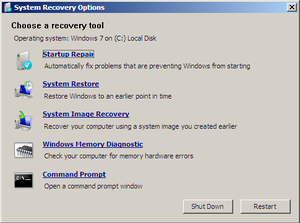
- Wait for the process to finish
- Restart the computer when prompted
Fix #3: Last Known Good Configuration
Similar to Windows XP instructions above, you can also try to boot into the Last Known Good Configuration that will attempt to use a previously error-free version of your system’s Registry.
To boot into this mode on a Windows Vista or Windows 7 system, follow these steps:
- Restart your computer or shut it down completely and then press the power button to start it
- Before the Windows Vista or Windows 7 logo appears on your screen, press the F8 key repeatedly (tap the key, do not keep it pressed).On certain models of laptops, you may need to keep the Fn key pressed down while tapping the F8 key.
- Once your system boots into the Advanced Boot Options menu, select Last Known Good Configuration (Advanced) from the list using the arrows keys
- Press Enter

Fix #4: System Restore
If you enabled System Restore on your computer, you may choose an earlier restore point to boot into your computer successfully.
If the 0xC000021A error is caused by an incompatible software or driver, System Restore will restore your computer to an earlier data when the incompatible software or driver wasn’t installed on your system.
To do so, System Restore must be enabled on your computer prior to you installing the software or driver that caused this error.
If you can’t boot into Safe Mode to run System Restore, go to Fix 0xC000021A with Easy Recovery Essentials. EasyRE can fix this error and you can run EasyRE from any CDs, DVDs or USB drives.
To run System Restore in Safe Mode, follow these steps:
- Boot the computer
- Press the F8 key before the Windows Vista or 7 logo appears
- At the Advanced Boot Options screen, select Safe Mode with Command Prompt
- Press Enter
- Login as Administrator
- Type the following command, when Command Prompt appears, and then press Enter:
rstrui.exe
- Follow the wizard instructions to restore your computer to an earlier date
If you have the original installation disc with Windows Vista or Windows 7, you can run System Restore by booting into the installation disc and then going to System Recovery Options > System Restore.
For more information on System Restore, go to our guide on System Restore for Windows Vista and Windows 7.
Fix #5: Last Restore Point by Command Prompt
If System Restore doesn’t load, you can run the dism command to automatically recover the last restore point by using the Command Prompt (System Restore must be enabled):
- Restart the computer and press the F8 key to boot into Windows Advanced Options
- Select Repair your computer and press Enter.If the Repair your computer option isn’t available, use your original installation disc to boot into System Recovery Options.
- Once at System Recovery Options, select Command Prompt
- When Command Prompt appears, type the following command and press Enter:
dism /image:C:\ /cleanup-image /revertpendingactions
Replace
C:with the letter of the driver where your Windows Vista or Windows 7 is installed.
Fix #6: Disable services in msconfig
If the 0xC000021A error is caused by a software or driver that starts when you start your Windows Vista or 7 system, you can try and disable the Services listed in the System Configuration (msconfig) utility:
- Boot into your system
If you can’t boot into your system because of the boot error, go to Fix 0xC000021A with Easy Recovery Essentials.
- Click Start
- Type
msconfig - Press Enter
- Go to Startup (or Services) and disable all services listed there
- Click OK
- Click Restart to apply the changes
- Restart the computer

Msconfig utility screen
If your computer works after apply the changes, the issue can be from one of the services listed in the Startup tab.
To debug which service is causing the error, boot back into the system and enable the services listed there one by one and restart the computer until you pinpoint the exact service that is causing the error.
Fix 0xC000021A on Windows 8, 8.1 and 10
Fix #1: Clean Boot
To perform a clean boot follow the steps below. A Clean Boot will allow you to troubleshoot the 0xC000021A error in-depth, if it works.
- Boot into your system
- Go to Desktop and click Start
- Press the
 and R keys to open the Run utility
 - Type
msconfig - Press Enter
- Go to the General tab, at the System Configuration window
- Click Selective startup
- Uncheck Load startup items
- Go to Services tab
- Check Hide all Microsoft services
- Click Disable all from the bottom right
- Go to Startup tab
- Disable all services listed there by doing: right-click on each and then click Disable
- Restart the computer
If your computer no longer shows the 0xC000021A error, a service listed in Startup might be the problem. To pinpoint which service exactly is causing this error, go back to msconfig and enable each service, one by one, restart the computer until the error appears again.

Msconfig utility screen
Fix #2: Uninstall software or drivers
A newly installed software or driver can cause this error. If Fix #1 above worked for your system, you need to uninstall that piece of software or driver.
Or, check online with the manufacturer for an updated version or a version that is compatible with the version of your Windows: 8 or 8.1
If you can’t boot into your computer, try booting into Safe Mode and uninstall the necessary software or drivers:
- Restart the computer and press the F8 key before the Windows 8 logo appears. If the F8 key doesn’t work, try the F11 key.
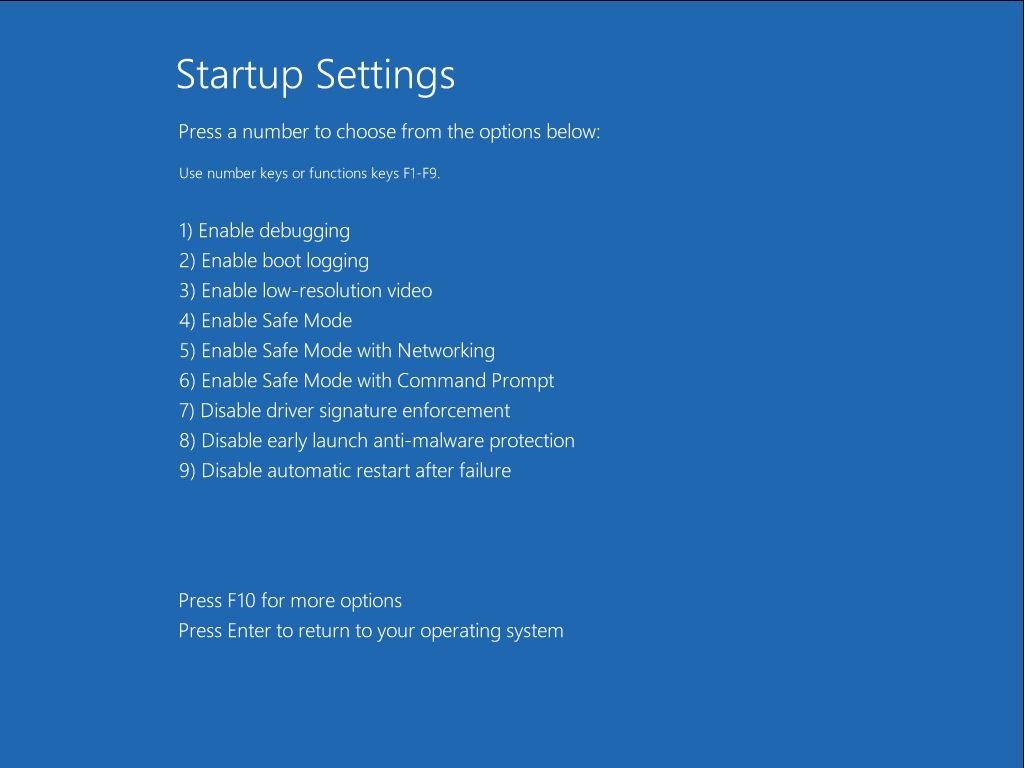
- Click Troubleshoot > Advanced Options > Startup Settings > Restart
- Press the F4 key to boot into Safe Mode
If you have the original disc, you can use it to boot into Safe Mode:
- Insert the disc and reboot the system
- Press any key to boot from the media
- Click Repair your computer
- Click Troubleshoot, then Advanced Options, then Startup Settings, then Restart
- Press F4 to boot into Safe Mode
Fix #3: Run DISM command
Boot your Windows system into Safe Mode with Command Prompt and run the dism command by following the steps below:
- Reboot your system
- Press the F8 key during boot before the Windows 8 logo appears. If the F8 key doesn’t work, try with Shift and F8 or just the F11 key.
- Choose Troubleshoot
- Select Advanced Options
- Select Startup Settings
- Click Restart
- Press the F6 key to boot into Safe Mode with Command Prompt
- Once the Command Prompt appears, type this command and press Enter:
dism /image:C:\ /cleanup-image /revertpendingactions
Replace
C:with the letter of the drive where your Windows 8/8.1/10 is installed. - Additional commands you can run are:
cd C:\Windows\WinSxS
and then:
move pending.xml pending.old
This will work if a pending.xml has been created.
If you can’t boot into Safe Mode, go to Fix 0xC000021A with Easy Recovery Essentials. On more information about the Safe Mode for Windows 8 and Windows 8.1 systems, go to our guide on Safe Mode: Windows 8/8.1
Fix #4: System Restore
If System Restore was enabled on your Windows 8/8.1/1-, you can use it to revert back your computer to an earlier time.
If you can’t run System Restore, go to Fix 0xC000021A with Easy Recovery Essentials.
- Restart the computer
- Press the F8 key or the F11 key
- Choose a keyboard layout, if prompted
- Click Troubleshoot
- Click Advanced Options
- Click System Restore
- Select the operating system
- The System Restore will now open. Click Next
- Choose a restore point and click Next
- Click Finish to confirm the restore point
- Click Yes at the warning message
- Wait for the process to finish
Fix #5: Driver Signature Disabled
If you disable Driver Signature, Windows 8/8.1/10 will use drivers that aren’t signed by Microsoft directly too.
This method can work if error is being caused by any of the drivers that are loading at startup.
- Restart the computer
- Press the F8 key. If F8 key doesn’t work, try the F11 key.
- Choose Troubleshoot > Advanced Options > Startup Settings
- Click Restart
- Press the F7 key to boot into Windows with the driver signature enforcement disabled
Fix #6: Reset
In Windows 8/8.1/10, you can perform a reset of your system. Before you do so, please note that:
- A Reset will erase all personal files from your computer
- If your system is Windows 8.1, a Reset will revert your computer to Windows 8. After the Reset operation is successful, you need to update to Windows 8.1
Follow these instructions:
- Restart the computer
- Press the F8 key or the F11 key
- Choose a keyboard layout, if prompted
- Click Troubleshoot
- Click Reset your PC
- Follow the instructions to complete the process
Troubleshooting the 0xC000021A error
Debug in Windows XP
While the 0xC000021A error is usually caused by an incompatible software or driver you may have recently installed, you can debug it using Dr. Watson software in Windows XP to troubleshoot its cause further more.
These are the instructions on using Dr. Watson to debug the error:
- Open Command Prompt
- Type the following command and press Enter:
System Root\System32\Drwtsn32.exe -I
- Type this and press Enter:
System Root\System32\Drwtsn32.exe
- Then select from the following options: Append to existing log file, Create crash dump, Visual Notification
By default, the log file created by Dr. Watson is created under the following folder path:C:\Documents and Settings\All Users.WINNT\Application Data\Microsoft\Dr Watson
If no log file was created by the utility software, you can also use the Userdump.exe utility to create a log file:
- Download User Mode Process Dumper 8.1 from http://www.microsoft.com/en-us/download/details.aspx?id=4060
- Run Setup.exe
- Go to Control Panel
- Click Process Dump
- At the Exception Monitoring tab, click New. After you add the program name (Lsass.exe, Winlogon.exe, Mtx.exe, Dllhost.exe) to the Monitor list, click OK.
- At Monitor, click the name you just added and click Rules
- Click Custom Rules and select what type of error you want to trigger (for example: Access violation errors)
Note: The User Dump utility has been removed from Microsoft’s site (archived link preserved above). You can use a 3rd party utility like Dumper instead to the do the same, but it needs to be run manually. Otherwise, you can follow our instructions on configuring the registry to create a crash dump.
More Information
Support Links
- Easy Recovery Essentials for Windows – our repair and recovery disk.
It’s an easy-to-use and automated diagnostics disk. It’s available for Windows 8, Windows 7 and Windows Vista. It’s also available for Windows XP and Windows Server.Read more at Windows Recovery Disks.
- The NeoSmart Support Forums, member-to-member technical support and troubleshooting.
- Get a discounted price on replacement setup and installation discs: Windows XP, Windows Vista, Windows 7, Windows 8, Windows 10, Windows 11, Windows Server 2022.
Applicable Systems
This Windows-related knowledgebase article applies to the following operating systems:
- Windows XP (all editions)
- Windows Vista (all editions)
- Windows 7 (all editions)
- Windows 8 (all editions)
- Windows 8.1 (all editions)
- Windows 10 (all editions)
- Windows 11 (all editions)
- Windows Server 2003 (all editions)
- Windows Server 2008 (all editions)
- Windows Server 2012 (all editions)
- Windows Server 2016 (all editions)
- Windows Server 2019 (all editions)
- Windows Server 2022 (all editions)