This is a guide for recovering Dell computers using the recovery partition for the following versions of Windows: Windows XP, Windows Vista, Windows 7 and Windows 8.
Looking for a recovery disk for Dell? Download Easy Recovery Essentials, our recovery and repair disk for Dell computers.
![]()
Contents
Download recovery disk for Dell
If the recovery partition of your Dell computer is corrupt or not working, you can download Easy Recovery Essentials that works with Dell computers.
Download Easy Recovery Essentials for Dell
Features of Easy Recovery Essentials include:
- Automatically find and fix boot errors
- Works even when you can’t get into Windows
- Recover from virus infections
- Restore your PC to a working state
- Access and backup your important data
- Advanced tools for IT experts

Easy Recovery Essentials is compatible with any Dell computer running Microsoft Windows XP, Vista, 7 or 8:
- Microsoft Windows 8 (read more on our Windows 8 Recovery Disk and Repair Disc Download article)
- Microsoft Windows 7 (read more on our Windows 7 Recovery Disk and Repair Disc Download article)
- Microsoft Windows Vista (read more on our Windows Vista Recovery Disk and Repair Disc Download article)
- Microsoft Windows XP (read more on our Windows XP Recovery and Repair Disk article)
- Microsoft Windows Server 2003, 2008 and 2012 (read more on our Windows Server 2008 and 2012 Recovery Discs Download article)
You can burn Easy Recovery Essentials directly to a CD, DVD or a USB flash drive.
Note: Easy Recovery Essentials can not be used to install or reinstall Windows.
Repair a Dell computer
Run Automated Repair to automatically find and fix various boot errors on your Dell computer:
- Download Easy Recovery Essentials
- Burn the ISO image. Follow these instructions on how to burn the bootable ISO image. Instructions on how to create a bootable Easy Recovery Essentials recovery USB stick are also available.
- Boot Easy Recovery Essentials
- Choose Automated Repair option and click Continue

- Choose the installation drive letter of your Windows (usually
C:\) and click Automated Repair - Easy Recovery Essentials will now begin to fix errors automatically
- Once the process is complete, click Restart
- Done! Your Windows should now start again.

Restore a Dell computer
Using the System Restore feature, you can access System Restore and restore your Dell computer:
- Download Easy Recovery Essentials
- Burn the ISO image. Follow our instructions on how to burn the bootable ISO image. Instructions on how to create a bootable Easy Recovery Essentials recovery USB stick/drive are available.
- Boot Easy Recovery Essentials
- Select your operating system and click System Restore

- Choose a restore point

- Easy Recovery Essentials will now create a backup of your current system configuration and begin restoring the selected snapshot

- Once the process is complete, click Restart
- Done!
More features
The following features are also available in Easy Recovery Essentials:
- Virus Scanner
- Browse/Backup files
- Partition Editor
- Internet Browser
Download Easy Recovery Essentials for Dell
The Dell recovery partition
Dell computers have a recovery partition that you can access to recover and restore your computer. The recovery partition may not be available for your computer if it was deleted or overwritten somehow.
Below you can see the recovery partition shown on a Dell computer, named “RECOVERY” on the “D:/” drive. In this example, Windows is installed on the “OS” partition, “C:/“.
Recovery partition of a Dell computer is shown here
If your computer doesn’t have a recovery partition, use a recovery disk to fix your computer of boot errors. Our recovery disk – Easy Recovery Essentials – works with all Dell computers and all Windows versions (XP, Vista, 7 or 8). Download Easy Recovery Essentials.
Some Dell series models like the Inspiron Mini 9 or the Vostro A90 do not support a restore process to factory settings because these models do not have a F11 key. For these models, you need to do a manual reinstallation of your Windows using the original installation disk.
Access the recovery partition in Windows XP
Windows XP users can access the recovery partition created by Dell and restore their Windows XP to the factory settings by following these instructions.
Using the Dell PC Restore software will restore your computer to its default settings. This action erases all your files: personal files, folders, programs, drivers, emails, photos etc.
Backup your files before you continue. You can use Easy Recovery Essentials Browse/Backup Files to backup your files. You can use Browse/Backup Files even if you can’t boot into Windows. Download Easy Recovery Essentials.
- Boot your computer
- When the Dell logo appears on your screen, hold the Ctrl key and press F11 simultaneously
- The Dell PC Restore by Symantec screen should now appear
- Select Restore and follow the instructions of the wizard. Use the Tab key to highlight “Restore” and make the selection
- When the “all data will be lost” warning message appears, click Confirm (or use the Tab key to select Confirm)
- Press Enter
- The progress screen will appear and the restore process starts. This process can take up to 10 minutes
- A success message will appear when the process is finished: The system recovery process was successful.
- Click Finish (or use the Tab key to select Finish)
- Press Enter
Access the recovery partition in Windows Vista
Windows Vista users can access the recovery partition created by Dell by following these instructions:
Using the recovery software from Dell to restore your computer to its default settings will delete all files: personal files, folders, programs, drivers, emails, photos etc.
Backup your files before you continue. You can use Easy Recovery Essentials Browse/Backup Files to backup your files. You can use Browse/Backup Files even if you can’t boot into Windows. Download Easy Recovery Essentials.
- Remove any peripherals, except your keyboard and mouse. This includes scanners, printers, USB drives, smartphones, camera and so on.
- Boot your computer
- When the computer starts, press F8 until the Advanced Boot Options menu appears on the screen.
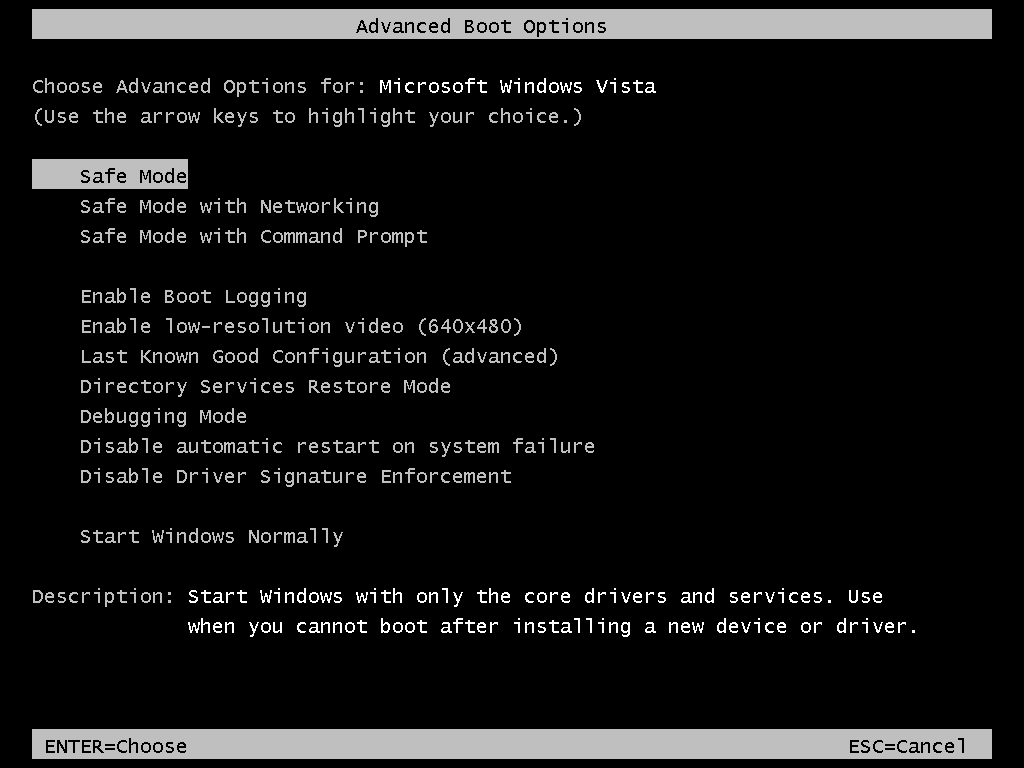
The Advanced Boot Options screen in Windows Vista on a Dell
- Use your arrow keys to select Repair Your Computer from the list
- Press Enter
- Choose your language
- Login as “Administrator” or any user that has administrative rights to the system
- Click on the Dell Factory Image Restore (usually the last item in the list).
Below, this is called Dell Backup and Recovery Manager as the computer model does not use Dell DataSafe Local Backup software – see Tips for more details about this.

The Dell Backup and Recovery Manager in System Recovery Options
- When the “Dell Backup and Recovery Manager” screen appears, click Next
- Click on Yes, reformat hard drive and restore system software to factory condition checkbox.
Warning:
This will erase all your personal files (pictures, emails, music, movies). Backup your files! - Click Next
- When the process is finished, click Finish to restart your computer
Access the recovery partition in Windows 7
Users of Windows 7 operating system can access the recovery partition on Dell computers by following these set of instructions.
Using the Dell Factory Tools or Dell Backup and Recovery Manager software to restore your computer to its default settings will delete all files: personal files, folders, programs, drivers, emails, photos etc.
Backup your files before you continue. You can use Easy Recovery Essentials Browse/Backup Files to backup your files. You can use Browse/Backup Files even if you can’t boot into Windows. Download Easy Recovery Essentials.
- Remove any plugged peripherals, except your keyboard and mouse. Peripherals include your scanner, printer, USB drives, smartphone, tablet etc.
If you use a laptop and it’s docked: remove the laptop from the dock station. It should not run on battery, but with AC adapter plugged in.
- Boot your computer.
- When the Dell logo appears on your screen, press the F8 key several times to boot into the Advanced Boot Options menu of the Windows 7 system.
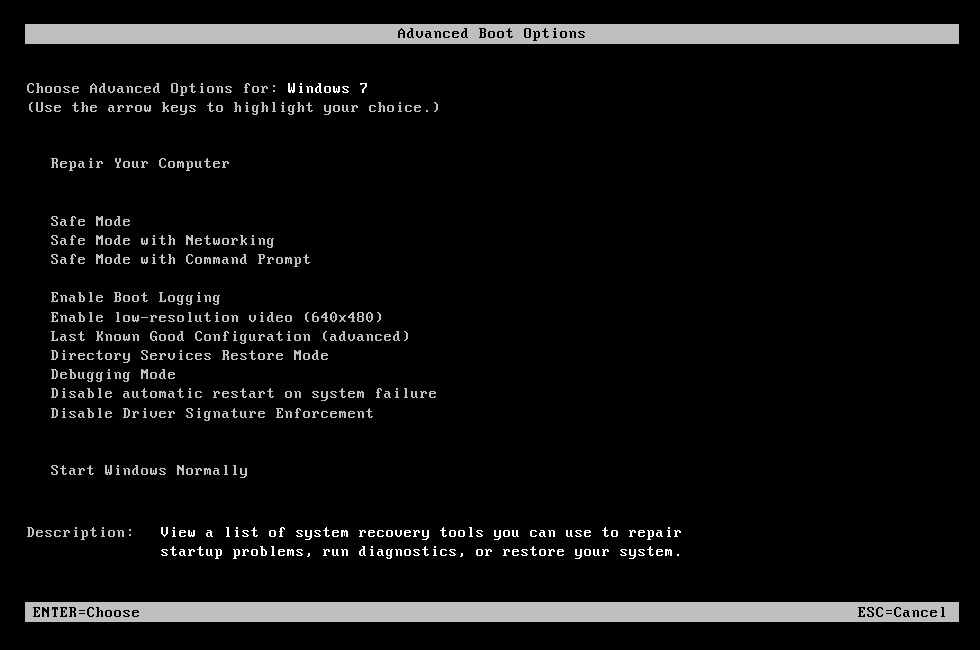
The Advanced Boot Options screen in Windows 7 on a Dell
- Select Repair Your Computer from the list. Use the arrow keys to go up and down through the list.
- The “System Recovery Options” screen will appear, select your keyboard and click Next.
- Log in as “Administrator“. If you don’t have this account, use any user account that has administrative rights to Windows 7.
- Select Dell Factory Tools (this is usually the last item in the list). The name can also be Dell Backup and Recovery Manager – see Tips on why this may be different for your computer.
- Click Next to confirm the action
- Check the Yes, reformat hard drive and restore system software to factory condition checkbox.
Warning:
This will restore your computer to its default settings. This action will delete all your personal files (emails, photos, movies). Backup your files! You can use Easy Recovery Essentials Browse/Backup Files to backup your files. - The restore process will now start. The process can take up to 10 minutes.
- When the process is finished, click Next to restart your computer.
Access the recovery partition in Windows 8
Windows 8 (Windows 8.1 too) users can access the recovery partition created by Dell by following these instructions.
Make sure your computer boots with Secure Boot on (UEFI/Secure Boot) before accessing the recovery partition. Follow the instructions from Troubleshooting, Boot in the Dell UEFI/Secure Boot to setup this for Dell computers.
Backup your files before you continue. You can use Easy Recovery Essentials Browse/Backup Files to backup your files. You can use Browse/Backup Files even if you can’t boot into Windows. Download Easy Recovery Essentials.
- Remove any peripherals, except your keyboard and mouse: scanners, printers, USB drives, smartphones or tablets etc.
If you have a laptop, remove it from the dock station and make sure it runs with AC adapter plugged in.
- Do not restart your computer yet.
- While you are logged into Windows 8, hold the Shift key and restart your computer (restart the computer while holding the Shift key). If this doesn’t work, try any of the next alternatives:
Alternative #1:
Click the “Restart now” option from the PC settings’ Advanced startup menu. You can find it by going to PC settings, at the Advanced startup tab. Click on the Restart now button.
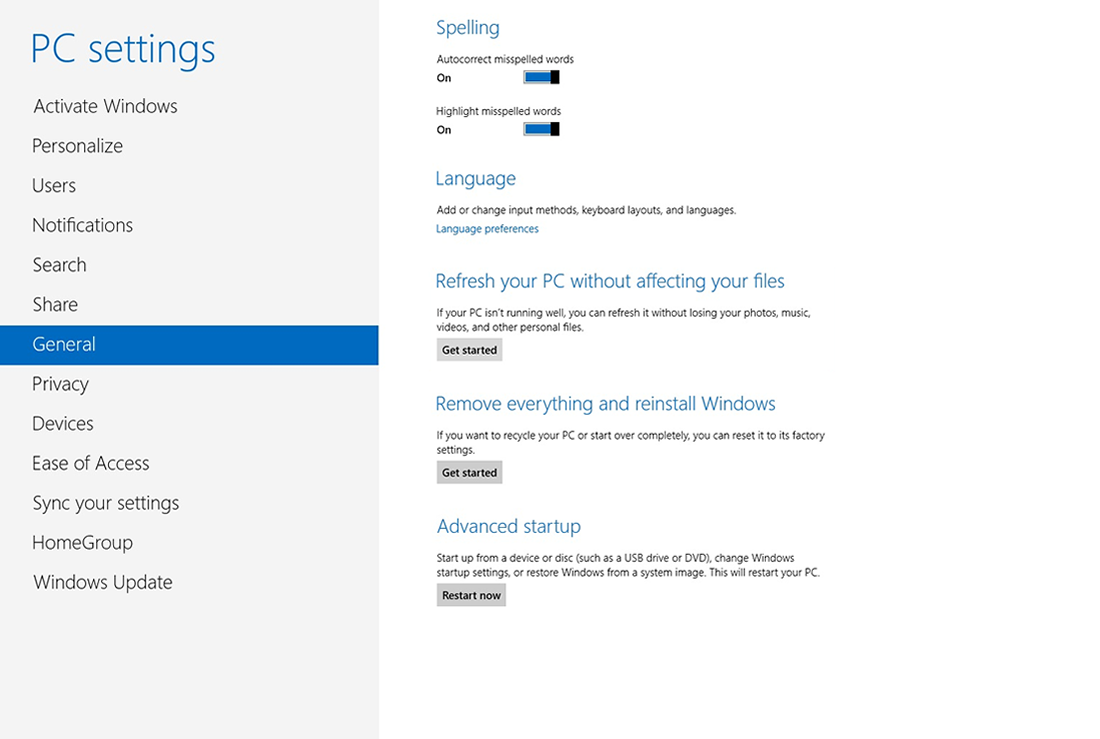
The Windows 8 Advanced startup screen in PC settings
Alternative #2:
If Alternative #1 doesn’t work, try restarting your computer 4 times, one after another after it loads for a few seconds. This should make the system to boot into recovery options automatically.
- Your computer should now restart into the recovery options menu. Choose Troubleshoot when the screen is titled “Choose an option“.

Troubleshoot in Windows 8 recovery options screen
- Select Dell Backup and Recovery item from the list – this is usually the last item in the list.
- Your computer may restart again.
- Click Next when the “Dell Backup and Recovery” screen appears
- Windows 8 Smart Repair feature will load and check if any errors can be fixed automatically. When this process is done, click Next.
- Choose the “Factory Image” option
- Click Next
- You’ll be asked to backup your files. If you have a USB flash drive to backup your data, select Yes, backup my personal files. If you are OK with delete all data from your computer, you can select No, Erase my files.
- The process will now start. When this is finished select Restart to restart your computer.
- Follow the wizard instructions to setup Windows 8 again.
Tips
Dell has 2 programs for backup and restore:
- Dell Inspiron, Dell Studio and Dell XPS models are using the Dell DataSafe Local Backup 2.0 software
- Dell OptiPlex, Dell Latitude, Dell Vostro and Dell Precisions models are using the Dell Backup and Recovery Manager software
- Windows XP and Windows Vista users may have their Dell backup and recovery software called Dell PC Restore (by Symantec)
Backup your files before using the recovery partition
If you are able to access your Windows copy, backup your files before accessing the recovery partition.
Restoring your Windows factory image by accessing the recovery partition will delete all files from your computer. This action restores your computer to its default settings.
To backup your files, use Easy Recovery Essentials Browse/Backup Files to access and backup your files. You can use Browse/Backup Files even if you can’t boot into Windows. Download Easy Recovery Essentials.
If you are not sure if your computer has the DataSafe Local Backup or the Backup and Recovery Manager software, go to Tips above and determine what software your Windows is using, depending om what Dell computer model you have and what is your Windows version.
Backup files using Dell DataSafe Local Backup 2.0
You can create a full system backup using DataSafe Local Backup by following these instructions:
- Boot the Windows system
- Go to Start and then to All Programs
- Find the Dell DataSafe Local Backup 2.0 folder
- Click on Dell DataSafe Local Backup 2.0
- Click on Back up your files menu item
- Select Full System Backup
- Click Backup now to start the backup process. You can click on “Edit plan” to change the location of your backups or setup a backup schedule.
- Select the location where you want your backup to be saved.
- Once you selected the location, click Next
- If you want the backup to be saved now, select I will manually backup my system and then click Next. If you want a backup later, select Backup my system automatically (recommended) and choose the time you wish the backup process to start.
- Click Finish.
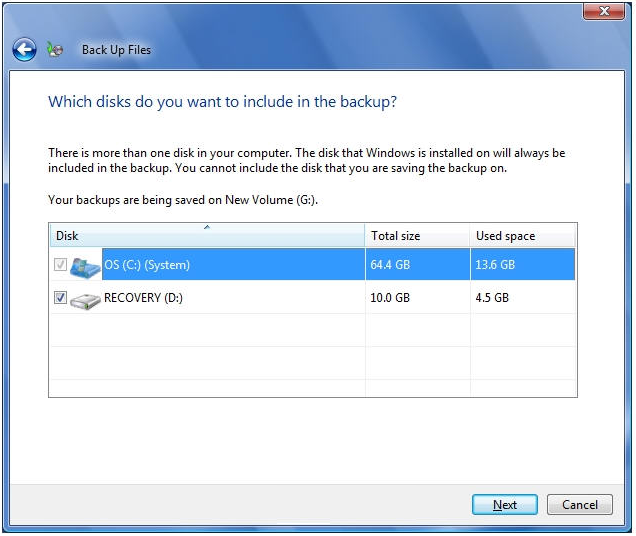
Backup files using Dell Backup and Recovery Manager
If your Dell computer uses the Backup and Recovery Manager software, follow these instructions:
- Open the Dell Backup and Recovery Manager software
- Select “File Backup and Restore” from the left
- Click “Backup files…”
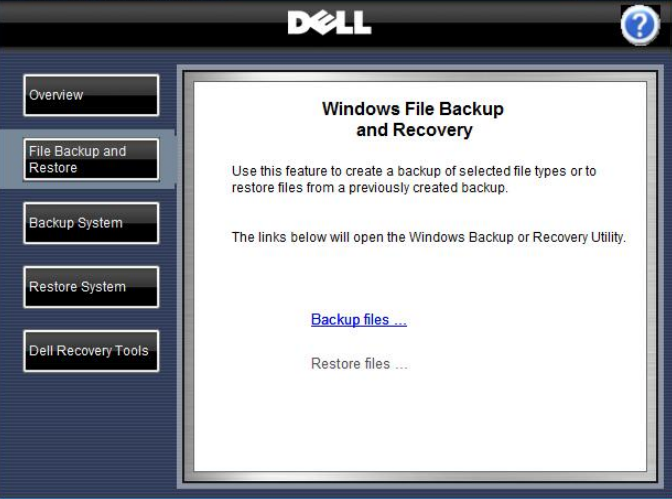
The Backup files option
- Select On a hard disk, CD, or DVD to save your backup to the hard drive, to a CD or to a DVD.
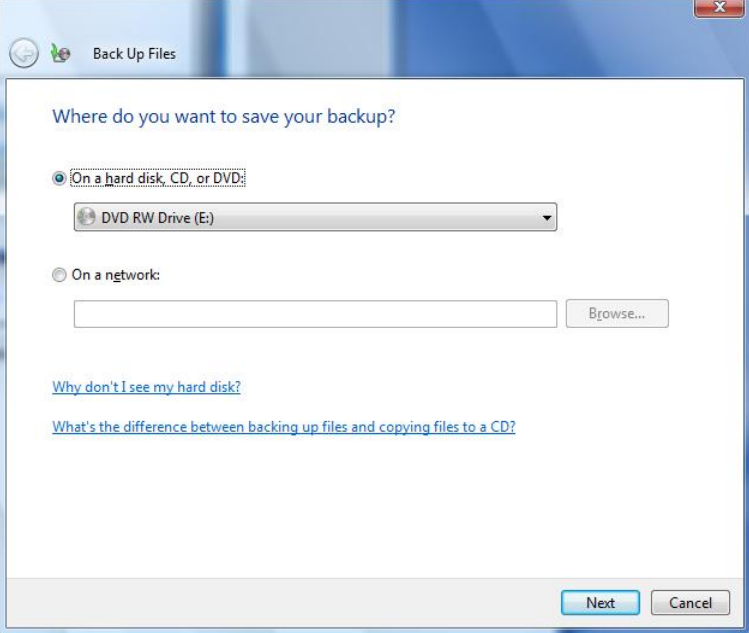
Backup on a hard disk, CD or DVD
- Specify the location where to save the backup
- Click Next
- Select what hard drive to backup
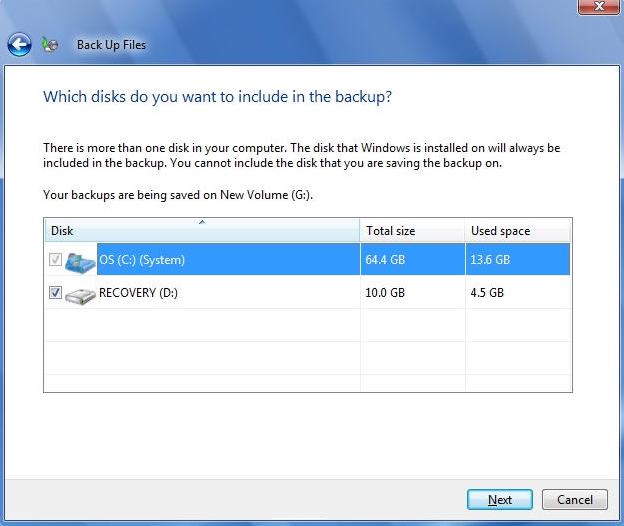
Select what disk to backup
- Click Next
- Select what type of files you want to backup. You can select all the available checkboxes.
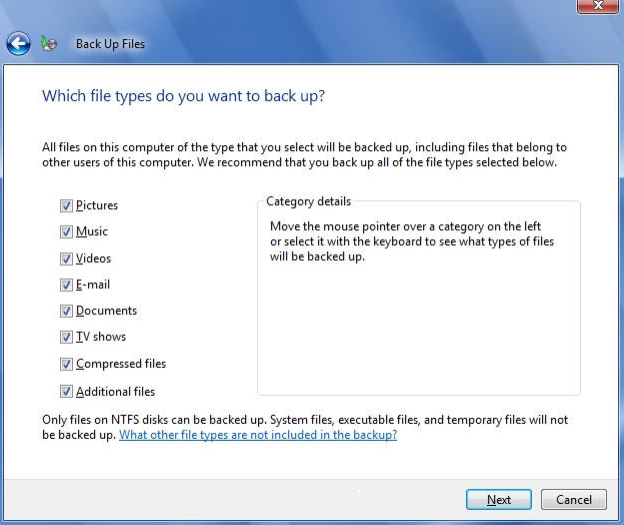
Select all available checkboxes to backup all types of files
- The software will ask you how many times you want to create backups (how often, on which day and at what time). If this is your first backup, it will create the full backup after clicking Save.
- Click Save settings and start backup.
- The Backup and Recovery Manager software will now begin the process
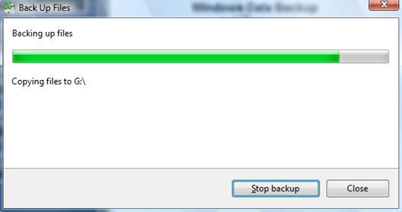
The process begins
Restore your files after using the recovery partition
If you are not sure what type of software your computer is using (the DataSafe Local Backup or the Backup and Recovery Manager), go to Tips and determine this based on your computer model series.
Restore files using Dell DataSafe Local Backup 2.0
You can restore a full system backup using the Dell DataSafe Local Backup 2.0 software by following these instructions:
- Power on your computer. If you are not able to boot into Windows, see different instructions below.
- Click on the Start icon and go to All Programs
- Search for a Dell DataSafe Local Backup 2.0 folder
- In this folder, click on Dell DataSafe Local Backup 2.0
- Click on “Restore my files“
- Select what kind of restore you want. You have 3 options here that depend on how you the first system backup:
- Restore your entire system to a previous date
- Restore specific files or folders from a System Backup
- Restore individual files from File & Folder Backups
- Select the date of the backup to be restore and click Next
- Confirm the selection and click on either Restart or Finish:
- Click Restart, if you selected “Restore specific files or folders from a System Backup“.
- Click Finish, if you selected “Restore individual files from File & Folder Backups“.
If you are not able to load Windows, follow these instructions:
- Boot your computer
- Press the F8 key when the Dell logo appears on your screen
- When the Advanced Boot Options screen appears, select Repair Your Computer. Use your arrows key to go up and down through the screen list.
- Click Next
- Login as “Administrator“. If you do not have the Administrator account, try to login with any user that has administrative rights.
- Click on Dell Factory Image Recovery and DataSafe options.
- When the “DataSafe Local Backup” screen appears, check the Preserve new or changed files before restoring to selected System Backup checkbox, if you want to keep any files since your last backup or check the Restore without preserving new or changed files checkbox, if not.
- Click Next
- If you selected “Preserve new or changed files before restoring to selected System Backup” checkbox earlier, click Next.
If you selected the “Restore without preserving new or changed files” checkbox, go directly to Step #12 here.
- The software will now scan the system and ask what files and folders you want to preserve. Make your selection of files and/or folders and click Next.
- Select the location for these files and folders and click Next
- Confirm your selections and click Next
- Once your preserved files are saved to your selected location, click Next
- Click the Yes, continue checkbox and then click Next.
- Click Restart once the software completed the restore process.
Restore files using Dell Backup and Recovery Manager
You can restore your files by following these instructions, if your computer is using the Dell Backup and Recovery Manager software.
Dell Backup and Recovery Manager will not show the “Restore files…” option if you haven’t created a backup through this software before. You cannot restore files if you don’t have a backup created.
- Open the Dell Backup and Recovery Manager software
- Select “File Backup and Restore” from the left
- Click “Restore files…“
- Choose what to restore: Files from the latest backup or Files from an older backup.

Choose what files to restore
- Click Next
- Select the files and folders to restore.
- Select the location where to save the restored files.
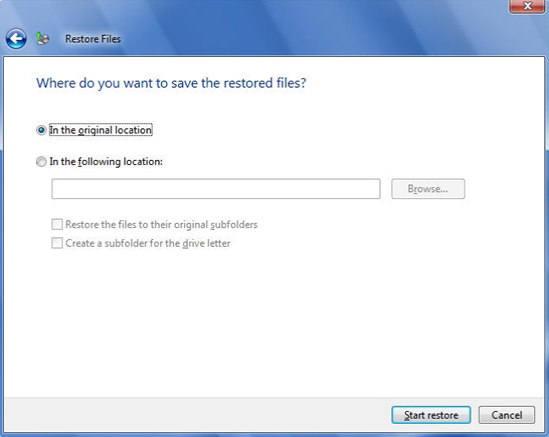
Select the location
- Click Start restore.
Boot in the Dell UEFI/Secure Boot
Before accessing the recovery partition, you can check if your computer (from Dell) is going to boot with Secure Boot enabled or not. Follow these steps to do so:
- Boot your computer
- When the Dell logo appears, press the F2 key
- The “UEFI” screen will now appear
- Navigate to the Boot tab by using the arrow keys of the keyboard.
- In the Boot tab screen, make sure that you have [Enabled] next to the Secure Boot option.
![Secure Boot [Enabled] on a Dell computer](/wiki/wp-content/uploads/sites/5/2014/02/dell-uefi-secure-boot-enabled-disabled.png)
Secure Boot [Enabled] on a Dell computer
- The Boot List Option must be set as UEFI. Use your arrow keys to navigate to the Boot List Option item and then hit Enter to open the window and select UEFI.
- Go to the Exit tab. Exit the Boot screen by saving the changes.
Troubleshooting
My Dell recovery partition is not accessible
If your system still has the recovery partition active but you can not access it, follow the next set of instructions to access it.
Windows Setup CD/DVD Required!
Some of the solutions below require the use of the Microsoft Windows setup CD or DVD. If your PC did not come with a Windows installation disc or if you no longer have your Windows setup media, you can use Easy Recovery Essentials for Windows instead. EasyRE will automatically find and fix many problems, and can also be used to solve this problem with the directions below.
- Boot your computer with the Command Prompt using your original Windows installation disk
- When Command Prompt loads run the following commands in order, one by one:
Alternative #1:
path d:\windows;d:\windows\system32
d:
cd tools
pcrestore
In this example,
C:\is where Windows is installed on andD:\is the recovery partition from Dell.Alternative #2: (if #1 doesn’t work)
imagex /apply d:\dell\image\factory.wim 1 c:\
- The recovery process should now start. This process may take up to 10 minutes.
- Type
exitwhen the process is completed to exit Command Prompt. - Restart your computer
My Dell recovery partition is not there
If your Dell computer doesn’t have a recovery partition (or if the partition is deleted or corrupted), you need to use a recovery disk instead to perform a recover and restore process for your computer.
Unless your recovery partition is accessible, you cannot use the DataSafe Local Backup software or the Backup and Recovery Manager to create system recovery disks.
If your computer displays boot errors, you can use Easy Recovery Essentials (our recovery and repair disk). It is compatible with all Dell computers (desktops, laptops/notebooks etc.) and with the following Windows systems: Windows XP, Vista, 7, 8 or Server versions.
Use the Automated Repair feature to automatically find and fix errors that prevent your computer from booting or the Browse/Backup files feature to access and backup your files.
You can burn Easy Recovery Essentials to USB drives, CDs or DVDs.
Download Easy Recovery Essentials for Dell computers from here
Note: Easy Recovery Essentials can not be used to install or reinstall Windows.
More Information
Support Links
- Easy Recovery Essentials for Windows – our repair and recovery disk.
It’s an easy-to-use and automated diagnostics disk. It’s available for Windows 8, Windows 7 and Windows Vista. It’s also available for Windows XP and Windows Server.Read more at Windows Recovery Disks.
- The NeoSmart Support Forums, member-to-member technical support and troubleshooting.
- Get a discounted price on replacement setup and installation discs: Windows XP, Windows Vista, Windows 7, Windows 8.
Applicable Systems
This Windows-related knowledgebase article applies to the following operating systems:
- Windows XP (all editions)
- Windows Vista (all editions)
- Windows 7 (all editions)
- Windows 8 (all editions)
- Windows 8.1 (all editions)
- Windows Server 2003 (all editions)
- Windows Server 2008 (all editions)
- Windows Server 2012 (all editions)
Applicable Models
This Dell-related knowledge base article applies to the following computer models:
- Inspiron series: 1000, 10z, 1100, 1121, 1122, 1150, 11z, 1200, 1210, 13, 1300, 1318, 1320, 1370, 13z, 14, 1410, 1420, 1425, 1427, 1428, 1440, 1464, 1470, 14r, 14z, 15, 1501, 1520, 1521, 1525, 1526, 1545, 1546, 1555, 1570, 15r, 15z, 17, 1720, 1721, 1750, 1764, 17r, 2000, 2100, 2200, 2500, 2600, 2650, 3000, 300m, 3200, 3500, 3700, 3800, 4000, 4100, 4150, 500, 519, 519, 530, 530s, 537, 537s, 537st, 545, 546, 560, 570, 5000, 5000e, 500m, 5100, 510M, 5150, 5160, 5425, 560, 6000, 600M, 6100, 630m, 640, 6400, 640m, 7000, 700m, 710m, 7500, 8000, 8100, 8200, 8500, 8600, 9100, 9200, 9300, 9400, B120, B130, DUO, E1405, E1505, E1705, M301z, M411r, M421r, M5010, M5030, M5040, M7010, MINI 10, MINI 1012, MINI 1018, MINI 10V, MINI 10V N, MINI 12, MINI 9, MINI 910, MM061, MP061, MXC061, N3110, N4120, X200, XPS, XPS Gen 2, XPS M140, One 2205, One 2305, One 2320
- Dimension series: 200, 400, 420, 630i, 1100, 1200, 2100, 2200, 2300, 2300c, 2350, 2400, 2400c, 3000, 3100, 3100, 3100c, 410, 4100, 420, 4200, 4250, 4300, 4300S, 4400, 44450, 500, 4500C, 4500S, 4550, 4590t, 4600, 4600c, 4601, 4700, 4700c, 5000, 5100, 5100c, 5150, 5600, 600, 6000, 610, 6700, 8100, 8200, 8250, 8300, 8300n, 8400, 900, 9100, 9150, 9200, B110, C521, D-610, E310, E510, E520, E521, GX150, L1000R, L600R, L667R, L800CXE, V333C
- Latitude series: 100L, 110L, 120L, 13, 131L, 2100, 2110, 2120, 2600, 3330, 3440, 3540, 6000d, 6430u, 840, ATG, C400, C500, C510, C540, C600, C610, C640, C800, C810, C840, Cpi, Cpt, CS, Csx, D400, D410, D420, D430, D500, D505, D510, D520, D530, D531, D600, D610, D620, D630, D630c, D631, D800, D810, D820, D830, E4200, E4300, E4310, E5400, E5410, E5420, E5420M, E5430, E5440, E5500, E5510, E5520, E5520M, E5530, E5540, E6220, E6230, E6320, E6330, E6400, E6410, E6420 , E6430, E6430s, E6440, E6500, E6510, E6520, E6530, E6540, E7240, E7440, L400, LM, LS, LT, LX, LXP, SX 4, V700, V710, V740, X1, X200, X300, XP4, Xpi, XT, XT2, XT3, Z
- Vostro series: 1000, 1011, 1014, 1015, 1088, 1220, 13, 130, 1320, 1400, 1420, 1440, 1450, 1500, 1510, 1520, 1540, 1550, 1700, 1720, 200, 220, 230, 2420, 2421, 2510, 2520, 2521, 3000, 3300, 3350, 3360, 3400, 3450, 3460, 3500, 3550, 3555, 3560, 3700, 3750, 5460, 5470, 5560, A860, V131
- Precision series: 350, 360, 370, 380 Workstation, 390 Workstation, 650, 670 Workstation, M50, M60, M65, M70, M90, M2400, M4300, M4700, M4700, T3400
- OptiPlex series: 150D, 160, 160L, 170L, 170LN, 210L, 210LN, 3010, 3011 AIO, 3020, 320, 330, 360, 380, 390, 5100, 560, 580, 7010, 740, 745, 745c, 755, 760, 780, 790, 9010, 9020 AIO, 960, 980, 990, E1, FX160, G1, GC, GH1, GH2, GH3, GL, GM, GMT, GX1, GX100, GX110, GX115, GX150, GX1p, GX200, GX240, GX260, GX260n, GX270, GX270n, GX280, GX300, GX400, GX50, GX520, GX60, GX60N, GX620, L60, N, NX1, SX260, SX270, SX270N, SX280, VDI Blaster, XE, XE2, XL, XM, XMT
- XPS series: 11, 12, 13, 14, 14z, 15, 15z, 17, 400, 410, 420, 720, 8100, 8200, 8250, 8300, 8400, 8500, 8600, 8700, 9150, 9200, L511X, M1210, M1330, M1530, M1531, M1532, M1533, M1534, M1535, M1710, M2010, MXC062, MXG061, MXP061
- Studio series: 1440, 1450, 1457, 1458, 15, 1530, 1535, 1536, 1537, 1555, 1557, 1558, 1569, 1735, 1736, 1737, 1745, 1747, 1749, 1909
- Studio XPS series: 13, 16, 1645, 1647, 1340, 1640, X1340
- Dimension XPS series: 210, 400, 410, 4100V, 420, 50, 600, 630i, 66, 720, 9200, D233, D234, M1530, One, P60, T450, T600, XTS800
- Alienware series: 14, 17, 18
- Adamo series