This guide is about recovery and restore disks for eMachines computers for the following versions of Windows: Windows XP, Windows Vista, Windows 7 and Windows 8.

A recovery disk is also known as a restore disc, repair disc, boot disc or rescue disk.
eMachines Inc. was acquired by Gateway in 2004 and Gateway Computers was acquired by Acer in 2007.
- If you have a computer from Gateway, follow the Gateway Recovery Disk guide instead.
- If you have a computer from Acer, follow the Acer Recovery Disk guide instead.
Looking for a recovery disk for eMachines? Download Easy Recovery Essentials, our recovery and repair disk for eMachines computers.
Contents
Download recovery disk for eMachines
If the recovery partition of your computer is corrupt or damaged, consider downloading Easy Recovery Essentials, that it’s compatible with eMachines computers running Windows XP, Vista, 7 and 8.
Easy Recovery Essentials works for any eMachines model and it’s compatible with the following Windows versions:
- Microsoft Windows 8 (read more on our Windows 8 Recovery Disk and Repair Disc Download article)
- Microsoft Windows 7 (read more on our Windows 7 Recovery Disk and Repair Disc Download article)
- Microsoft Windows Vista (read more on our Windows Vista Recovery Disk and Repair Disc Download article)
- Microsoft Windows XP (read more on our Windows XP Recovery and Repair Disk article)
- Microsoft Windows Server 2003, 2008 and 2012 (read more on our Windows Server 2008 and 2012 Recovery Discs Download article)
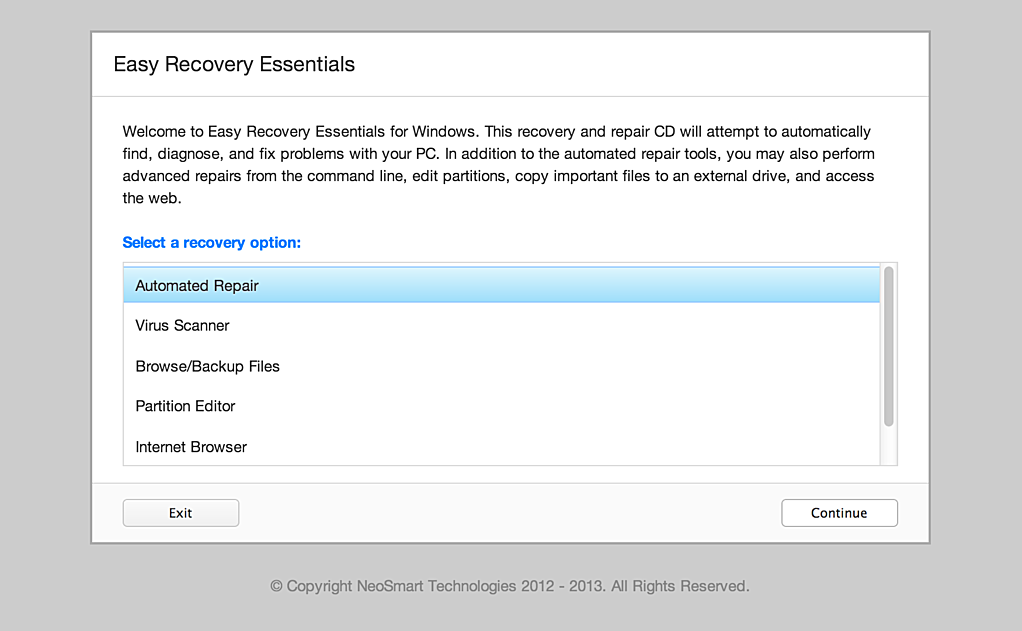
Screenshot of Easy Recovery Essentials
You can burn Easy Recovery Essentials directly to a CD, DVD or a USB flash drive and use its Automated Repair function to automatically find and fix boot errors.
Download Easy Recovery Essentials for eMachines
Note: Easy Recovery Essentials can not be used to install or reinstall Windows.
Create recovery disk for eMachines
Depending on your computer model and Windows version you can create a recovery disk to use later in case of emergencies or hard disk failure.
On various computer models from eMachines you don’t have a set of discs, but have a recovery partition already installed on your computer that you can use to restore your computer.
Using this partition, you can restore your computer to its default settings like it was when the PC was first purchased.
If you don’t have the set of discs already available and neither a recovery partition, you can download Easy Recovery Essentials and run the Automated Repair function to automatically repair various boot errors or use the System Restore feature to restore your computer.
Create recovery disk in Windows XP
If you don’t have the recovery software provided by eMachines, download our recovery and repair disk for eMachines.
You can create a recovery disk for Windows XP on a eMachine computer, if you have the software installed by eMachines that allows you to create the disks.
Depending on your computer model, the following steps may slightly differ:
- Boot into Windows XP
- Find the eMachines Recovery Management application (by going to Start > All Programs)
- Click Create Factory Default Disc
- Insert the CDs or DVDs required in the optical drive of your computer and click Start to begin the process
- Follow the instructions of the application to complete the process
Create recovery disk in Windows Vista
If you don’t have the recovery software provided by eMachines, download our recovery and repair disk for eMachines.
To create a recovery disk for Windows Vista for an eMachines computer, you need to be able to boot into Windows Vista to run the Recovery Management software:
- Boot your system
- Click Start
- Go to eMachines > eMachines Recovery Management
- Click Create Factory Default Disc
- Depending on what type of media (CD or DVD) you want to use, the software will let you know how many CDs or DVDs you need to complete the creation process
- Click Start
- When prompted, remove CD or DVD #1 and insert the next CD or DVD and hit OK
- Remove the last CD or DVD and close the Recovery Management software
- The process is now complete
Create recovery disk in Windows 7
If you don’t have the recovery software provided by eMachines, download our recovery and repair disk for eMachines.
To create a recovery disk for Windows 7, use the Recovery Management software installed by eMachines on your computer:
- Click Start
- Go to All Programs
- Find the eMachines folder
- Launch the eMachines Recovery Management application
- Click Create Factory Default Disc
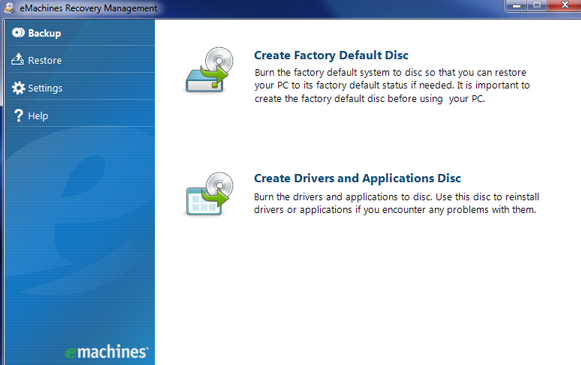
- Insert the first blank CD or DVD and select the optical drive
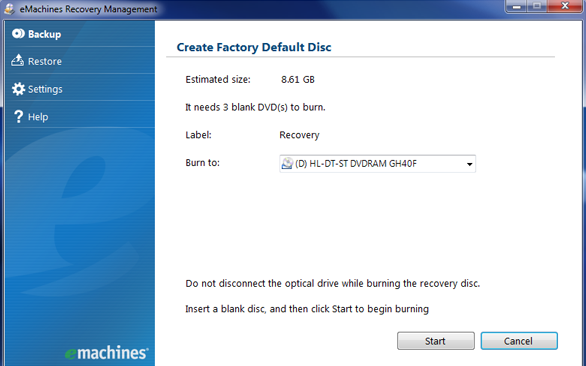
- Click Start
- Wait for the process to finish
- If prompted by the software, insert more CDs or DVD until the process is complete and click OK to load each CD or DVD
Create recovery disk in Windows 8
If you don’t have the recovery software provided by eMachines, download our recovery and repair disk for eMachines.
The eMachines brand was discontinued in 2013 by Acer. The following steps are from the Gateway guide.
If you updated from Windows 7 to Windows 8 and have the eMachines Recovery Management software, follow these steps to create a disk:
- Press the
key and C to begin a search
- Type
recoveryand click on eMachines Recovery Management - Click Create Factory Default Disc
- Click Copy content from the recovery partition to the recovery drive
- Click Next
- Select the media you want to use as a recovery media
- Click Next
- Click Create
- Click No, if you are being asked to delete the recovery partition
Restore eMachines computers
To restore an eMachines computer, you either need to:
- Have the set of recovery discs available
- Have the recovery partition intact on your PC to use the Restore process
If none of the above are available for your computer, go to Download recovery disk for eMachines.
Restore Windows XP
If you don’t have the recovery software provided by eMachines, download our recovery and repair disk for eMachines.
If you have the restore CDs available for your eMachines computer, you can restore Windows XP by following the instructions below.
These restore CDs from eMachines allows you to:
- Restore all software, including Windows XP
- Restore any drivers
This process deletes personal files stored on your PC and restores your PC to its default settings.
Follow these steps to restore Windows XP on an eMachines PC:
- Boot Windows XP
- Insert the first recovery CD in the disc tray before Windows loads
- At the Windows Startup Menu, type
1and press Enter - Press any key at the warning message:
- Press Y at the next warning message. If you don’t want to continue, press N instead.
- The restore process will now begin to restore your computer to its default settings like it was when it was first purchased
- When the “Insert next media and press enter to continue…” message appears, remove the first CD from the disc tray and insert CD #2
- Press Enter to load CD #2
- And so on for each restore CD you have available. Your computer model may have 2 or 3 restore CDs.
- When the process is complete, remove any CDs from the disk tray
- Press Enter to restart your computer
- Boot your PC and follow any instructions left to do to setup Windows again
THIS PROCESS WILL RE-INSTALL WINDOWS XP ON YOUR PC
==================================================

!!Warning!!

ALL CONTENTS OF HARD DRIVE (C:) WILL BE LOST!
** BACK UP YOUR FILES BEFORE PROCEEDING AND RESTART **

Press any key to continue..
CONFIRMATION OF RESTORE PROCEDURE
==================================================
!!Warning!!

ALL DATA OF HARD DRIVE (C:) WILL BE LOST!
** ARE YOU SURE YOU WOULD LIKE TO PROCEED?**

IF YES, PRESS Y. IF NO, PRESS N.
Restore Windows Vista
If you don’t have the recovery software provided by eMachines, download our recovery and repair disk for eMachines.
If you can’t boot into Windows Vista
If you don’t have the recovery disks, you can use the recovery partition installed on your eMachines computer to restore Windows Vista. To do so, follow these steps:
- Boot your computer
- Press the F8 key multiple times to boot into the Advanced Boot Options
- At the Advanced Boot Options screen, select Repair Your Computer
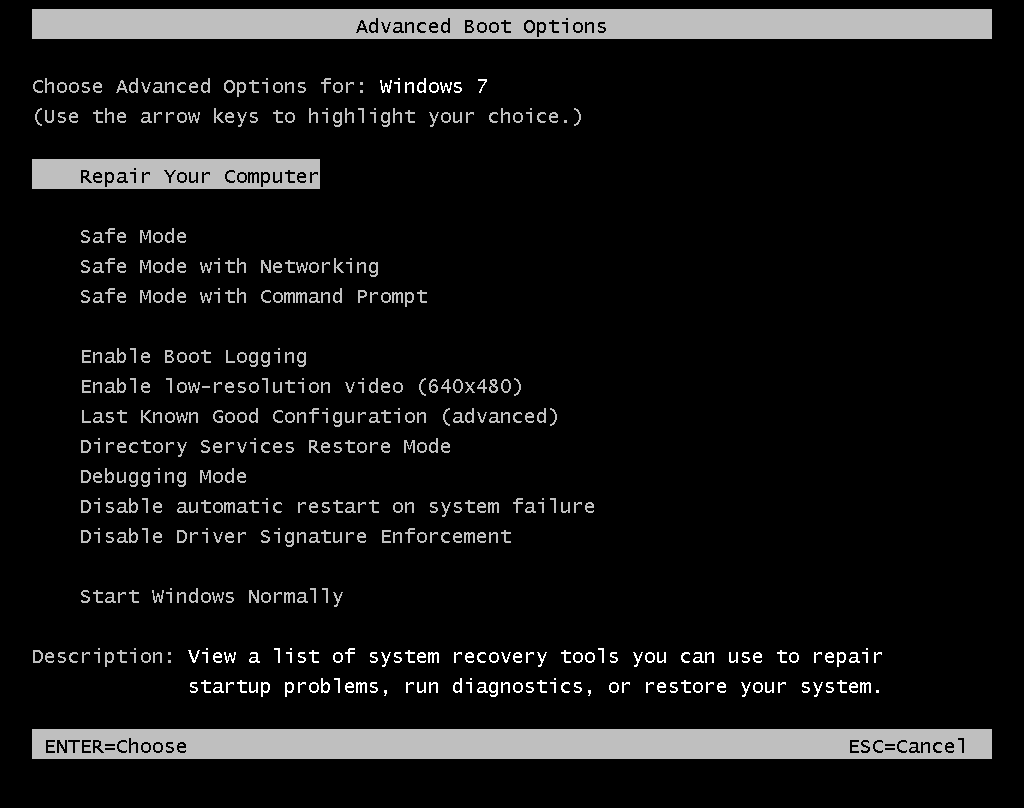
- Press Enter
- Select a keyboard layout
- Click Next
- Login as an Administrator or as any user that has administrative rights to the PC
- Click OK
- At the System Recovery Options window, select Recovery Manager. This is usually the last item from the list.
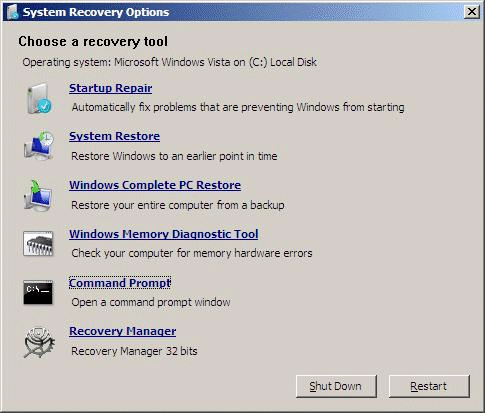
- The Welcome to eMachines system Recovery window should appear now
- Click Next to continue
- Select what type of recovery you want: Recovery with automatic data backup or Full factory recovery.
A Full factory recovery will erase anything on your computer (including personal files) and restores the system to factory settings (when first purchased).
- After you selected an option, click Next
- Select Yes at the “Are you sure you want to continue?” screen
- Click Next
- Wait for the process to finish
- At the Recovery is complete screen, click Finish
- Your PC will now restart
- Follow the instructions on the screen to setup Windows Vista again
If you have the set of recovery discs, follow these steps:
- Power on the computer
- Insert CD #1 in the disk tray of your computer before Windows loads
- When the eMachines logo is displayed on your monitor, press the F12 key
- At the Boot Menu screen, select the CD/DVD option
- Press Enter
- Select Restore from the list on the left
- Select Completely Restore System to Factory Defaults
- Insert the CDs or DVDs when prompted
Restore Windows 7
If you can boot into Windows 7
If you don’t have the recovery software provided by eMachines, download our recovery and repair disk for eMachines.
If you’re able to boot into Windows 7, use the Recovery Management software to restore the operating system.
eMachines Recovery Management gives you 3 options to choose from as part of the restore process:
- Completely Restore System to Factory Default: this option will delete all data from your computer and it would restore it to factory settings (when first purchased).
- Restore Operating System and Retain User Data: this option will move your personal files to a “backup” folder, while it restores your operating system to its default settings.
- Reinstall Drivers or Applications: this option will reinstall drivers and applications.
The steps are:
- Go to Start and find the eMachines Recovery Management application either by going to All Programs or by typing
recoveryin the search field - Click Restore from the menu on the left
- Choose what type of restore you want: Completely Restore System, Restore Operating System or Reinstall Drivers or Applications
- You may be prompted to enter the password. Do so and then click OK.
- Follow any wizard instructions left to complete the process
If you can’t boot into Windows 7
If you don’t have the recovery software provided by eMachines, download our recovery and repair disk for eMachines.
If you have the set of recovery discs, follow these steps to restore the PC:
- Start the computer
- Insert the first disk in the CD/DVD drive
- Restart the computer again and hold the R key to enter the Options menu
- Select a restore option: Non-Destructive System Restore or Full System Restore.
The Full System Restore process deletes all your files from the computer. Backup your files!
- Follow the on-screen instructions of the wizard to complete the process
If you can’t boot into Windows 7 or you don’t have the recovery disks, then follow these steps to boot from the recovery partition instead:
- Restart the computer
- Press F11 before Windows loads
- System Recovery software should now load
- Select any of the 2 available options: Non-Destructive System Restore or Full System Restore.
The Full System Restore process will delete all your files from the computer. Backup your files!
- Follow the on-screen instructions to complete the restore process
Restore Windows 8
If you can boot into Windows 8
If you don’t have the recovery software provided by eMachines, download our recovery and repair disk for eMachines.
If you upgraded from Windows 7 to Windows 8 and have the eMachines Recovery Management software, follow these steps to restore your system (steps taken from the Gateway recovery disk guide):
- Power on your computer
- Press the
and C key to begin a search
- Type
recoveryand click eMachines Recovery Management - Click on Restore Factory Settings, at the Restore tab from the left menu
- Click Next
- Click Fully clean the drive option
- Click Reset
- Your computer will restart and begin the restore process
If you can’t boot into Windows 8
If you don’t have the recovery software provided by eMachines, download our recovery and repair disk for eMachines.
If the recovery partition on your PC is still intact, follow these instructions instead:
- Restart the computer
- Press the Alt and F10 keys when the eMachines logo appears
- At the next screen, select Restore Operating System to Factory Defaults
- Read the text at the Notice screen
- Click Next
- Wait for the process to finish
If you have a set of recovery discs, follow these instructions:
- Power on the computer
- If you have a USB flash drive as a recovery media, go to BIOS first and make sure the “USB HDD” option is at the top of the list in the Boot tab. Save the changes, exit BIOS and power on your computer.
- Select a keyboard language
- Go to Troubleshoot > Reset your PC
- Click Next to confirm the action
- Choose Windows 8 as your operating system from the list
- Select Yes, repartition the drives if you no longer have the recovery partition. Otherwise, select No, keep the existing partitions.
- Select Fully clean the drive
- Click Reset
- Wait for the process to finish
- At the Choose an option screen, remove the recovery media from your drive
- Click Continue
- Follow any on-screen instructions to continue setting up Windows 8 again
Troubleshooting
Boot into the recovery partition
Some eMachines models have a recovery partition installed on your hard drive that you can boot to and recover or restore a system.
To access this partition, follow these steps:
- Boot your system
- Press Alt and F10 several times before the eMachines logo appears
- Choose to boot from the HDD and then press Enter, if you have this option
If you don’t a recovery partition installed on the computer, use your recovery CDs or go to Download recovery disk for eMachines. to fix your computer.
Before you continue with the process to restore your computer using the recovery partition, check the BIOS settings:
- Boot into BIOS by press F2 during the initial boot, before Windows or eMachines logo appears
- Make sure the eMachines disk-to-disk recovery (D2D) is Enabled
- Save the changes
Restore without a disc
You can restore an eMachines computer without the recovery disc by either booting in the recovery partition or by launching the eMachines Recovery Management software from Windows directly.
You can find the Recovery Management software by going to Start > All Programs > eMachines > eMachines Recovery Management.
If you can’t boot into Windows, boot into the recovery partition instead: press Alt and F10 during boot (find more details here).
If the partition isn’t available, go to Download recovery disk for eMachines.
More Information
Support Links
- Easy Recovery Essentials for Windows – our repair and recovery disk.
It’s an easy-to-use and automated diagnostics disk. It’s available for Windows 8, Windows 7 and Windows Vista. It’s also available for Windows XP and Windows Server.Read more at Windows Recovery Disks.
- The NeoSmart Support Forums, member-to-member technical support and troubleshooting.
- Get a discounted price on replacement setup and installation discs: Windows XP, Windows Vista, Windows 7, Windows 8.
Applicable Systems
This Windows-related knowledgebase article applies to the following operating systems:
- Windows XP (all editions)
- Windows Vista (all editions)
- Windows 7 (all editions)
- Windows 8 (all editions)
- Windows 8.1 (all editions)
- Windows Server 2003 (all editions)
- Windows Server 2008 (all editions)
- Windows Server 2012 (all editions)
Applicable Models
This eMachines-related knowledge base article applies to the following computer models from eMachines Inc.:
- eMonster series: 1000, 1000B, 500, 500A, 550, 550R, 600, 700K, 800
- Desktop series: 1352G-03W, 633ID, A26EV17F
- Desktop C series: C1641, C1844, C1904, C2160, C2280, C2480, C2684, C2685, C2782, C2825, C2881, C3060, C3070, C6207, C6415, C6423, C6535, C6537
- Desktop D series: D2046, D2244, D2246, D2266, D2346, D2386, D2586, D2685, D2823, D2880, D3024, D3107, D3123, D3315, D3415, D4362, D5039, D6405, D6417, D6419
- Desktop EL and ET series: EL1200 (05W, 06W, 07W), EL1210, EL1220, EL1300G (02W), EL1331G, EL1333G, EL1352 and EL1352G, EL1352G (01W, 41W-02W), EL1358G, EL1360G, EL1600-01, EL1850 (01E), EL1852G (52W), EL2352, ET1160, ET1161, ET1161-07, ET1300-02, ET1331 (40E), ET1331G (03W), ET1641, ET1810 (03R, 03W), ET1831, ET1850
- Desktop H series: H2341, H2482, H2542, H2602, H2615, H2825, H2862, H2865, H3060, H3106, H3256, H3308, H3990, H5036, H5038, H5042, H5048, H5048A, H5088, H6207, H6212, H6216, H6528, H6535
- Desktop S series: S1642, S1862, S1940, S2482, S2485, S3649
- Desktop T series: T1090, T1096, T1100, T1105, T1106, T1110, T1115, T1116, T1120, T1125, T1140, T1150, T1220, T1221, T1300, T1360, T1400, T1440, T1600, T1740, T1742, T1801, T1840, T1842, T1855, T1860, T1862, T1905, T1980, T2040, T2042, T2080, T2082, T2085, T2200, T2200SE, T2240, T2241, T2245, T2260, T2341, T2385, T2460, T2482, T2484, T2542, T2596, T2605, T2615, T2625, T2642, T2672, T2682, T2692, T2698, T2742, T2778, T2792, T2796, T2798, T2824, T2825, T2842, T2858, T2862, T2865, T2875, T2878, T2882, T2885, T2890, T2891, T2892, T2893, T2894, T2895, T2896, T2898, T2899, T2958, T2984, T3025, T3042, T3062, T3065, T3085, T3090, T3092, T3095, T3096, T3100, T3101, T3103, T3104, T3106, T3110, T3112, T3114, T3116, T3120, T3124, T3256, T3265, T3302, T3304, T3306, T3308, T3312, T3393, T3395, T3406, T3408, T3410, T3414, T3418, T3422, T3504, T3506, T3508, T3512, T3516, T3516A, T3522, T3524, T3604, T3612, T3616, T3624, T3626, T3638, T3640, T3642, T3646, T3656, T3828, T3830, T3882, T3958, T3985, T3990, T3995, T3998, T4010, T4060, T4080, T4130, T4150, T4155, T4160, T4165, T4170, T4200, T4480, T4510, T4511, T4697, T4852, T4892, T5010, T5016, T5020, T5022, T5026, T5036, T5042, T5046, T5048, T5052, T5062, T5082, T5086, T5088, T5212, T5216, T5224, T5226, T5230, T5234, T5246, T5248, T5254, T5274, T5526, T6000, T6003, T6209, T6211, T6212, T6216, T6410, T6412, T6414, T6420, T6426, T6520, T6522, T6524, T6528, T6532, T6534, T6536, T6538, T6540, T6542, T6544
- Desktop W series: W1500, W1640, W1700, W1800, W2040, W2047, W2060, W2247, W2260, W2646, W2686, W2785, W2828, W2888, W2925, W3050, W3052, W3080, W3105, W3107, W3115, W3118, W3400, W3410, W3502, W3503, W3506, W3507, W3507A, W3609, W3611, W3611A, W3615, W3619, W3621, W3622, W3623, W3629, W3644, W3650, W3653, W4065, W4605, W4620, W4682, W4685, W4885, W5233, W5243, W6409