Get the fix for the “Failed to find OS Loader” error for Windows Vista, Windows 7, Windows 8 and Windows 8.1
Contents
About “Failed to find OS Loader”
The following information on this error has been compiled by NeoSmart Technologies, based on the information gathered and reported by our global network of engineers, developers, and technicians or partner organizations.
Synopsis
The error “Boot manager failed to find OS loader” is displayed when Startup Repair fails to correct problems with a non-booting PC.
In particular, this message indicates that Startup Repair was unable to find the correct BOOTMGR bootloader at the expected location(s). While the usual fix for a missing bootloader is to run Startup Repair, in this case, Startup Repair is unable to correct the problem for one or more reasons.
Symptom 1: Startup repair fails with message “Boot manager failed to find OS loader”
When attempting to use the automated repair feature of Startup Repair, it attempts to repair your PC but fails. Clicking to view the contents of Startup Repair’s “Diagnosis and repair details” reveals the error to be “Boot manager failed to find OS loader” with one or more failed repair attempts. Example message:
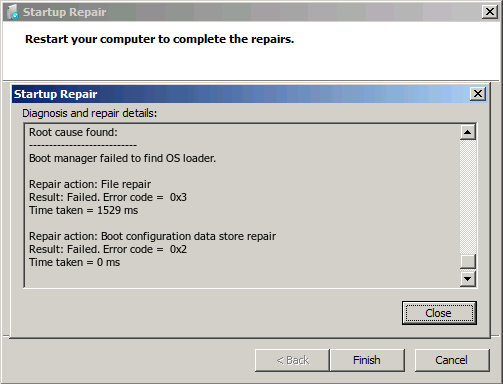
The full text:
Root cause found:
---------------------------
Boot manager failed to find OS loader.

Repair action: File repair
Result: Failed. Error code =  0x3
Time taken = 1529 ms

Repair action: Boot configuration data store repair
Result: Failed. Error code =  0x2
Time taken = 0 ms
Causes of this Error
This error has been known to occur as a result of one or more of the following:
Cause 1: Corrupt boot volume
Corruption of the boot partition on a Windows PC can cause this error to present.
The filesystem on the boot partition can become corrupted as a result of an unsafe shutdown, sudden power loss, unsafe removal of local and/or external drives, or physical damage to your computer’s hard disk, amongst others.
Corruption of the boot partition is known to occur on both NTFS and FAT32 partitions.
Cause 2: Bootloader was deleted
Windows Vista, Windows 7, Windows 8 and Windows 8.1 use the new BOOTMGR bootloader.
On Windows Vista, BOOTMGR is found in the root partition of your Windows installation drive (normally drive C:\).
On Windows 7 and above, BOOTMGR is typically located on a separate 100 MiB NTFS partition created at the beginning of your drive during setup. This file can be deleted due to a failed Windows Automatic Update installation, a failed attempt at upgrading the OS, or by viruses and other malware.
Cause 3: Hard disk was removed
If your computer had more than one hard disk, and you have removed or replaced one or more of these disks, this error can occur.
If the disk that was removed or replaced was the first boot device in the BIOS, the boot files would have been installed to this drive, even if Windows was on a different physical disk.
It’s important to be sure that the boot files have been moved to a different drive before replacing a boot disk in your PC.
Fix Cannot find OS Loader on Windows
Fix #1: Use Easy Recovery Essentials
Easy Recovery Essentials is guaranteed to fix the “Failed to find OS Loader” error automatically using its built-in Automated Repair option. EasyRE is currently available for Windows XP, Vista, 7, 8, Windows 10, and Windows 11 and can be downloaded and created on any PC.
- Download Easy Recovery Essentials. Make sure to note your Windows version (XP, Vista, 7, 8, 10, or Windows 11) before you download EasyRE. This guide can help you identify what version of Windows you have installed.
- Burn the image. Follow these instructions on how to burn the bootable ISO image very carefully, as making a bootable CD can be tricky! Alternatively, these instructions explain how to create a bootable EasyRE recovery USB stick/drive.
- Boot up your PC from the Easy Recovery Essentials CD or USB you created.
- Once EasyRE is running, choose the “Automated Repair” option and click Continue.

Choose “Automated Repair” in Easy Recovery Essentials
- After EasyRE scans your computer’s drives, identify and select the drive letter for your Windows installation from the list, and then click on the Automated Repair button to begin.

Choose the drive associated with the Windows installation you’re trying to repair.
- Easy Recovery Essentials will start analyzing the selected drive for problems. EasyRE will test for and attempt to automatically correct errors with the disk, partition, bootsector, filesystem, bootloader, and registry. No intervention is required, as EasyRE’s repair is fully automated:

Easy Recovery Essentials searches for errors and makes corrections to the selected Windows installation.
- Once the process is complete, EasyRE will report its findings. Click on the Restart button to reboot your PC and test the changes.
- The “Failed to find OS Loader” error should now be fixed as your PC begins to load:


You can download Easy Recovery Essentials from here.
Fix #2: Use the System File Checker
Windows Setup CD/DVD Required!
Some of the solutions below require the use of the Microsoft Windows setup CD or DVD. If your PC did not come with a Windows installation disc or if you no longer have your Windows setup media, you can use Easy Recovery Essentials for Windows instead. EasyRE will automatically find and fix many problems, and can also be used to solve this problem with the directions below.
Windows ships with a tool called sfc, which stands for the System File Checker. More information about how sfc operates and when to use it can be found in our knowledgebase. The following steps will launch the command line option from Startup Repair on the Windows setup disc and use the system file checker to attempt a repair of your PC.
- Insert your Windows installation DVD into your PC’s CD-ROM drive,
- Fully power down your PC, and make sure it has fully shut off,
- Power up your PC,
- Press any key when you see “Press any key to boot from CD or DVD..”
- Click the link titled “Repair your computer” in the bottom-lefthand corner, after first selecting your language and keyboard options.

- Wait for Startup Repair to scan your PC for Windows installations, then select your install from the list it shows:

- Choose “Command Prompt” from the list of available recovery options to begin:


Once the command prompt is launched, enter the following to use the System File Checker to check your installation for corrupted, invalid, or deleted system files. If the previous page showed that your Windows installation has a drive letter other than C:\, make sure to use that below!
sfc /scannow /offbootdir=C:\ /offwindir=C:\Windows
Once sfc has completed its scan, it will report its results like below:
Beginning system scan. This process will take some time.
Beginning verification phase of system scan.
Verification 100% completed.

Windows Resource Protection found corrupt files and successfully repaired them. OR
Windows Resource Protection found corrupt files but was unable to fix some of them.
Details are included in the CBS.Log windir\Logs\CBS\CBS.log. For example
C:\Windows\Logs\CBS\CBS.log
Fix #3: Manually rebuild the BCD, MBR, and bootsector
Problems booting up Windows can often be traced back to errors in the bootloader installation or configuration. Rebuilding your PC’s master boot record (MBR), partition bootsectors, and boot configuration data (BCD) can fix various problems with the BOOTMGR bootloader.
You can rebuild the BCD using bootrec.exe, a tool built found in the Windows Recovery Environment. Follow these steps:
- Insert your Windows installation DVD into your PC’s CD-ROM drive,
- Fully power down your PC, and make sure it has fully shut off,
- Power up your PC,
- Press any key when you see “Press any key to boot from CD or DVD..”
- Click the link titled “Repair your computer” in the bottom-lefthand corner, after first selecting your language and keyboard options.
- Wait for Startup Repair to scan your PC for Windows installations, then select your install from the list it shows:
- Choose “Command Prompt” from the list of available recovery options to begin:
- Once the command line has launched, type in the following commands in the Command Prompt and hit Enter after each command:
bootrec /fixmbr
bootrec /fixboot
bootrec /rebuildbcd
Unable to boot into the Windows setup CD?
See our guide on setting up a PC to boot from the CD or DVD for troubleshooting and more detailed instructions.
BCD not getting rebuilt?
There is an entire entry in our wiki dedicated to advanced manual repair of the bootloader that can also be followed, if necessary.
More Information
Linked Entries
Support Links
- Easy Recovery Essentials for Windows – our repair and recovery disk.
It’s an easy-to-use and automated diagnostics disk. It’s available for Windows 8, Windows 7 and Windows Vista. It’s also available for Windows XP and Windows Server.Read more at Windows Recovery Disks.
- The NeoSmart Support Forums, member-to-member technical support and troubleshooting.
- Get a discounted price on replacement setup and installation discs: Windows Vista, Windows 7, Windows 8.
Applicable Systems
This Windows-related knowledgebase article applies to the following operating systems:
- Windows Vista (all editions)
- Windows 7 (all editions)
- Windows 8 (all editions)
- Windows 8.1 (all editions)
- Windows Server 2008 (all editions)
- Windows Server 2012 (all editions)