This guide is about recovery disks for Samsung computers for the following versions of Windows: Windows XP, Windows Vista, Windows 7 and Windows 8.
A recovery disk is also known as a restore disc, repair disc, boot disc or rescue disk.
Looking for a recovery disk for Samsung? Download Easy Recovery Essentials, our recovery and repair disk for Samsung.
Depending on your computer model from Samsung, the recovery software may not be provided or may have a different version from the versions we’ve covered here. Also, some functions may differ slightly depending on the software version of your computer.
Samsung uses the Samsung Recovery Solution software for recovery, restoring and backing up your computer. Windows 8 computers have the Recovery software. If you don’t have the Samsung Recovery Solution software available on your computer, download the alternative recovery disk for Samsung.
![]()
Contents
Download recovery disk for Samsung
Easy Recovery Essentials works with any Samsung computer model and it’s compatible with the following Windows versions:
- Microsoft Windows 8 (read more on our Windows 8 Recovery Disk and Repair Disc Download article)
- Microsoft Windows 7 (read more on our Windows 7 Recovery Disk and Repair Disc Download article)
- Microsoft Windows Vista (read more on our Windows Vista Recovery Disk and Repair Disc Download article)
- Microsoft Windows XP (read more on our Windows XP Recovery and Repair Disk article)
- Microsoft Windows Server 2003, 2008 and 2012 (read more on our Windows Server 2008 and 2012 Recovery Discs Download article)
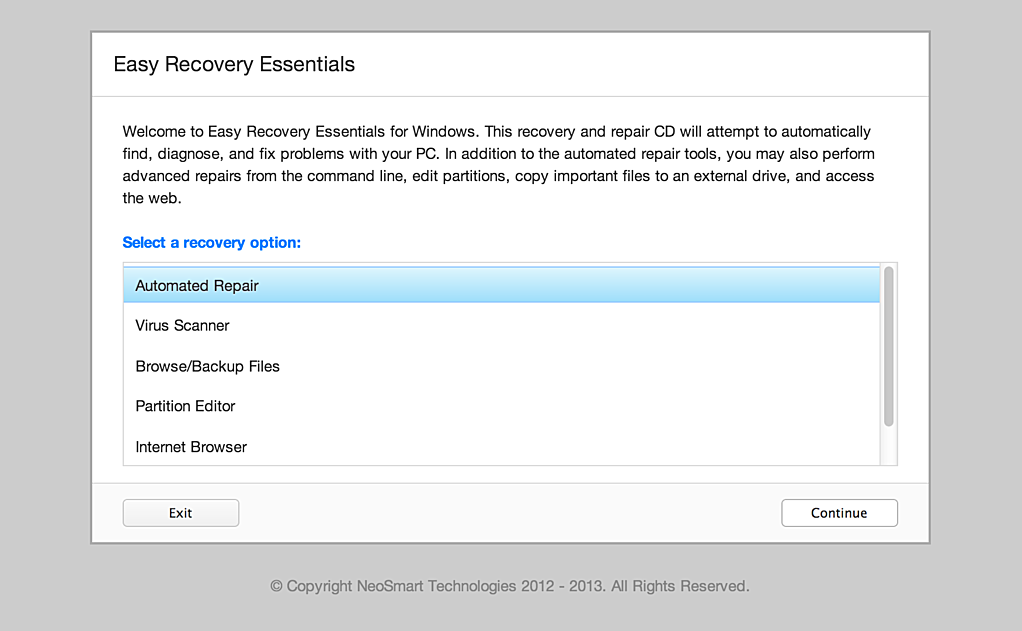
You can burn Easy Recovery Essentials directly to a CD, DVD or a USB flash drive and use its Automated Repair function to automatically find and fix boot errors.
Download Easy Recovery Essentials for Samsung
Note: Easy Recovery Essentials can not be used to install or reinstall Windows.
Restore a Samsung computer
Backup your files before you continue.
Depending on the type of “Restore” you choose provided by the software, this process of restoring your system may delete all your data (pictures, music, movies etc.) and any programs you may have installed after the last restore point created by the system.
Windows XP
If you don’t have the recovery software provided by Samsung, download our recovery and repair disk for Samsung.
Windows XP users may have the Samsung Recovery Solution III (3) version installed on their computers. This software is provided by Samsung and installed directly on a computer with Windows XP, at the time of purchase.
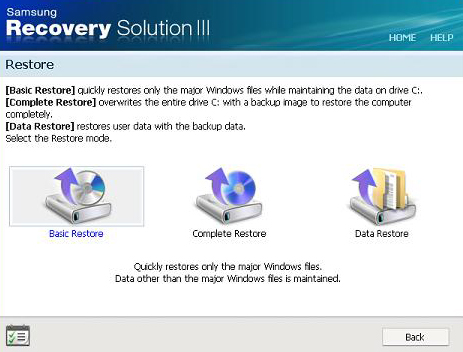
In Recovery Solution III (3), you can choose to perform the following type of restore:
- Basic Restore. Basic Restore reloads all Windows-related files, but leaves your personal files (movies, pictures etc.) intact.
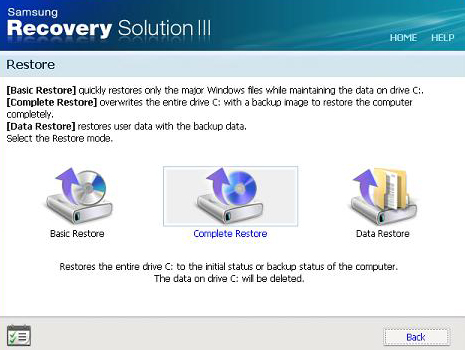
- Complete Restore. Complete Restore overwrites the entire C:\ drive with a backup image to restore the computer.
- Data Restore. Data Restore restores your user data with any backup data available.
Recovery Solution III (3) allows you to:
- Backup and restore your files
- Backup the entire PC
- Restore your PC to an earlier date from a previously created backup
To perform the Basic Restore using Recovery Solution III (3) in Windows XP, follow these steps:
- Go to Start
- Go to All Programs
- Find the Samsung Recovery Solution III (3) software and open the software
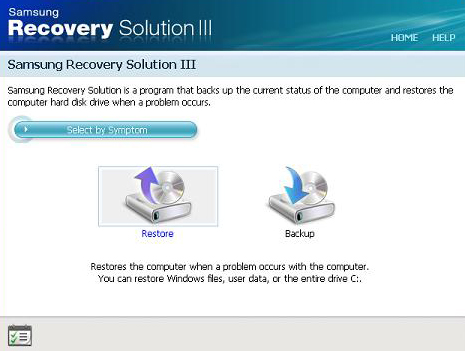
- Click Restore
- At the Restore window, choose Basic Restore
- Click Next
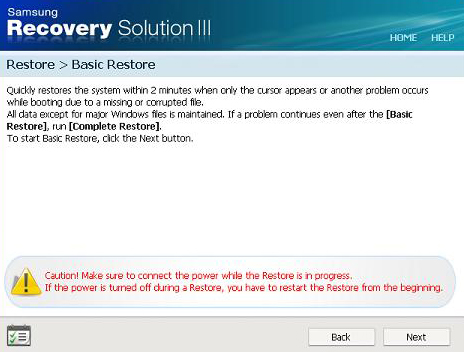
- The Recovery Solution 3 software will ask to restart the computer. Press OK to do so.

- After restarting your computer, the software will launch automatically and will begin the restore process.
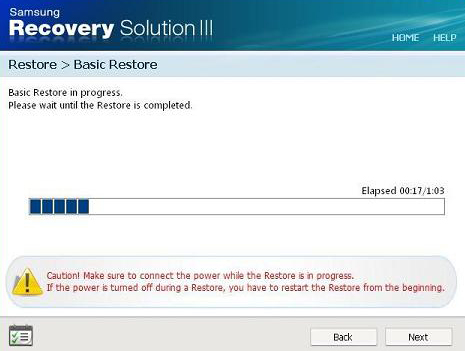
- Wait for the process to finish
- Click Yes, at the “Restart the system?” window.
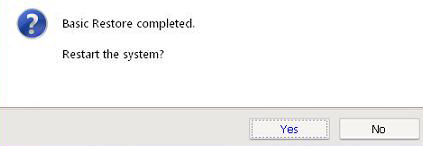
- The restore process is completed
To perform the Complete Restore using Recovery Solution III (3) in Windows XP, follow the below steps.
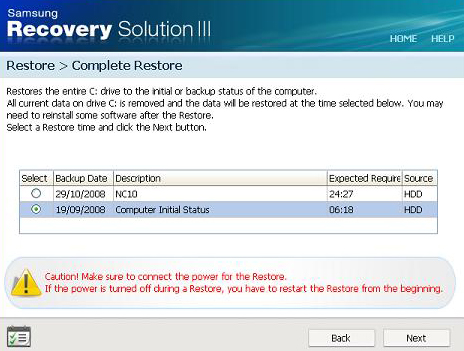
The Complete Restore features restores your computer to the latest available “Complete Restore” made. If you haven’t created a Complete Restore before, it would restore your computer to its initial settings when you first purchased the computer.
Complete Restore deletes all data from the system! Backup your files.
- Restart the computer
- Press the F4 key when the Samsung logo appears
- Click Yes, at the Licensing Agreement window
- Select Restore
- Select Complete Restore
- Select what backup to restore from the list
- Click Yes at the “Start Restore?” window
- Wait for the process to complete
- Click OK to restart the system, when prompted
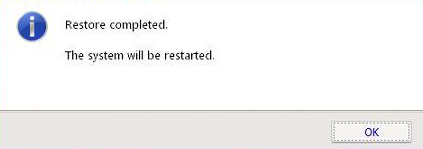
- The process is complete
To perform the Data Restore using Recovery Solution III (3) in Windows XP, follow these steps:
- Open the Recovery Solution 3 software by going to Start and then All Programs
- Click Restore

- At the Restore window, choose the last option: Data Restore
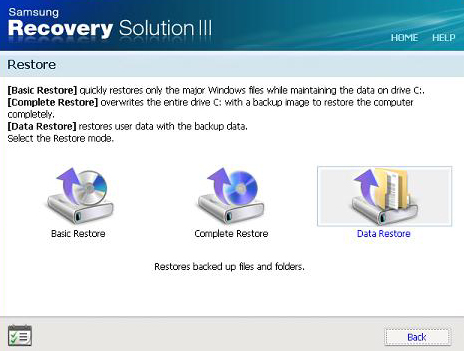
- Choose the latest backup available for your computer from the list and what data to restore
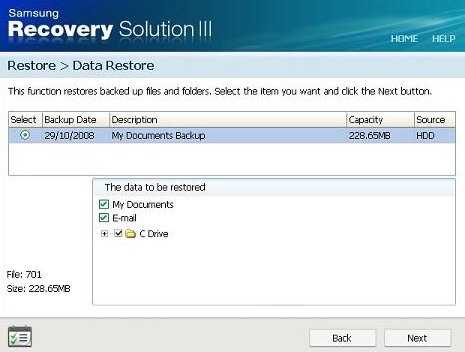
- Once selected, click Next
- Choose if you’d to restore the files to the same location or to a new location
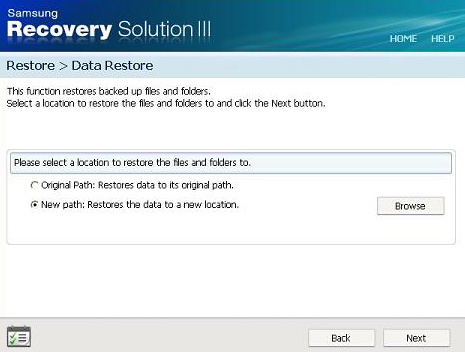
- Click Next
- Click Yes to restart the system
- Wait for the computer to restart and Recovery Solution III (3) to re-open automatically
- If you’re prompted to overwrite certain files, click Yes to overwrite the mentioned files and use the backup or click No to keep the current files
- At the “Restore completed.” window, click OK
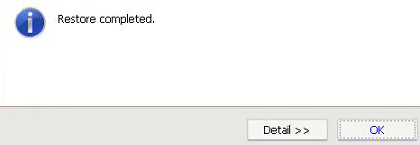
- The process is complete
If you can’t boot into Windows XP to launch Recovery Solution III (3), follow these steps:
- Boot your computer
- Press the F4 key when the Samsung logo appears on your screen
Windows Vista
If you don’t have the recovery software provided by Samsung, download our recovery and repair disk for Samsung.
Computers from Samsung with Windows Vista usually have the Samsung Recovery Solution 4 software installed.
Recovery Solution 4 has several options for a restore:
- Basic Restore. This option reloads Windows-related files and keeps your personal files intact.
- Complete Restore. This option restores from a previously created Complete Backup.
- Data Restore. This option restores a backup created with Data Backup.
- System Software Installation. This option reloads all Samsung related applications and drivers.
If you’re not able to boot into Windows Vista to run Recovery Solution 4, follow these steps:
- Boot your computer
- Press the F4 key when the Samsung logo appears on your screen
Perform a Basic Restore using Recovery Solution 4 in Windows Vista with these instructions:
- Restart your computer
- Press the F4 key when the Samsung logo appears
- Click Yes to accept the License Agreement
- Select Restore
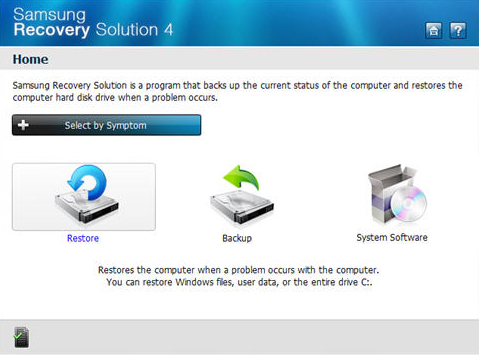
- Select Basic Restore
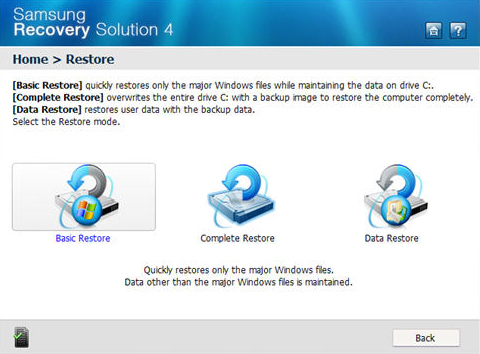
- Click Next
- Click OK to restart the computer
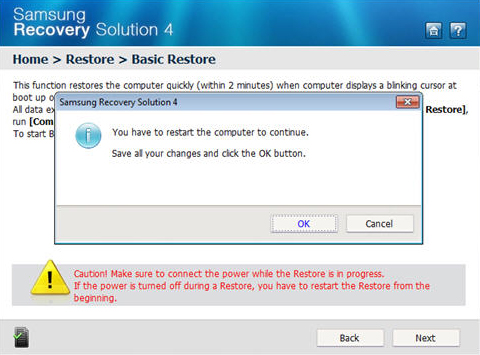
- Your computer will restart and the software will relaunch automatically
- Accept the License Agreement again and wait for the restore process to finish
- When the software finished, select Yes at the “Restart the system?” question
- The process is now complete
Perform a Complete Restore using Recovery Solution 4 in Windows Vista with these instructions:
- Boot your computer and start pressing the F4 key
- Accept the License Agreement by selecting Yes
- Select Restore

- Select Complete Restore
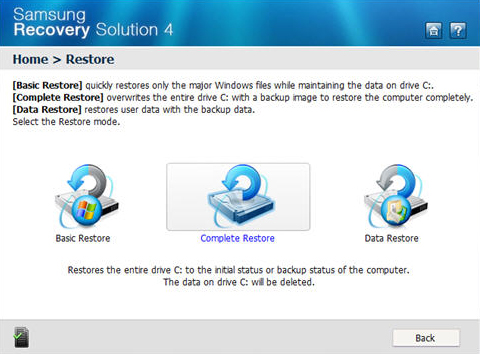
- Select what backups you want to restore from the list of available backups
- Click OK to restart your computer. The software will relaunch automatically.
- After your computer is restarted, the software will open again. Click Yes at the “Start Restore?” question.
- Wait for the process to finish
- Click OK at the “Restore completed.” window
- Your computer will restart
- The restore process is now complete
An additional restart might be needed to apply changes to Windows.
Also, depending on your system, you may receive a “Hyperspace” notification. If fo, follow these tips:
- Choose Reinstall to overwrite the currently installed Hyperspace
- Choose Uninstall to remove Hyperspace from your computer
- Click Cancel to leave Hyperspace as it is
You can perform a Data Restore using Recovery Solution 4 in Windows Vista with these instructions:
- Boot your computer and press the F4 key
- Accept the License Agreement
- Select Restore

- Select Data Restore
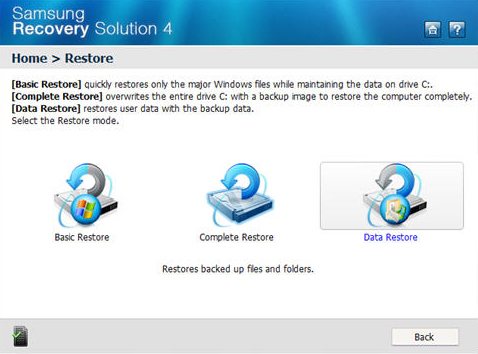
- Choose what backup you’d like to restart. If you don’t have any backups created, this list will be empty at this step.
- Select your backup and click Next
- Select what path you want for the backup: Original path will restore the backup to its original path, while New path will restore the backup to a new location
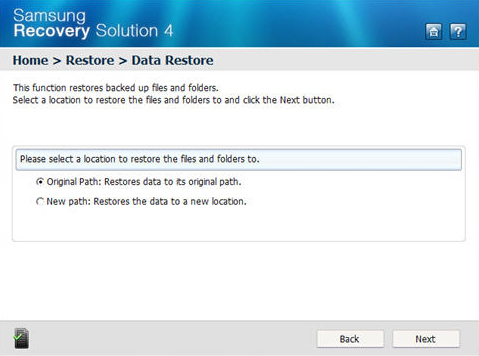
- Click Yes to start the process
- Wait for the process to finish
- Click OK at the “Restore completed.” window
- The process is complete
Perform a System Software Installation using Recovery Solution 4 in Windows Vista with these instructions:
- Open the Recovery Solution 4 software by booting your computer and pressing the F4 key
- Accept the License Agreement by clicking Yes
- Select System Software

- Choose System Software Installation
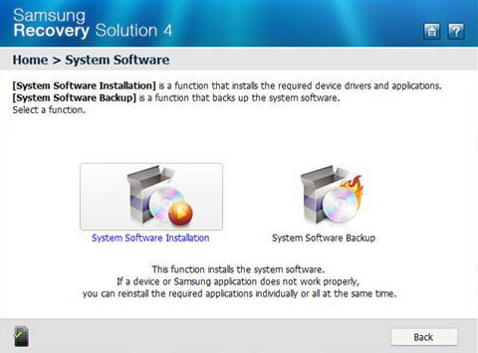
- Select Recommended Items or Minimum-Recommended
- Click Install Now!
- At the “Reboot system?” question, choose Yes and click Finish
- Your computer will restart
- The process is complete
Windows 7
If you don’t have the recovery software provided by Samsung, download our recovery and repair disk for Samsung.
Windows 7 users usually have the Samsung Recovery Solution 5 installed on their computers.
With Samsung Recovery Solution 5 you can restore your computer by choosing any of the two (2) available options:
- Basic Restore
- Complete Restore
- Data Restore
Start a Basic Restore using Recovery Solution 5 in Windows 7 with these instructions:
- Boot your computer and start Windows 7
- Go to Start and find the Samsung Recovery Solution 5 folder
- Open Samsung Recovery Solution 5
- Click Restore
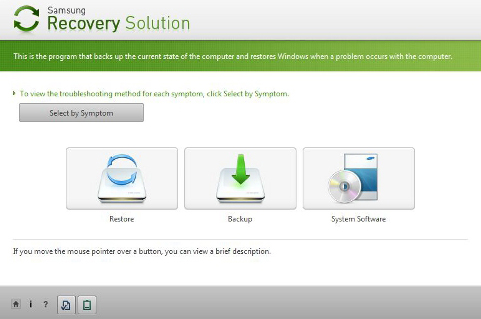
- Select Basic Restore
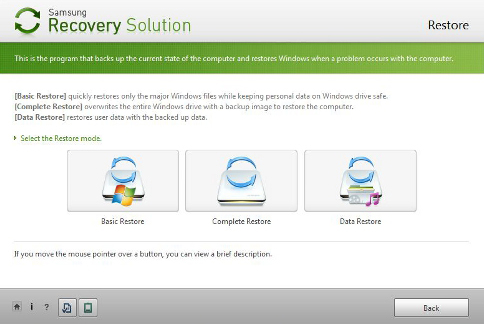
- Click Next
- Click OK at the “You have to restart the computer to continue.” screen
- The software will restart your computer and will reload automatically
- Wait for the process to finish
- Click Yes to restart the computer once the process is complete
- The restore process is now complete
To start a Complete Restore using Recovery Solution 5 in Windows 7, follow these steps:
- Boot into Windows 7 and open Samsung Recovery Solution 5 by clicking Start > All Programs. If you can’t boot into Windows 7, press the F4 key at boot when the Samsung logo appears
- Click Restore

- Select Complete Restore

- Select what backup you want to restore
- Click Next
- Click OK at “You have to restart the computer to continue.”
- Your computer restart and the software will relaunch automatically
- Click Yes when prompted to delete all data on drive C:\
- Wait for the process to complete
- After the process is complete, click OK to restart your computer
- The restore process is now complete
To start a Data Restore using Recovery Solution 5 in Windows 7, follow these steps:
- Boot into Windows 7
- Go to Start, then All Programs
- Open the Recovery Solution 5 software
- Click Restore

- Click Data Restore

- Select what backup you’d like to restore and click Next
- Select what path you want for this restore. Original path will restore the backup to its original location, while New path will restore the backup to a new location.
- Click Yes at the “Do you want to start Restore?” question
- Wait for process to finish
- Click OK at the “Restore completed.” screen
Windows 8
If you upgraded to Windows 8
If you don’t have the recovery software provided by Samsung, download our recovery and repair disk for Samsung.
If you upgraded your system to Windows 8 you need to update the Samsung Recovery Solution 5 to the 5.6 version.
Once updated, you can perform a Complete Restore with Recovery Solution 5.6 for Windows:
- Open Recovery Solution 5.6
- Click Restore
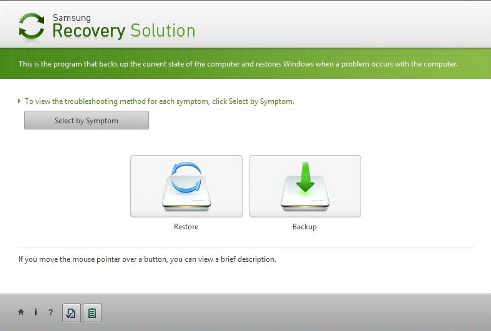
- Select Complete Restore
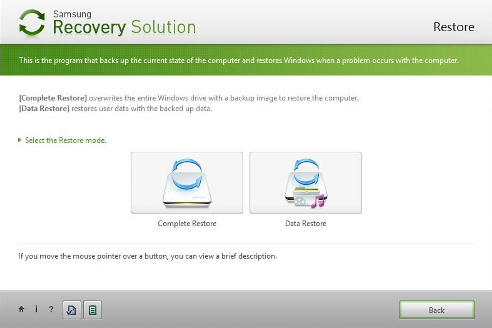
- Select what backup you want to restore and click Next
- Click OK to restart the computer and being the restore process
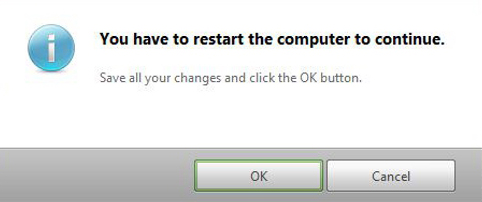
Complete Restore erases all your data from the C:\ drive. Backup your files before you continue or choose to perform a Data Backup.
- Your computer restart and the software will reopen
- Wait for the process to finish
- Click OK to restart the computer, when prompted
- After you restart your computer, the process is complete
An additional restart may be required for Windows 8 to apply its own changes.
To perform a Data Restore in Windows 8 using Recovery Solution 5.6, follow these steps:
- Open the Recovery Solution 5.6 software
- Click Restore

- Select Data Restore
- Select the backup to restore
- After you made your select, click Next
- Select the path where to restore the backup: its original location or to a new location
- Click Yes at the “Do you want to start Restore?”
- Wait for the process to finish
- Click OK at the “Restore completed.” screen
If Windows 8 was already installed
If you don’t have the recovery software provided by Samsung, download our recovery and repair disk for Samsung.
If your Samsung computer already had Windows installed, you can perform a “Recovery” by following the steps below:
- At Start, type
recovery. If you can’t boot into Windows 8, boot your computer and press the F4 key when the Samsung logo appears to boot into Recovery mode. - Select Recovery from the search results list.
- Accept the License Agreement, if prompted, by clicking Agree
- Select Recover from the main menu on the left

- Select a restore point you’d like to restore to. If you don’t have any restore points created, the software will restore your computer to its default settings (when purchased).
- After you selected the restore point, click Recover
- Click OK to reboot the system
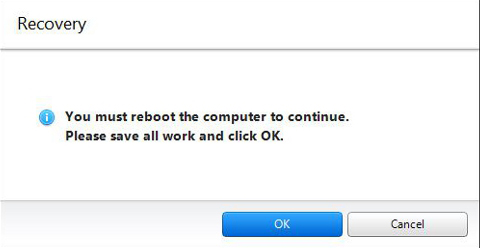
- Wait for the software to open again
- At the Start Recovery screen, click OK
- When the recovery process is finished, click OK to restart the system
- The restore process is now complete
Backup a Samsung computer
The Recovery Solution software provided by software can be used to create a backup of your computer and your files.
Creating a backup will allow you to restore your computer in the future, if an error appears preventing you from starting your computer.
Windows XP
If you don’t have the recovery software provided by Samsung, download our recovery and repair disk for Samsung.
Computer with Windows XP usually have the Recovery Solution III (3) version installed that can be used to create a backup.
To launch the software, you can either:
- Go to Start > All Programs > Samsung > Samsung Recovery Solution III > Samsung Recovery Solution III
- Press the F4 key when the Samsung logo appears on your screen, after you restart the computer. Use this option if you can’t boot into Windows XP.
Recovery Solution III (3) allows you to create 2 types of backup:
- Complete Backup. Complete Backup will create a backup of the entire C:\ drive
- Data Backup. Data Backup will create a backup of your hard drive to another location
To perform a Complete Backup using Recovery Solution III (3) in Windows XP, follow these steps:
- Boot your computer
- Press the F4 key when the Samsung logo appears on your screen
- Select Backup
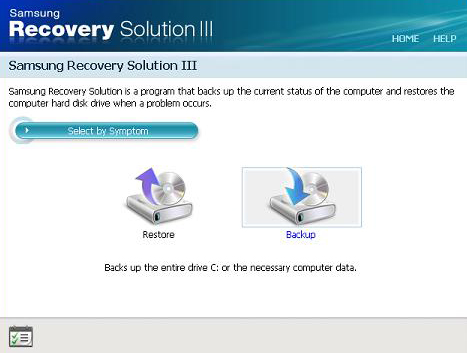
- Select what type of backup you’d like to perform: Complete Backup
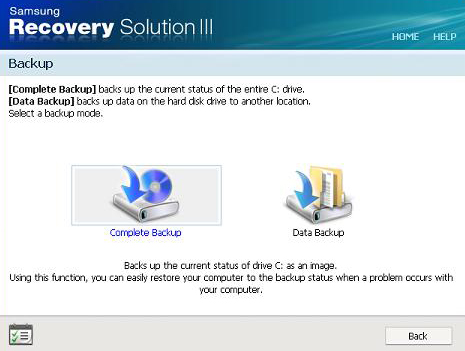
- Enter a description for this backup and choose a location where to save the backup to. Make sure you have enough space.
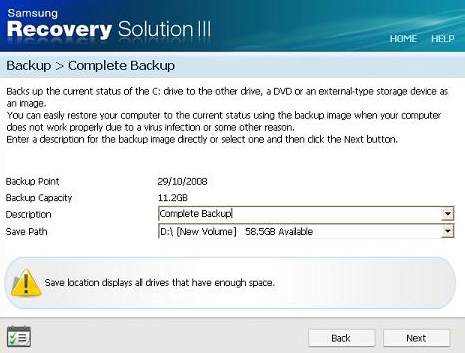
- Click Yes, at the “Do you want to start the backup?” question
- Click Next
- Wait for the process to finish
- Click Yes at the “Backup completed.” window
- Your computer will now restart
- The process is complete
To perform a Data Backup using Recovery Solution III (3) in Windows XP, follow these steps:
- Restart your computer
- Press the F4 key when the Samsung logo appears to open the Recovery Solution III (3) software
- Select Backup

- Select Data Backup
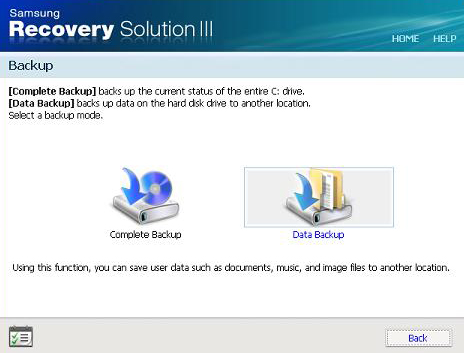
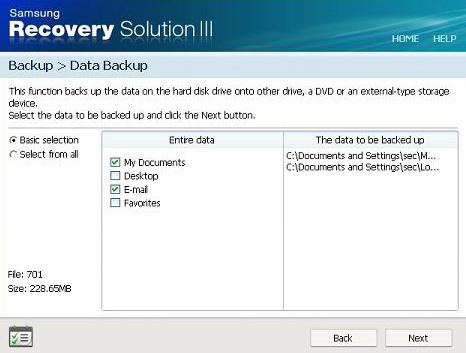
- Select what files you want to backup:
- Basic selection. This option selects the files from My Documents, Desktop, Email and Favorites
- Select from all. This option allows you to select folders and files individually.
- Click Next
- Enter a description for this backup and choose where to save it (at Save Path)
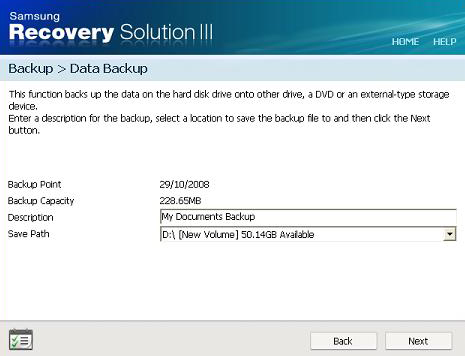
- Click Yes at the “Do you want to start the backup?” question
- Wait for the process to complete
- Click OK at “Backup completed.”
Windows Vista
If you don’t have the recovery software provided by Samsung, download our recovery and repair disk for Samsung.
You can create a backup of your Samsung computer using the Recovery Solution 4 software.
Recovery Solution 4 allows for 3 types of backups to be created:
- Complete Backup. This option creates a backup of the entire C:\ drive which you can restore later in case of a system failure.
- Data Backup. With this option you can choose what files and folders to backup.
- System Software Backup. This option backups Samsung related applications and drivers.
To perform a Complete Backup using Recovery Solution 4 in Windows Vista, follow these steps:
- Open the Recovery Solution 4 by going to Start > All Programs or reboot your system and press the F4 key when the Samsung logo appears
- Select Backup from the main window
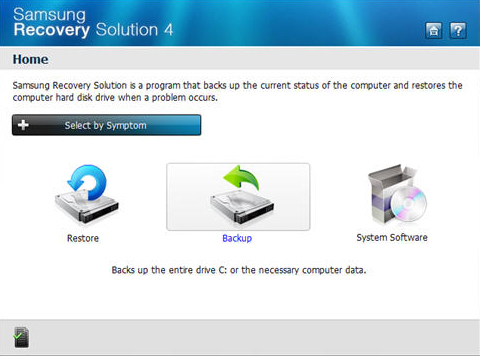
- Select Complete Backup
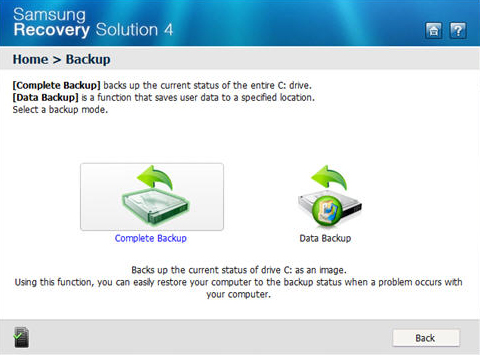
- Choose a description for this backup and a path where to save it
- Then click Next
- Click OK to restart your computer. This is mandatory to complete the backup process.
- Your computer will restart and Recovery Solution 4 reloads automatically
- Click Yes at the “Do you want to start the backup?” question
- Wait for the process to finish
- Click Yes at the “Restart the system?” question
- The backup process is now complete
To perform a Data Backup using Recovery Solution 4 in Windows Vista, follow these steps:
- Open the software either by going to Start > All Programs, if you can boot into Windows Vista or reboot your system and press the F4 key when the Samsung logo appears
- Select Backup from the main window

- Select Data Backup
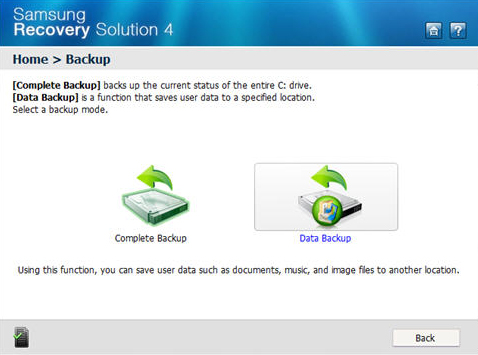
- Select what type of files you want to backup. To select files and folders individually for backup, select “Select from all” from the left.
- Enter a description of this backup and a save path where to save it
- Click Yes at the “Do you want to start the backup?” question
- Wait for the process to finish
- Click OK at the “Backup completed.” window
To perform a System Software Backup using Recovery Solution 4 in Windows Vista, follow these steps:
- Open the software from Start > All Programs or boot your computer or press the F4 key when booting your computer, if you can’t open Windows Vista
- Choose System Restore

- Select System Software Backup
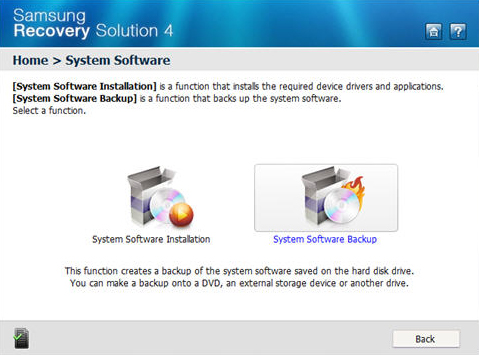
- Choose a save path to save this backup. Make sure you have enough space for this.
- Click Next
- Click Yes at the “Continue?” question
- Wait for the process to finish
- Click OK at the “System Software Backup complete.” window
Windows 7
If you don’t have the recovery software provided by Samsung, download our recovery and repair disk for Samsung.
Windows 7 users can create 2 types of backups for their computers: Complete Backup and Data Backup.
To perform a Complete Backup using Recovery Solution 5 in Windows 7, follow these steps:
- Boot into your Windows 7 system and open the software
- Click Backup

- Click Complete Backup
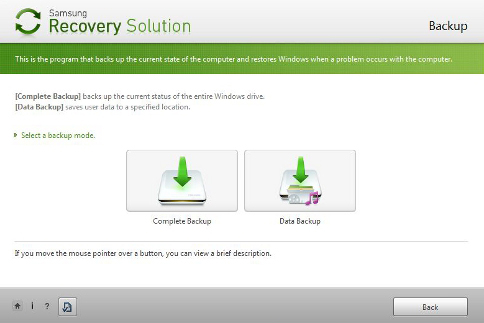
- Enter a description to create this backup and choose where to save it: locally or to a portable media. Recovery Solution 5 supports only the following type of media: DVD+R, DVD-R, DVD+RW, DVD-RW
- Click Next
- The next screen allows you to select 2 optional features: LiveImaging and System Software Backup.
LiveImaging will create a backup without restarting the computer. However you can’t use the computer during the backup creation process.
System Software Backup will create a backup of preinstalled Samsung related applications and drivers.
You are not required to choose any of these 2 options.
- Your computer may restart, depending on the choice you made earlier
- Recovery Solution 5 will reload again
- Click Yes to start the backup process
- Wait for the process to continue
- Click Yes to restart the computer, when prompted
- The Complete Backup process is now complete
To perform a Data Backup using Recovery Solution 5 in Windows 7, follow these steps:
- Open Recovery Solution 5
- Click Backup

- Click Data Backup

- Select what type of files you’d like to backup. To manually select files and folders, choose the “Select from all” option
- Click Next
- Enter a description for this backup and choose a save path for it. If you select to save it on a DVD, please note that Recovery Solution 5 only supports DVDs: DVD+R, DVD-R, DVD+RW, DVD-RW
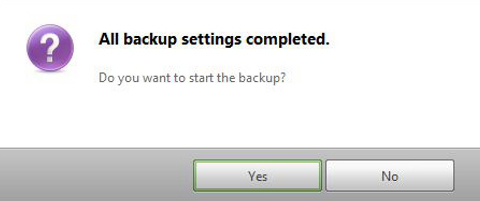
- Click Yes at the “All backup settings completed.” screen
- Wait for the process to finish
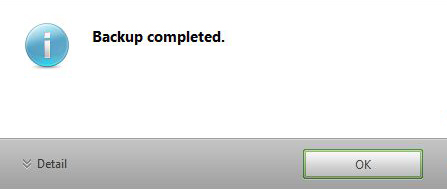
- Click OK at the “Backup completed.” message
- The Data Backup process is now complete
Windows 8
If you upgraded to Windows 8
If you don’t have the recovery software provided by Samsung, download our recovery and repair disk for Samsung.
If you upgraded your computer to Windows 8, you need to update Recovery Solution 5 to 5.6 first.
After doing so, you can create a complete backup using Recovery Solution 5.6 in Windows 8 by following these steps:
- Open the software
- Click Backup

- Click Complete Backup
- Make sure you enter a description for the backup you’re about to create and choose where to save it (at the Save Path field). You can also save the backup to a DVD.
- Click Next
- The next screen is optional: you can choose to also include LiveImaging and System Software Backup options
- Click Next
- Your computer may now restart and the software will open again
- Click Yes to start the backup process
- Click Yes to restart your computer, when prompted
- After your computer restarted, the backup process is complete
If Windows 8 was already installed
If you don’t have the recovery software provided by Samsung, download our recovery and repair disk for Samsung.
If your computer already had Windows 8 installed, follow these steps instead:
- Plug an external USB flash drive
- At the Start screen, type
recoveryand select Recovery from the search results list - Click Backup from the main menu, on the left
- Select the drive where you want to save the backup
- You can select to create the USB flash drive as a boot disk by sliding the OFF/ON slider to ON at the Create boot disk section
- Click Backup
- Click Yes at the “Would you like to start backup?” screen
- Click OK when the backup process is complete
Create recovery disk with Recovery
To create a recovery disk your computer must have Windows 8 and the latest available version of the Recovery software installed.
The Recovery software available in Windows 8 computers allows you to create a Disk Copy and a Factory Image.
To create a Disk Copy, follow these steps:
- Connect the HDD or the SSD for the disk copy. You need to make sure you have the same amount of space available as your computer has.
- Type
recoveryat Start and select Recovery from the search results list - Select Disk Copy from the left menu
- Select one of the 2 available options: Recovery disk to factory settings (this save the default settings) or Recovery disk to current settings (this saves the current settings)
- Once selected, click Disk copy
- Click OK to start the process
- Click OK to restart the system, when prompted
To create a Factory Image, follow these steps:
- Type
recoveryat Start and click on the Recovery item when the search results list appears - Select Factory Image from the menu on the left
- Select a location where to save the factory image
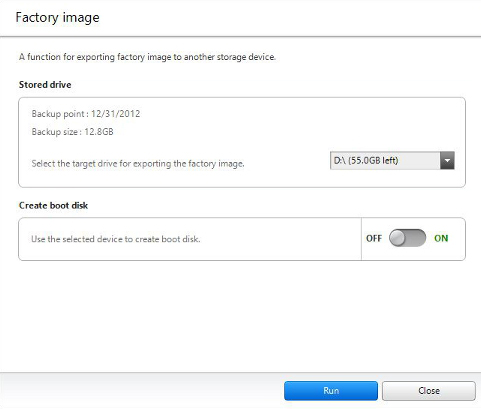
- You can also select if you’d like to make the disk as a boot disk by sliding the Create boot disk slider from OFF to ON
- Click Run
- Click OK when the process is finished
More Information
Support Links
- Easy Recovery Essentials for Windows – our repair and recovery disk.
It’s an easy-to-use and automated diagnostics disk. It’s available for Windows 8, Windows 7 and Windows Vista. It’s also available for Windows XP and Windows Server.Read more at Windows Recovery Disks.
- The NeoSmart Support Forums, member-to-member technical support and troubleshooting.
- Get a discounted price on replacement setup and installation discs: Windows XP, Windows Vista, Windows 7, Windows 8.
Applicable Systems
This Windows-related knowledgebase article applies to the following operating systems:
- Windows XP (all editions)
- Windows Vista (all editions)
- Windows 7 (all editions)
- Windows 8 (all editions)
- Windows 8.1 (all editions)
- Windows Server 2003 (all editions)
- Windows Server 2008 (all editions)
- Windows Server 2012 (all editions)