Information about the cause and possible resolutions of boot-related Blue Screen of Death (BSOD) with error “UNMOUNTABLE_BOOT_VOLUME” and stop code STOP: 0x000000ED.
This error is sometimes misspelled as UNMOUNTABLE_BOOT_DRIVE, but is functionally the same.
Contents
About “UNMOUNTABLE BOOT VOLUME”
The following information on this error has been compiled by NeoSmart Technologies, based on the information gathered and reported by our global network of engineers, developers, and technicians or partner organizations.
Description and Symptoms
The error messages, alerts, warnings, and symptoms below are tied to this error.
Symptom 1: BSOD with error UNMOUNTABLE_BOOT_VOLUME
Upon starting a PC running Windows XP, Windows Vista, or Windows 7, a blue screen of death (BSOD) may be encountered with the error message “UNMOUNTABLE_BOOT_VOLUME” and usually with a stop code of STOP: 0x000000ED, similar to the screen shown below:
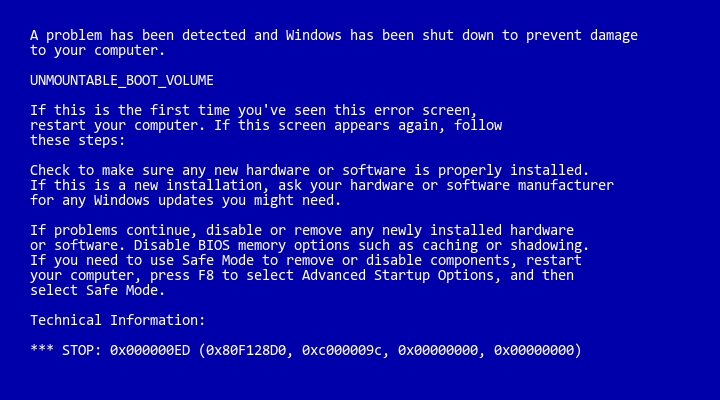
The full text of this error is written below:
A problem has been detected and Windows has been shut down to prevent damage
to your computer.

UNMOUNTABLE_BOOT_VOLUME

If this is the first time you've seen this error screen,
restart your computer. If this screen appears again, follow
these steps:

Check to make sure any new hardware or software is properly installed.
If this is a new installation, ask your hardware or software manufacturer
for any Windows updates you might need.

If problems continue, disable or remove any newly installed hardware
or software. Disable BIOS memory options such as caching or shadowing.
If you need to use Safe Mode to remove or disable components, restart
your computer, press F8 to select Advanced Startup Options, and then
select Safe Mode.

Technical Information:

*** STOP: 0x000000ED (0x80F128D0, 0xc000009c, 0x00000000, 0x00000000)
Symptom 2: BSOD with error UNMOUNTABLE_BOOT_VOLUME
A variation of symptom 1, with this possible alternate text is this:
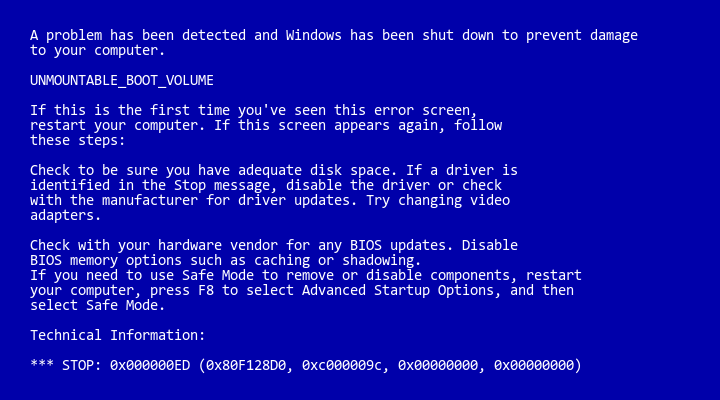
The text of this error:
A problem has been detected and Windows has been shut down to prevent damage
to your computer.

UNMOUNTABLE_BOOT_VOLUME

If this is the first time you've seen this error screen,
restart your computer. If this screen appears again, follow
these steps:

Check to be sure you have adequate disk space. If a driver is
identified in the Stop message, disable the driver or check
with the manufacturer for driver updates. Try changing video
adapters.

Check with your hardware vendor for any BIOS updates. Disable
BIOS memory options such as caching or shadowing.
If you need to use Safe Mode to remove or disable components, restart
your computer, press F8 to select Advanced Startup Options, and then
select Safe Mode.

Technical Information:

*** STOP: 0x000000ED (0x80F128D0, 0xc000009c, 0x00000000, 0x00000000)
Causes of this Error
A blue screen of death with the UNMOUNTABLE BOOT VOLUME error is an indication that Windows was unable to mount the boot filesystem1 to read/load required dependencies from it.
While Windows, being based off a largely microkernel-esque architecture, can load dependencies and components dynamically, there is a basic subset of dependencies that absolutely must be brought online during the boot procedure or else Windows will fail to boot, even if the kernel has been invoked.
With the latest versions of Windows, and especially after the kernel and driver restructuring that took place during the development of Windows Vista, this list of components has steadily dwindled and now comprises only the most basic (and largely universal) input/output drivers2 in addition to the controllers for the hard disk driver.
If Windows is unable to identify and interface with the hard disk controller (whether integrated into the motherboard or as a drop-in PCI-E card) or if hard disk controller is brought online successfully but Windows cannot read the volume it is being booted from for a variety of reasons, a BSOD featuring the UNMOUNTABLE BOOT VOLUME error may present.
This error has been known to occur as a result of one or more of the following:
Cause 1: Failed/Incompatible disk controller drivers
As explained above, if Windows is unable to identify and interface with the hard disk controller responsible for the drive the system partition resides on, the Windows kernel won’t be able to read and load the basic dependencies from disk and this blue screen will be encountered.
A common cause that’s often responsible for this scenario is an uninstall or failed update/upgrade of the hard disk controller drivers.
For instance, if the Intel or LSI disk management drivers are removed, corrupted, uninstalled, or incorrectly upgraded and Windows does not already have “native,” basic support for the particular hard disk controller in use, it will be unable to communicate with the disk adapter to read the required data resulting in the UNMOUNTABLE BOOT VOLUME blue screen of death.
Cause 2: Attempt to load Windows from wrong partition
Another scenario where Windows will be unable to load its core drivers and other basic dependencies would be in a situation where Windows has the required drivers to interface with the hard disk controller, but is instructed to load itself from the wrong partition (i.e. not the partition it is actually installed to). When the bootloader (either NTLDR in the case of Windows XP or BOOTMGR in the case of Windows Vista and Windows 7) begins to load an operating system based on the configuration file3 it passes along to the kernel (in the environment block) information about where it should load the operating system from.
If the configuration store (BOOT.INI/BCD) is incorrectly set or no longer points to the correct partition, the ntoskrnl will be unable to load Windows from the indicated partition and an UNMOUNTABLE BOOT VOLUME BSoD may occur.
Cause 3: Windows partition resized or moved
In a similar vein to the situation with an incorrectly-configured BCD or BOOT.INI that directs the Windows kernel to load the operating system from the wrong partition, the UNMOUNTABLE BOOT VOLUME error may also occur if the identifier for the Windows partition is changed but the boot configuration file retains the outdated information.
NTLDR and BOOTMGR both have multiple methods of uniquely identifying (or trying to) a partition, some of which are based off a combination of the disk number and the partition offset (how far from the start of the disk) or partition number (how many partitions precede it either physically in the sequential disk layout or in the partition table in the MBR).
If the Windows partition is moved, a partition is added or removed before the Windows partition on disk, or the order of the disks changes, the BCD or BOOT.INI references to the Windows partition may no longer be correct and the kernel will throw the UNMOUNTABLE BOOT VOLUME blue screen when it attempts to load Windows from the wrong partition.
Cause 4: Changed or reconfigured SATA AHCI/IDE/RAID mode
Similar to the first situation discussed above wherein the necessary device drivers for communicating with the Windows partition have been uninstalled or incorrectly replaced, it is possible for the drivers that Windows has been configured to load and use at the very start of the boot procedure are no longer correct — even though the underlying hardware has not changed. Most SATA controllers (the onboard Intel ICH ACH controllers, Marvell, JMicron, nVidia, and others) expose an option in the BIOS for the disk controller to be configured in any one of three modes: IDE, AHCI, or RAID.
- IDE is the most-basic mode and treats the SATA controller in the same way legacy IDE controllers treated ATA drives: the controller itself contains almost no read/write-related logic and simply serves as the most ascetic of bridges, simply proxying data to and from the drives.
- AHCI was a new standard for communication that first saw use in home PCs for disks connected to SATA controllers on newer operating systems, wherein the hard disk controller contains substantial logic pertaining to the read and write procedure.Instead of having the Windows device driver dictate each move of the read/write heads and disk seeks, controllers in AHCI mode will act as “scribes” of sorts for Windows, taking higher-level (more-abstract) read and write orders, and then using its own logic to process the commands as efficiently as possible (to allow for hardware-level caching, read/write order optimization (known as NCQ) to minimize disk seeks and decrease latency, and other optimizations.
- Newer SATA controllers feature a RAID mode where a mostly-software implementation of RAID is used for setting up disks in RAID 0 (“stripe”) for performance, RAID 1 (“mirror”) for data redundancy, or RAID 5/6/1+0 for a combination thereof.Traditionally a separate, fully hardware-based RAID controller would be required for such a configuration, but modern SATA drive controllers split the RAID process between device drivers and on-board microcontrollers for a cost-effective solution.
As can be seen, the three different operation modes above differ quite-greatly in terms of features and implementation. Each of the above three requires a completely different driver to be used by Windows, even though the hardware itself (both the physical disk controller and the drive) has not changed.
Most computers allow for the IDE/AHCI/RAID mode to be set from the BIOS and changed “on-the-fly” without requiring a wipe of the drives. If Windows was installed and booted using one mode, but a different mode was configured (due to changes in the BIOS configuration, a BIOS upgrade, a reset of BIOS settings, etc.) the existing driver will no longer suffice.
Fix: Using EasyRE to correct incorrect boot configuration
For cases where UNMOUNTABLE BOOT VOLUME is caused by incorrect or outdated information regarding the Windows partition in the boot configuration files (BOOT.INI or the BCD) for NTLDR or BOOTMGR, Easy Recovery Essentials’ automatic one-click Windows repair can normally recreate the boot configuration with the correct settings and parameters to allow for Windows to boot correctly.
Easy Recovery Essentials can fix many errors such as this automatically using its built-in Automated Repair option. EasyRE is currently available for Windows XP, Vista, 7, 8, Windows 10, and Windows 11 and can be downloaded and created on any PC.
- Download Easy Recovery Essentials. Make sure to note your Windows version (XP, Vista, 7, 8, 10, or Windows 11) before you download EasyRE. This guide can help you identify what version of Windows you have installed.
- Burn the image. Follow these instructions on how to burn the bootable ISO image very carefully, as making a bootable CD can be tricky! Alternatively, these instructions explain how to create a bootable EasyRE recovery USB stick/drive.
- Boot up your PC from the Easy Recovery Essentials CD or USB you created.
- Once EasyRE is running, choose the “Automated Repair” option and click Continue.

Choose “Automated Repair” in Easy Recovery Essentials
- After EasyRE scans your computer’s drives, identify and select the drive letter for your Windows installation from the list, and then click on the Automated Repair button to begin.

Choose the drive associated with the Windows installation you’re trying to repair.
- Easy Recovery Essentials will start analyzing the selected drive for problems. EasyRE will test for and attempt to automatically correct errors with the disk, partition, bootsector, filesystem, bootloader, and registry. No intervention is required, as EasyRE’s repair is fully automated:

Easy Recovery Essentials searches for errors and makes corrections to the selected Windows installation.
- Once the process is complete, EasyRE will report its findings. Click on the Restart button to reboot your PC and test the changes.
- The “UNMOUNTABLE_BOOT_VOLUME” error should now be fixed as your PC begins to load:


You can download Easy Recovery Essentials from here.
Fixing “UNMOUNTABLE BOOT VOLUME BSOD” on Windows
Windows Setup CD/DVD Required!
Some of the solutions below require the use of the Microsoft Windows setup CD or DVD. If your PC did not come with a Windows installation disc or if you no longer have your Windows setup media, you can use Easy Recovery Essentials for Windows instead. EasyRE will automatically find and fix many problems, and can also be used to solve this problem with the directions below.
Fix #1: Roll back disk controller drivers with System Restore
Most driver-related causes of this error can be corrected by rolling back to an earlier system configuration with System Restore.
Windows normally makes an explicit System Restore point each time certain drivers are installed, upgraded, or removed — meaning that in 9 cases out of every 10, if the UNMOUNTABLE_BOOT_VOLUME error was caused by a change in device drivers, a System Restore point should be available to reverse the damage.
System Restore, available from the Startup Repair/Recovery Console that ships on the Windows Vista, Windows 7, and Windows 8 setup DVDs, can be used to show a list of “snapshots” of your PC taken at various points in time in the recent past, and attempt to rollback your PC to the chosen restore point. System Restore is “non-destructive,” in that it only affects Windows and programs, but not your personal files and folders.
Unable to boot into the Windows setup CD?
See our guide on setting up a PC to boot from the CD or DVD for troubleshooting and more detailed instructions.
- Insert your Windows installation DVD into your PC’s CD-ROM drive,
- Fully power down your PC, and make sure it has fully shut off,
- Power up your PC,
- Press any key when you see “Press any key to boot from CD or DVD..”
- Click the link titled “Repair your computer” in the bottom-lefthand corner, after first selecting your language and keyboard options.

- Wait for Startup Repair to scan your PC for Windows installations, then select your install from the list it shows:

- Choose “System Restore” from the list of available recovery options to begin:

- The System Restore utility will start, giving you the option of choosing a pre-selected System Restore point it has picked out for you, or giving you the option of manually making your choice, choose an option and then press Next to continue.

- Depending on your choice, you may be presented with a list of valid System Restore points and their respective dates, plus a brief description of the reason (if any) they were taken. Make your choice here and then choose Next again to continue.

- System Restore will ask you to confirm your selection and then begin the restoration procedure. You will be prompted to exit and restart your computer for the restore to complete.


Once your PC has rebooted, if System Restore completed its restoration successfully your PC will be repaired and System Restore will inform you of the changes it has made to your PC once you’ve logged back in to Windows. If the System Restore procedure failed or if the System Restore procedure completed successfully but your problem wasn’t resolved, you can repeat the steps above — choosing a different restore point this time — as you experiment and see what works for your PC.
Fix #2: Change IDE/RAID/AHCI mode in the BIOS
If the UNMOUNTABLE_BOOT_DEVICE error is being caused by a change of the SATA disk controller’s mode in the BIOS or firmware, the fix can be as simple as entering the BIOS and toggling the SATA controller’s “mode” setting. The exact instructions differ from one manufacturer to the other, but the options will resemble what is shown in the screenshots below.
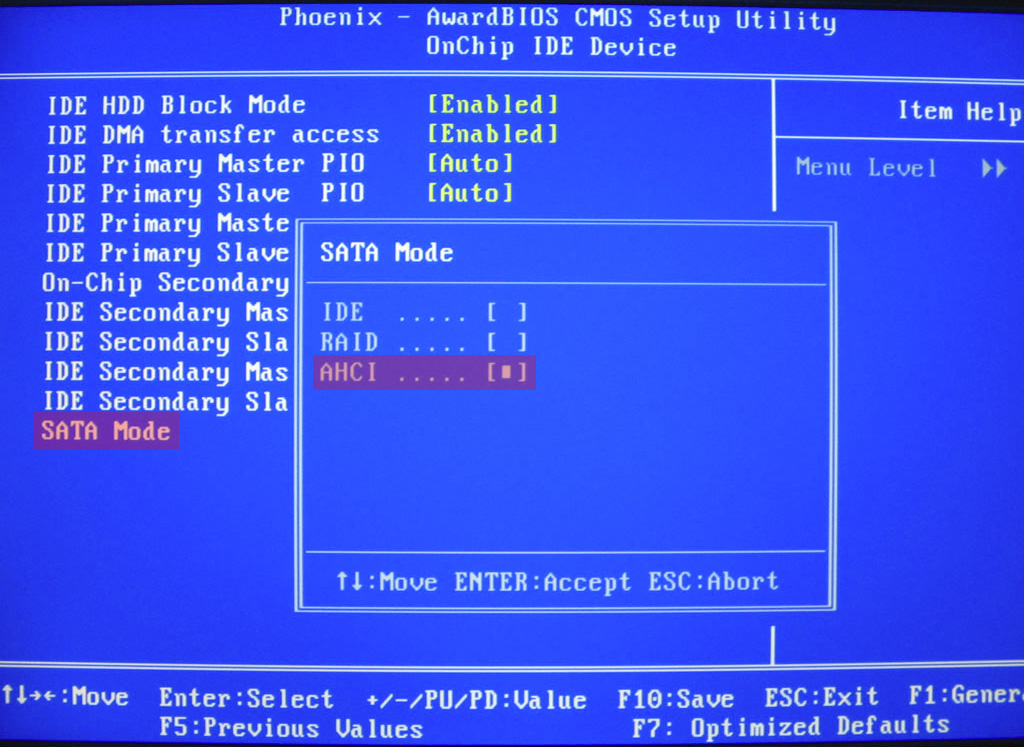

SATA Mode American Megatrends BIOS
Attempt to toggle between all three (or more) modes until a combination that results in Windows booting successfully once more is found.
More Information
Support Links
- Easy Recovery Essentials for Windows – our repair and recovery disk.
It’s an easy-to-use and automated diagnostics disk. It’s available for Windows 8, Windows 7 and Windows Vista. It’s also available for Windows XP and Windows Server.Read more at Windows Recovery Disks.
- The NeoSmart Support Forums, member-to-member technical support and troubleshooting.
- Get a discounted price on replacement setup and installation discs: Windows XP, Windows Vista, Windows 7.
Applicable Systems
This Windows-related knowledgebase article applies to the following operating systems:
- Windows XP (all editions)
- Windows Vista (all editions)
- Windows 7 (all editions)
- Windows Server 2003 (all editions)
- Windows Server 2008 (all editions)
-
In this context — as in a few other places in Windows — “boot” actually means the system partition and not the actual boot partition (active partition on startup disk 0), per-se. ↩
-
The basic input/output drivers are, in general, device-agnostic as much of the hardware they interface with has been designed and built around “standards” — even if not everyone sticks to the RFCs and other formal standards as closely as they should! ↩
-
Configuration is stored in the plaintext file BOOT.ini in the case of NTLDR and the binary (registry hive) \BOOT\BCD in the case of BOOTMGR. ↩