Get the fix for the error Windows Update is stuck in an endless loop on Windows Vista, Windows 7, Windows 8 and Windows 8.1.
Contents
About “Windows Update is stuck in an endless loop“
The following information on this error has been compiled by NeoSmart Technologies, based on the information gathered and reported by our global network of engineers, developers, and technicians or partner organizations.
Description and Symptoms
The error messages, alerts, warnings, and symptoms below are tied to this error.
Symptom 1: Windows Update is stuck in an endless loop during installation
Windows Update can fail during the updates installation if the updates began to be installed during a shutdown operation of your computer
The exact moment when Windows Update seems stuck can be different depending on your computer and Windows version, but it’s usually any of the following:
- Configuring update: Stage 3 of 3 – 0% complete. Do not turn off your computer.
- Please do not power off or unplug your machine. Installing update 1 of 4.
- Configuring Windows update. 0% complete. Do not turn off your computer.
- Failure configuring Windows updates. Reverting changes.
When you force restart your computer, Windows boots again with Windows Update trying to install the pending updates.
Causes of this Error
This error has been known to occur as a result of one of the following causes:
Cause 1: File system integrity compromised
The hard drive’s file system may become damaged because of disk write errors, power outages or virus attacks. If that’s the case, the operating system cannot boot properly and the loading process is halted.
Cause 2: File system settings are set incorrectly
Sometimes, the system may start looping endlessly when the system update flags are not set correctly. This can be solved by deleting these files manually.
Fixing “Windows Update is stuck in an endless loop” on Windows
Windows Setup CD/DVD Required!
Some of the solutions below require the use of the Microsoft Windows setup CD or DVD. If your PC did not come with a Windows installation disc or if you no longer have your Windows setup media, you can use Easy Recovery Essentials for Windows instead. EasyRE will automatically find and fix many problems, and can also be used to solve this problem with the directions below.
Fix #1: Rebuild boot.ini or BCD with Easy Recovery Essentials
Easy Recovery Essentials is guaranteed to fix the “Windows Update loop” error automatically using its built-in Automated Repair option. EasyRE is currently available for Windows XP, Vista, 7, 8, Windows 10, and Windows 11 and can be downloaded and created on any PC.
- Download Easy Recovery Essentials. Make sure to note your Windows version (XP, Vista, 7, 8, 10, or Windows 11) before you download EasyRE. This guide can help you identify what version of Windows you have installed.
- Burn the image. Follow these instructions on how to burn the bootable ISO image very carefully, as making a bootable CD can be tricky! Alternatively, these instructions explain how to create a bootable EasyRE recovery USB stick/drive.
- Boot up your PC from the Easy Recovery Essentials CD or USB you created.
- Once EasyRE is running, choose the “Automated Repair” option and click Continue.
- After EasyRE scans your computer’s drives, identify and select the drive letter for your Windows installation from the list, and then click on the Automated Repair button to begin.
- Easy Recovery Essentials will start analyzing the selected drive for problems. EasyRE will test for and attempt to automatically correct errors with the disk, partition, bootsector, filesystem, bootloader, and registry. No intervention is required, as EasyRE’s repair is fully automated:
- Once the process is complete, EasyRE will report its findings. Click on the Restart button to reboot your PC and test the changes.
- The “Windows Update loop” error should now be fixed as your PC begins to load:

You can download Easy Recovery Essentials from here.
Fix Windows Update Loop in Windows Vista and 7
Fix #1: Boot into Last Known Good Configuration
A quick fix for the loop error could be booting into the Last Known Good Configuration mode:
- Restart the computer
- Press the F8 key as soon as the computer boots, but before the Windows Vista or Windows 7 logo appears on the screen
- At the Advanced Boot Options screen, select Last Known Good Configuration (advanced)
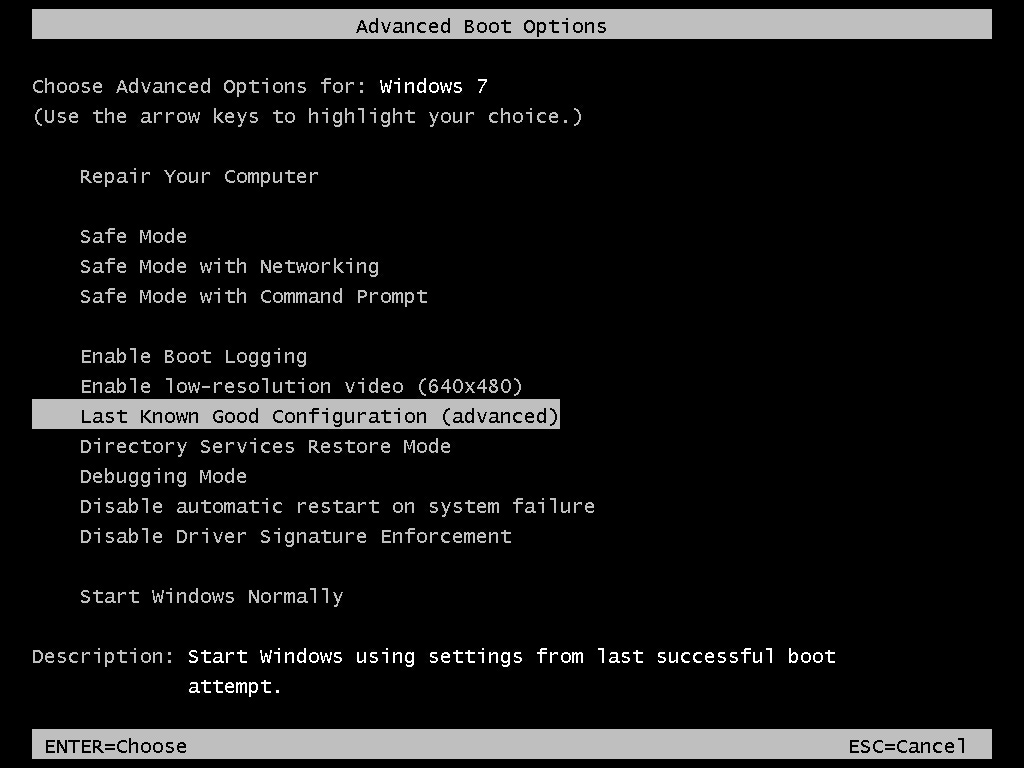
- Press Enter
If this fix doesn’t solve the loop error, try any of the following fixes below.
Fix #2: Delete cleanup.xml and pending.xml
The Windows Update loop can be fixed in most cases by deleting the following files found in the \Windows\WinSxS\ folder:
- cleanup.xml
- pending.xml
To delete these files, follow these steps:
- Insert the Windows Vista or Windows 7 installation media in the disc tray
- Restart your computer
- Boot from the DVD by pressing any key when you see the “Press any key” message on your screen
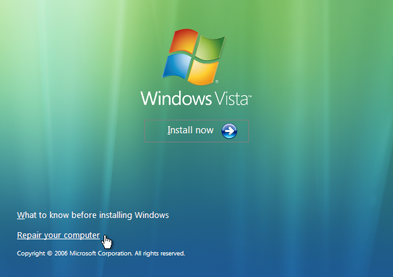
- At the Install Windows screen, click Repair your computer
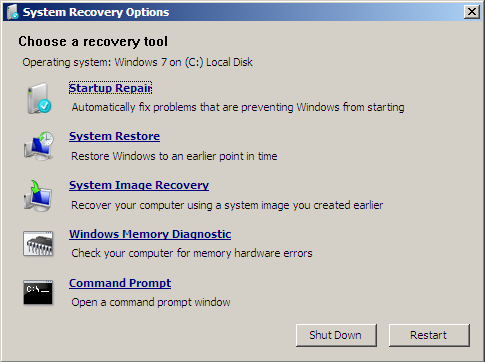
- At System Recovery Options, click Command Prompt
- Type the following commands and press Enter after each.Make sure to replace
C:with the letter of the drive where your Windows Vista or Windows 7 is installed on.The commands are:del C:\Windows\WinSxS\cleanup.xml
and
del C:\Windows\WinSxS\pending.xml
- Type
exitto quit Command Prompt - Restart your computer
Fix #3: Run sfc
The sfc utility can scan and restore corrupted files found on your Windows system and could fix the loop error.
To run sfc, follow these steps for any Windows Vista or 7 system:
- Insert the installation media and boot from it
- Click Repair your computer
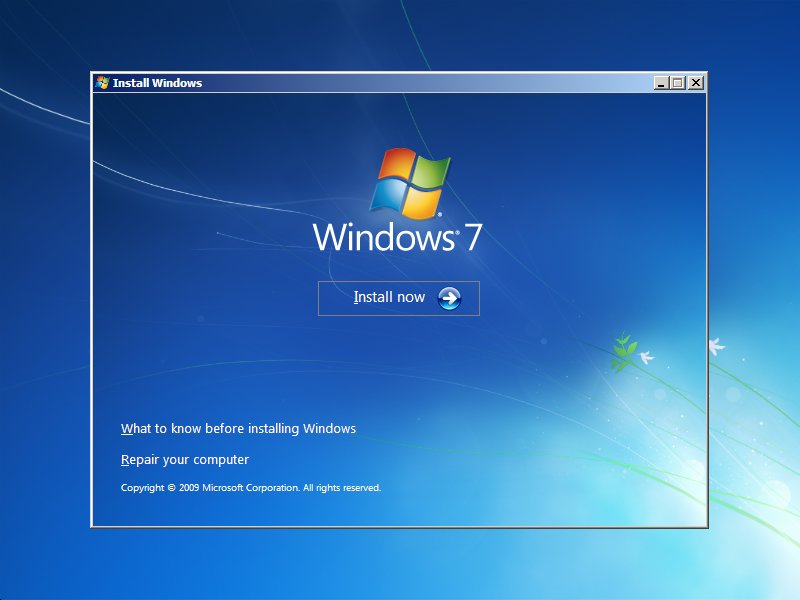
- At System Recovery Options, select Command Prompt and type:
sfc /scannow /offbootdir=c:\ /offwindir=c:\windows
Replace
c:\with the drive where Windows Vista or Windows 7 is installed on. - Press Enter
- The system scan should begin

- When the process is complete, restart your computer
If you don’t have your original installation media to access Command Prompt, you could either follow the instructions from Fix Loop Error with Easy Recovery Essentials or check if your system has the necessary recovery tools installed on the hard drive:
- Restart the computer
- Press F8 before the Windows logo appears
- If at the Advanced Boot Options screen you have a Repair Your Computer option, select it and hit Enter
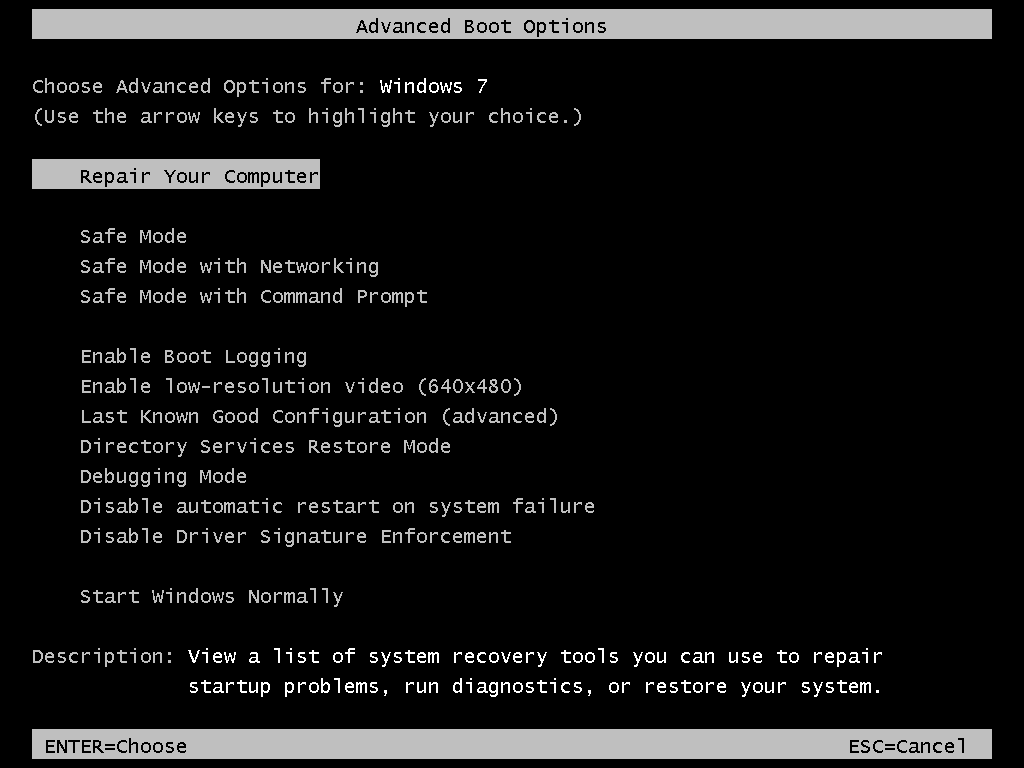
- Your system will boot into System Recovery Options and you can select Command Prompt from the list.If the option isn’t listed, your system doesn’t have the necessary recovery tools installed. In this case, follow the instructions from Fix Loop Error with Easy Recovery Essentials.
Fix #4: Install System Update Readiness Tool
Certain Windows Updates can be the main cause for the Windows Update endless loop:
- KB2515325
- KB2522422
- KB2492386
- KB982018
If your Windows Vista or Windows 7 is trying to install these updates and the installation isn’t being completed, Microsoft recommends you to install System Update Readiness Tool:
- Go to What is the System Update Readiness Tool on Microsoft.com and download the tool corresponding to your Windows version: Vista (32-bit or 64-bit) or 7 (32-bit or 64-bit).
- Click Download
- Once the tool is downloaded on your computer, run it
- At the Windows Update Standalone Installer dialog, click Yes or OK
- At the Installation complete dialog, click Close
- Restart your computer
- Go to Windows Updates in Control Panel and try to install any pending updates
Fix #5: Perform a Clean Boot
Starting your Windows Vista or Windows 7 in a clean boot mode could fix the Windows Update loop error by installing the pending updates in this mode:
- Restart the computer and log into your Windows Vista or 7
- Click Start
- Type
msconfig.exein the Run field - Press Enter to access msconfig
- At the General tab, select Selective startup
- Uncheck Load startup items
- Check Load system services
- At the Services tab, check the Hide all Microsoft Services
- Click Disable all to disable all other services
- Click OK
- Click Restart
Fix #6: System Restore
If System Restore was enabled and running on your system, you can try to restore your computer to an earlier date to access Windows, follow the steps to prepare for a clean boot and then install the pending Windows updates in the clean boot mode.
- Restart the computer and begin press the F8 key to boot into Advanced Boot Options
- Select Safe Mode
- Press Enter
If Safe Mode option isn’t successfully booting you into Windows, try selecting Safe Mode with Command Prompt:
- Select Safe Mode with Command Prompt
- Press Enter
- At Command Prompt, type:
rstrui.exe
- Press Enter
- Follow the System Restore instructions to complete a restore
Fix Windows Update Loop in Windows 8/8.1
Fix #1: Delete cleanup.xml and pending.xml
Similar to Windos Vista or 7 instructions, the Windows Update loop can be fixed in most cases by deleting the cleanup.xml and pending.xml files from the WinSxS folder.
To do so on a Windows 8 or Windows 8 system, follow these steps:
- Insert the Windows 8/8.1 media to boot from it
- Click Repair your computer or press R
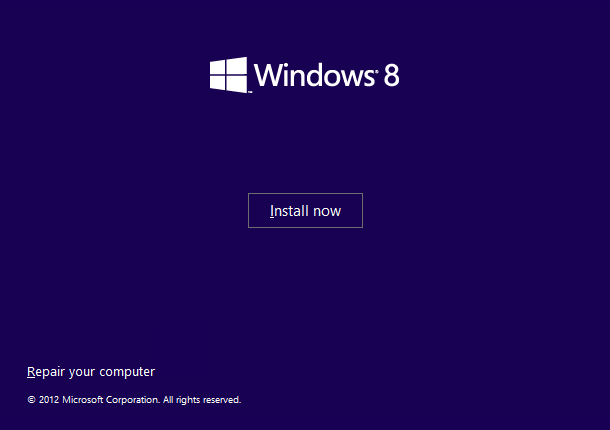
- Select Troubleshoot
- Select Advanced options
- Select Command Prompt
- Type these commands and press Enter:
del C:\Windows\WinSxS\cleanup.xml
del C:\Windows\WinSxS\pending.xml
Replace
C:\with the letter of the drive where Windows 8/8.1 is installed - Type
exitto quit Command Prompt - Restart the computer
Fix #2: Use DISM
If deleting pending.xml and cleanup.xml doesn’t work, use the DISM command:
- Boot from the installation media and access Command Prompt (after you select Repair your computer > Troubleshoot > Advanced options > Command Prompt)
- Type the DISM command:
dism /image:C:\ /cleanup-image /revertpendingactions
-
where
C:is the drive where Windows 8/8.1 is installed - Press Enter
If you don’t have the Windows 8/8.1 installation media, either follow the Fix Loop Error with Easy Recovery Essentials instructions or try these next steps:
- Restart the computer
- Try any of the following tips to access the Startup Settings menu of your Windows:
- Press F8 before Windows 8 logo appears
- Press Shift and F8 before Windows 8 logo appears
- Press F11 before Windows 8 logo appears
- Restart the computer while holding the Shift key
- Click Troubleshoot
- Click Advanced options
- Click Startup settings
- Click Restart
- Your computer will restart and boot into the Startup Settings screen:
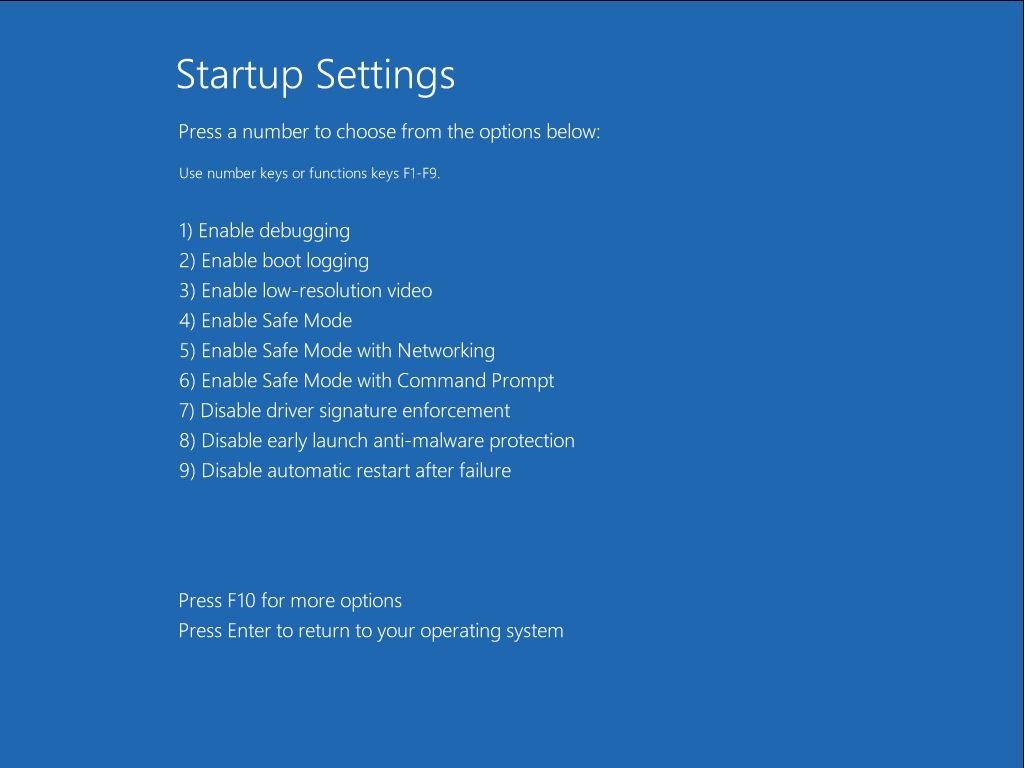
- Press F6 to access Safe Mode with Command Prompt
- Once in Command Prompt type the DISM command:
dism /image:C:\ /cleanup-image /revertpendingactions
Replace
C:with the Windows 8 installation drive letter - Press Enter
Fix #3: Run sfc
To run sfc on a Windows 8 or Windows 8.1 system, follow these steps:
- Insert the installation media and boot from it to access the Install now screen

- Click Repair your computer
- Navigate to Troubleshoot > Advanced options
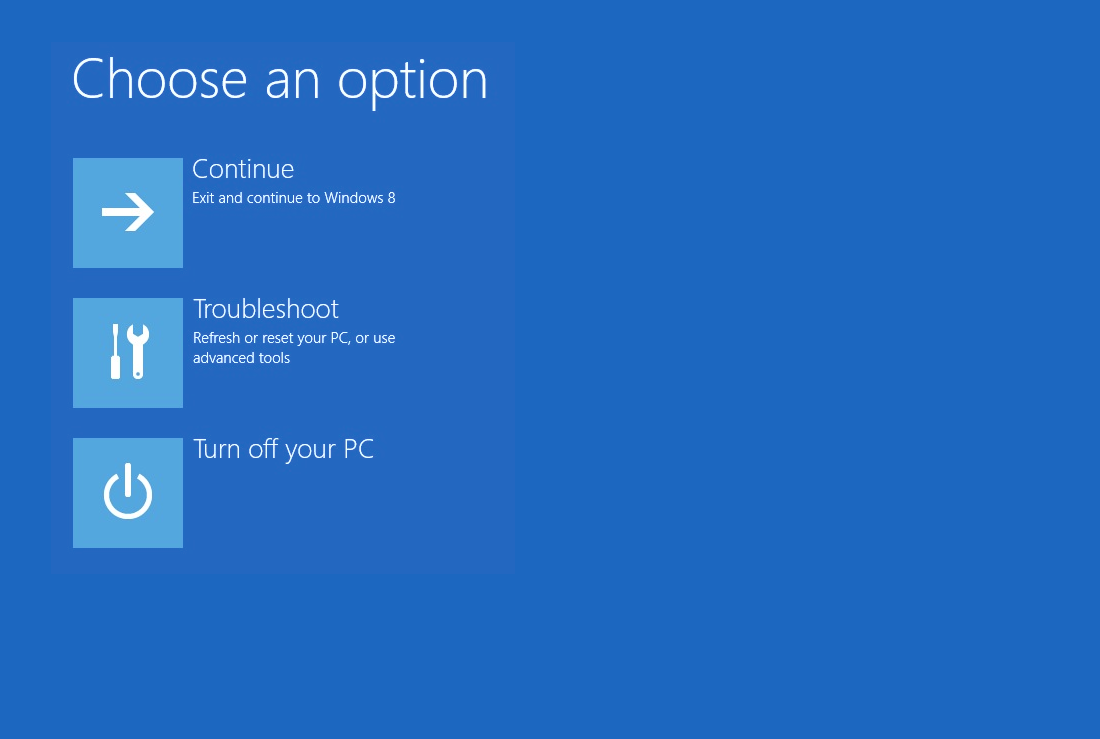
- Click Command Prompt
- Type the sfc command and replace
c:with the letter of the drive where Windows 8 is installed on:sfc /scannow /offbootdir=c:\ /offwindir=c:\windows
- Press Enter
Fix #4: System Restore
Usually System Restore is enabled and running by default on Windows 8/8.1 systems. If this is the case, you can use System Restore to restore the computer to an earlier date in time to fix the Windows Updates loop error:
- Insert the installation disc and boot from it
- Once at the Install now screen, click Repair your computer
- Click Troubleshoot
- Click Advanced options
- Select the operating system
- Click System Restore
- Follow the wizard instructions to complete the process
Fix #5: Clean Boot
If you successfully managed to restore Windows 8/8.1 to an earlier restore point before the Windows Update loop error, boot your system into a Clean Boot mode and install the pending Windows updates again:
- Boot into the system
- Press the
and R keys to open the Run dialog
- Type
msconfig - Click OK or press Enter
- Go to Services tab
- Check the Hide all Microsoft services option
- Click Disable all
- Go to General tab
- Check Selective startup
- Uncheck Load startup items
- Check Load system services
- Click OK
- Click Restart
More Information
Linked Entries
Support Links
- Easy Recovery Essentials for Windows – our repair and recovery disk.
It’s an easy-to-use and automated diagnostics disk. It’s available for Windows 8, Windows 7 and Windows Vista. It’s also available for Windows XP and Windows Server.Read more at Windows Recovery Disks.
- The NeoSmart Support Forums, member-to-member technical support and troubleshooting.
- Get a discounted price on replacement setup and installation discs: Windows Vista, Windows 7, Windows 8.
Applicable Systems
This Windows-related knowledgebase article applies to the following operating systems:
- Windows Vista (all editions)
- Windows 7 (all editions)
- Windows 8 (all editions)
- Windows 8.1 (all editions)


