This is a guide about Dell recovery disks for the following versions of Windows: Windows XP, Windows Vista, Windows 7 or Windows 8.
A recovery disk is also known as a restore disc, repair disc, boot disc or rescue disk.
![]()
Dell no longer ships operating system disks with new systems. You can create recovery disks using the Dell Backup and Recovery or Dell DataSafe Local Backup software programs Dell provides on your computer’s recovery partition.
If none of these software programs are available for your computer (check if your recovery partition created by Dell is still intact), you can still download an alternative recovery disk if you need to fix boot errors.
Looking for a recovery disk for Dell? Download Easy Recovery Essentials (our recovery and repair disk for Dell computers). You can read more about Easy Recovery Essentials here.
Contents
Download alternative recovery disk for Dell
If your Dell computer no longer has the recovery partition needed to create the system recovery disk (read the Dell Recovery partition article for more details on this topic) or if you deleted the partition, you can use an alternative recovery disk to access and backup your files.
You can download Easy Recovery Essentials. It’s an ISO download image ready to be burned directly to a CD, DVD or a USB flash drive.
Easy Recovery Essentials is compatible with Dell and with the following Windows versions:
- Microsoft Windows 8 (read more on our Windows 8 Recovery Disk and Repair Disc Download article)
- Microsoft Windows 7 (read more on our Windows 7 Recovery Disk and Repair Disc Download article)
- Microsoft Windows Vista (read more on our Windows Vista Recovery Disk and Repair Disc Download article)
- Microsoft Windows XP (read more on our Windows XP Recovery and Repair Disk article)
- Microsoft Windows Server 2003, 2008 and 2012 (read more on our Windows Server 2008 and 2012 Recovery Discs Download article)

Note: Easy Recovery Essentials can not be used to install or reinstall Windows.
With Easy Recovery Essentials you can:
- Find and fix boot errors automatically with Automated Repair
- Recover your PC from infections with the built-in antivirus
- Restore your PC to a working state
- Access and backup your most important data (like documents, pictures, music, videos and so on)
Features of Easy Recovery Essentials include:
- Automatically find and fix boot errors
- Works even if you can’t log into Windows
- Recovers your computer from virus infections
- Restores your computer to a working state
- Access and backup your important data
- Advanced tools for IT experts
It’s compatible with Dell computers (laptops, desktops, notebooks etc.) and with the following Windows versions: XP, Vista, 7, 8 and Server editions.
Download Easy Recovery Essentials for Dell computers
For Windows XP users
Easy Recovery Essentials can be used as an alternative recovery disk for computers from Dell with Windows XP installed, including the full list of Windows XP editions with Service Packs installed:
- Microsoft Windows XP SP1 (Service Pack 1)
- Microsoft Windows XP SP2 (Service Pack 2)
- Microsoft Windows XP SP3 (Service Pack 3)
It’s compatible with both the Home and Professional editions of Windows XP:
- Microsoft Windows XP Home
- Microsoft Windows XP Professional
Download Easy Recovery Essentials for Dell with Microsoft Windows XP
For Windows Vista users
You can use Easy Recovery Essentials as an alternative recovery disk for Dell computers, if you have Windows Vista installed.
Easy Recovery Essentials supports x86 and x64 platforms and all Windows Vista editions, including the 32-bit and 64-bit editions:
- Microsoft Windows Vista Ultimate (32-bit and 64-bit editions)
- Microsoft Windows Vista Enterprise (32-bit and 64-bit editions)
- Microsoft Windows Vista Business (32-bit and 64-bit editions)
- Microsoft Windows Vista Home Premium (32-bit and 64-bit editions)
- Microsoft Windows Vista Home Basic (32-bit and 64-bit editions)
- Microsoft Windows Vista Starter (32-bit edition; Starter edition doesn’t have a 64-bit edition)
It’s compatible with any of the available Service Packs of Windows Vista:
- Microsoft Windows Vista Service Pack 1 (SP1)
- Microsoft Windows Vista Service Pack 2 (SP2)
Download Easy Recovery Essentials for Dell with Microsoft Windows Vista
For Windows 7 users
Easy Recovery Essentials can be an alternative recovery disk for Dell computers from with Windows 7 installed.
Easy Recovery Essentials supports both x86 and x64 platforms and is compatible with the full list of Windows 7 editions, including the 32-bit and the 64-bit:
- Microsoft Windows 7 Ultimate (32-bit and 64-bit editions)
- Microsoft Windows 7 Enterprise (32-bit and 64-bit editions)
- Microsoft Windows 7 Professional (32-bit and 64-bit editions)
- Microsoft Windows 7 Home Premium (32-bit and 64-bit editions)
- Microsoft Windows 7 Home Basic (32-bit and 64-bit editions)
- Microsoft Windows 7 Starter (32-bit edition) (Starter is available only in 32-bit)
It’s compatible with SP1 of Windows 7:
- Microsoft Windows 7 Service Pack 1 (SP1)
Download Easy Recovery Essentials for Dell with Microsoft Windows 7
Windows 8 users
Easy Recovery Essentials can be used as an alternative recovery disk for Dell computers with Windows 8 installed.
It supports the x86 and x64 platforms and all the Microsoft Windows 8 editions (8 and 8.1), including the 32-bit and the 64-bit editions:
- Microsoft Windows 8 (32-bit and 64-bit editions)
- Microsoft Windows 8.1 (32-bit and 64-bit editions)
Download Easy Recovery Essentials for Dell with Microsoft Windows 8
Create a recovery disk for Dell
Dell users can use their recovery partition (read the Dell recovery partition article) to create a system recovery disk.
Your Dell computer must have a recovery partition to create the system recovery disk. Otherwise, consider using an alternative recovery disk.
If your computer displays boot errors and you can’t log into Windows, download Easy Recovery Essentials for Dell, our recovery and repair disk for Dell computers with Windows XP, Vista, 7 or 8. Use the Automated Repair function to automatically find and fix the boot errors.
Before you begin creating a system recovery disk, you need to determine what kind of model you have from Dell. Dell uses 2 software programs for backup and recovery:
- Dell Inspiron, Dell Studio and Dell XPS computers are using the DataSafe Local Backup 2.0. software
- Dell OptiPlex, Dell Latitude, Dell Vostro and Dell Precision models are using the Dell Backup and Recovery Manager software
Create the recovery disk for Windows XP
A Dell Factory Image is not available for Windows XP users as the Windows Recovery Environment is only available for Windows Vista, 7 or 8.
You can use an alternative recovery disk for Windows XP, Easy Recovery Essentials (our recovery and repair disk). It’s compatible with all computer models from Dell and with the Windows XP operating system (it also works with Vista, 7 or 8).
If you are not able to boot into the Windows XP, you can use Easy Recovery Essentials’ Browse/Backup files function to access and backup your most important files. You can burn the EasyRE to any CD, DVD or USB flash drives.
Download Easy Recovery Essentials.
Create the recovery disk for Windows Vista
Using Dell DataSafe Local Backup 2.0
If your Dell PC has Windows Vista installed and uses the DataSafe Local Backup 2.0. software (if you are not sure, go to Chapter #1 above to see how to determine this), follow these instructions to create the disk.
Warning:
If you plan to create a system recovery disk to restore your computer’s Dell Factory Image: restoring the factory image will remove all the data from the hard disk. Backup your files before proceeding!
- Click on Start and go to All Programs. Find the Dell DataSafe Local Backup 2.0 folder from the list
- Click on Dell DataSafe Local Backup 2.0
- Select Backup from the menu
- Click on the Create Recovery Media button
- Select Discs if you’d like to have the disk saved on a DVD or select USB Flash Drive if you’d like the disk to be saved on a USB drive.
- Click Next
- Insert the DVD or USB. If you opted for DVDs, the software will notify you how many DVDs you need to insert to create the recovery disks.
- Click Next
- Wait for the process to finish. When the screen confirms a success creation, remove your DVD or USB
- Label the USB or DVD. Keep them safe!
Using Dell Backup and Recovery Manager
If you have Windows Vista installed on a Dell PC and it uses the Dell Backup and Recovery Manager software, follow these instructions to create the disk.
If you are not sure what software your computer has, go to Chapter #1 above and determine the software based on your computer’s series name.
Warning:
If you plan to create a system recovery disk to restore your computer’s Dell Factory Image: restoring the factory image will remove all the data from the hard disk. Backup your files before proceeding!
- Go to Start > All Programs and open Dell Backup and Recovery Manager
- Click on Dell Recovery ToolsThe Dell Recovery Tools option
dell-backup-and-recovery-manager-screen.png - Click on Create a recovery disk or device… and edit the following information:
- Name for the recovery media (recommended: leave unmodified, as suggested by the software)
- If to include the Dell Factory Image (recommended)
- Location to save the recovery media: Optical Media (CDs, DVDs) or External Storage Device (USB Flash Drives). You can use the Refresh icon to refresh the item list (if your DVD/USB isn’t yet displayed in the menu yet)
- Click Next and verify that the information is correct: name, Factory Image, location
- Click Create Image to make the recovery disk
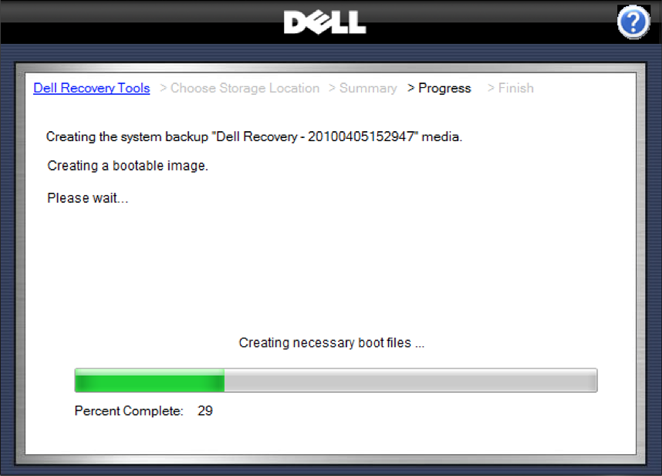
Creating a bootable recovery image…
- Remove your media when the screen confirms the creation of disk is a success
- Label the DVD or USB. Keep it safe!
Create the recovery disk for Windows 7
Using Dell DataSafe Local Backup 2.0
The Dell DataSafe Local Backup 2.0. software is used for Windows 7 by the following model series:
- Dell Inspiron
- Dell Studio
- Dell XPS
If your model isn’t listed above, go to #1 above to see if your computer model is using the DataSafe Local Backup program or not.
These instructions are for creating a recovery disk for Windows 7 using the DataSafe Local Backup 2.0 software.
You may need one or more DVD and your computer must have a DVD burner installed. You can also use a USB flash drive as a recovery media.
Warning:
If you plan to create a system recovery disk to restore your computer’s Dell Factory Image: restoring the factory image will remove all the data from the hard disk. Backup your files before proceeding!
- Click on the Start icon
- Click All Programs
- Search for Dell DataSafe Local Backup 2.0
- Click on the Dell DataSafe Local Backup 2.0 software icon
- Click Backup from the list on the left
- Click on Create Recovery Media
- Select Discs if you’d like to have the recovery disk saved on a DVD or select the USB Flash Drive option if you’d like the recovery disk to be saved on a USB.
- Click Next
- Insert the DVD (or USB). The software will notify you how many DVDs you may need to create the recovery media, if you opt for saving to DVDs.
- Click Next
- Wait for the recovery media to be created
- Label the USB or the DVD and keep it safe!
Using Dell Backup and Recovery Manager
The Dell Backup and Recovery Manager software is used for Windows 7 by the following models:
- Dell OptiPlex
- Dell Latitude
- Dell Vostro
- Dell Precision
If your computer model is not listed above, go to #1 above and determine if your Windows 7 is using the Backup and Recovery Manager software.
If your computer is indeed using the Dell Backup and Recovery Manager software, you can follow these instructions.
Warning:
If you plan to create a system recovery disk to restore your computer’s Dell Factory Image: restoring the factory image will remove all the data from the hard disk. Backup your files before proceeding!
- Open the Dell Backup and Recovery Manager software
- Click on Dell Recovery Tools menu from the list on the left:
The Dell Recovery Tools option
- Click on Create a recovery disk or device…
- Your next screen is called Choose Storage Location
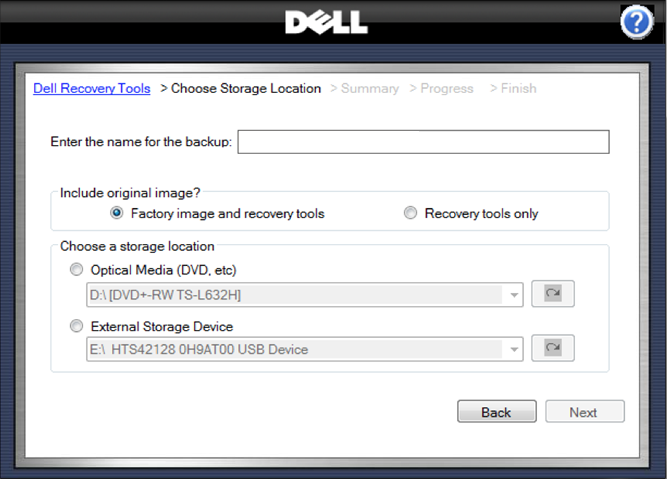
Choose Storage Location in Dell Recovery Tools menu
Here is what you need to add in this screen:
- The name for the recovery media you are about to created. Recommended to leave it unmodified, as suggested by the software.
- Select if you’d like to include the factory image (recommended)
- Where to save the recovery media: Optical Media (CDs, DVDs) or External Storage Device (USB Flash Drives etc.)
Use the Refresh arrow on the right to refresh the storage menu list and have the latest available items
- Click Next
- The Summary screen appears. Confirm your selections before clicking Create Image.
- Click Create Image to create the recovery media
Creating a bootable recovery image…
- The Finish screen appears, you can remove your CD/DVD or USB and click on Close Dell Backup and Recovery Manager
- Label your recovery media. Keep it safe!
Create the recovery disk for Windows 8 with Dell Backup and Recovery Manager
You can create a recovery disk for Dell with Windows 8 installed using the Dell Backup and Recovery Manager software by following these instructions.
Warning:
If you plan to create a system recovery disk to restore your computer’s Dell Factory Image: restoring the factory image will remove all the data from the hard disk. Backup your files before proceeding!
- Open the Dell Backup and Recovery Manager software by searching it (or go to Start > All Programs and find the folder). You can type “recovery” in Windows 8 Search Charm to find the software.
- Click on Recovery Media
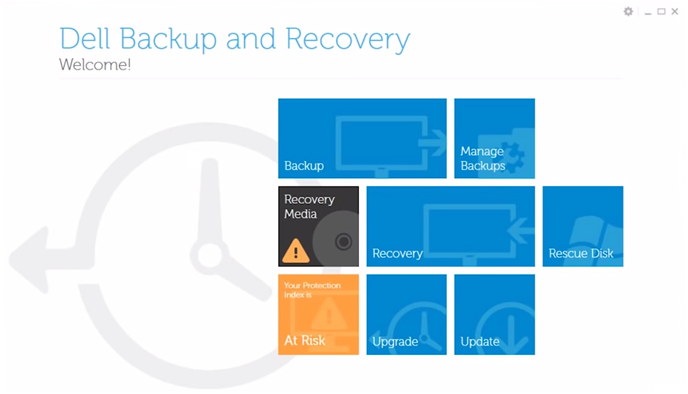
Dell Backup and Recovery Manager screenshot in Windows 8
- Select what type of media you’d like to save the recovery disk as: USB flash drive or Discs (as in DVDs)
- Insert a blank USB or a blank DVD. If you did this already the media should appear in Select Drive Below screen. Make sure you have enough space on your USB or DVD to create the recovery disk.
Warning:
If you use a USB flash drive you will lose all data available on it as the drive must be formatted - After you selected your media from the list, click Start
- Click Yes when the warning message appears
- When the process is done, remove the media and label it. Keep it safe!
More Information
Support Links
- Easy Recovery Essentials for Windows – our repair and recovery disk.
It’s an easy-to-use and automated diagnostics disk. It’s available for Windows 8, Windows 7 and Windows Vista. It’s also available for Windows XP and Windows Server.Read more at Windows Recovery Disks.
- The NeoSmart Support Forums, member-to-member technical support and troubleshooting.
- Get a discounted price on replacement setup and installation discs: Windows XP, Windows Vista, Windows 7, Windows 8.
Applicable Systems
This Windows-related knowledgebase article applies to the following operating systems:
- Windows XP (all editions)
- Windows Vista (all editions)
- Windows 7 (all editions)
- Windows 8 (all editions)
- Windows 8.1 (all editions)
- Windows Server 2003 (all editions)
- Windows Server 2008 (all editions)
- Windows Server 2012 (all editions)
Applicable Models
This Dell-related knowledge base article applies to the following computer models:
- Inspiron series: 1000, 10z, 1100, 1121, 1122, 1150, 11z, 1200, 1210, 13, 1300, 1318, 1320, 1370, 13z, 14, 1410, 1420, 1425, 1427, 1428, 1440, 1464, 1470, 14r, 14z, 15, 1501, 1520, 1521, 1525, 1526, 1545, 1546, 1555, 1570, 15r, 15z, 17, 1720, 1721, 1750, 1764, 17r, 2000, 2100, 2200, 2500, 2600, 2650, 3000, 300m, 3200, 3500, 3700, 3800, 4000, 4100, 4150, 500, 519, 519, 530, 530s, 537, 537s, 537st, 545, 546, 560, 570, 5000, 5000e, 500m, 5100, 510M, 5150, 5160, 5425, 560, 6000, 600M, 6100, 630m, 640, 6400, 640m, 7000, 700m, 710m, 7500, 8000, 8100, 8200, 8500, 8600, 9100, 9200, 9300, 9400, B120, B130, DUO, E1405, E1505, E1705, M301z, M411r, M421r, M5010, M5030, M5040, M7010, MINI 10, MINI 1012, MINI 1018, MINI 10V, MINI 10V N, MINI 12, MINI 9, MINI 910, MM061, MP061, MXC061, N3110, N4120, X200, XPS, XPS Gen 2, XPS M140, One 2205, One 2305, One 2320
- Dimension series: 200, 400, 420, 630i, 1100, 1200, 2100, 2200, 2300, 2300c, 2350, 2400, 2400c, 3000, 3100, 3100, 3100c, 410, 4100, 420, 4200, 4250, 4300, 4300S, 4400, 44450, 500, 4500C, 4500S, 4550, 4590t, 4600, 4600c, 4601, 4700, 4700c, 5000, 5100, 5100c, 5150, 5600, 600, 6000, 610, 6700, 8100, 8200, 8250, 8300, 8300n, 8400, 900, 9100, 9150, 9200, B110, C521, D-610, E310, E510, E520, E521, GX150, L1000R, L600R, L667R, L800CXE, V333C
- Latitude series: 100L, 110L, 120L, 13, 131L, 2100, 2110, 2120, 2600, 3330, 3440, 3540, 6000d, 6430u, 840, ATG, C400, C500, C510, C540, C600, C610, C640, C800, C810, C840, Cpi, Cpt, CS, Csx, D400, D410, D420, D430, D500, D505, D510, D520, D530, D531, D600, D610, D620, D630, D630c, D631, D800, D810, D820, D830, E4200, E4300, E4310, E5400, E5410, E5420, E5420M, E5430, E5440, E5500, E5510, E5520, E5520M, E5530, E5540, E6220, E6230, E6320, E6330, E6400, E6410, E6420 , E6430, E6430s, E6440, E6500, E6510, E6520, E6530, E6540, E7240, E7440, L400, LM, LS, LT, LX, LXP, SX 4, V700, V710, V740, X1, X200, X300, XP4, Xpi, XT, XT2, XT3, Z
- Vostro series: 1000, 1011, 1014, 1015, 1088, 1220, 13, 130, 1320, 1400, 1420, 1440, 1450, 1500, 1510, 1520, 1540, 1550, 1700, 1720, 200, 220, 230, 2420, 2421, 2510, 2520, 2521, 3000, 3300, 3350, 3360, 3400, 3450, 3460, 3500, 3550, 3555, 3560, 3700, 3750, 5460, 5470, 5560, A860, V131
- Precision series: 350, 360, 370, 380 Workstation, 390 Workstation, 650, 670 Workstation, M50, M60, M65, M70, M90, M2400, M4300, M4700, M4700, T3400
- OptiPlex series: 150D, 160, 160L, 170L, 170LN, 210L, 210LN, 3010, 3011 AIO, 3020, 320, 330, 360, 380, 390, 5100, 560, 580, 7010, 740, 745, 745c, 755, 760, 780, 790, 9010, 9020 AIO, 960, 980, 990, E1, FX160, G1, GC, GH1, GH2, GH3, GL, GM, GMT, GX1, GX100, GX110, GX115, GX150, GX1p, GX200, GX240, GX260, GX260n, GX270, GX270n, GX280, GX300, GX400, GX50, GX520, GX60, GX60N, GX620, L60, N, NX1, SX260, SX270, SX270N, SX280, VDI Blaster, XE, XE2, XL, XM, XMT
- XPS series: 11, 12, 13, 14, 14z, 15, 15z, 17, 400, 410, 420, 720, 8100, 8200, 8250, 8300, 8400, 8500, 8600, 8700, 9150, 9200, L511X, M1210, M1330, M1530, M1531, M1532, M1533, M1534, M1535, M1710, M2010, MXC062, MXG061, MXP061
- Studio series: 1440, 1450, 1457, 1458, 15, 1530, 1535, 1536, 1537, 1555, 1557, 1558, 1569, 1735, 1736, 1737, 1745, 1747, 1749, 1909
- Studio XPS series: 13, 16, 1645, 1647, 1340, 1640, X1340
- Dimension XPS series: 210, 400, 410, 4100V, 420, 50, 600, 630i, 66, 720, 9200, D233, D234, M1530, One, P60, T450, T600, XTS800
- Alienware series: 14, 17, 18
- Adamo series