This guide shows you how to use the sfc utility for the following Windows versions: Windows XP, Vista, 7, 8, 8.1 and 10.
Contents
About sfc
Sfc or sfc.exe stands for System File Checker. It’s a utility in Microsoft Windows operating systems, starting from Windows 98, that allows you to scan and restore corruptions in system files.
The sfc utility is available for Windows XP, Windows Vista, Windows 7, Windows 8, Windows 8.1 and Windows 10.
To run this utility you need to be logged in as an Administrator.
Parameters
The most command parameter for this utility is:
sfc /scannow
The /scannow command will scan for issues and, if it finds one, it will attempt to replace the files that have issues from the DLL Cache.
In Windows Vista or later (7, 8, 8.1), the sfc utility can be used to scan individual files.
Other parameters for the sfc utility are:
sfc /scanonce will scan the system files only once.
sfc /scanboot will scan the system files at every boot of your computer
sfc /revert will return the scan to its default operating
sfc /purgecache will remove the Windows File Protection cache and begin a scan over the system files
sfc /cachesize=x, where x is the size in MB, will set the cache size of the Windows File Protection
sfc /? will display the help list
Run sfc in Easy Recovery Essentials
You can download and burn Easy Recovery Essentials on any CD, DVD or USBs and run the sfc.exe commands you need.
To do so, follow these steps:
- Download Easy Recovery Essentials
- Burn the ISO image. Follow our instructions on how to burn a bootable ISO image to a CD or DVD. If you’d like to have a recovery USB instead, follow these instructions.
- Boot into Easy Recovery Essentials
- Select Launch Command Line

Run sfc in Windows XP
To run the sfc utility in Windows XP, follow these steps.
If you run the utility while you’re logged into Windows XP:
- Open Command Prompt. To do so, go to Start > Run and type
cmdand click OK. - Type the
/scannowcommand and press Enter:sfc /scannow
If you run sfc outside Windows XP, e.g. when you’re at Recovery Console or via Easy Recovery Essentials if you can’t boot into Windows XP, you need to set the path where your Windows XP is installed:
- Open Command Prompt
- Type this command, but replace
c:\with the letter of the drive where your Windows XP is installed:sfc /scannow /offbootdir=c:\ /offwindir=c:\windows
- Press Enter
If System File Checker founds any errors and repairs the issues found, restart your computer before you boot into Windows XP.
To run the commands using your Windows XP installation disc, follow these steps:
- Insert the installation CD in the disc tray
- Restart the computer
- At the Press any key message, press any key on your keyboard to boot from the CD
- At the Welcome to Setup screen, press R to open Recovery Console
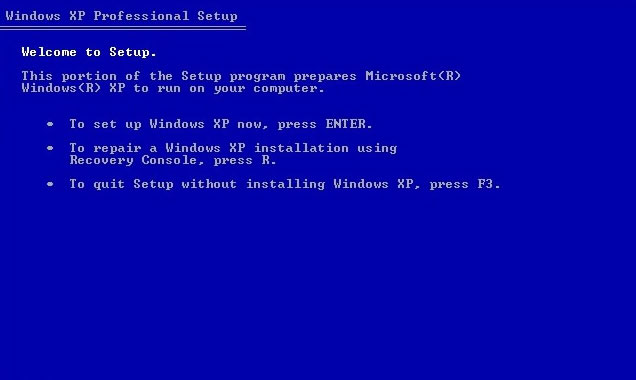
- Enter the Administrator password
- When Command Prompt appears, type the sfc command and press Enter:
sfc /scannow /offbootdir=c:\ /offwindir=c:\windows
Replace
c:\with the letter of the drive where your Windows XP is installed.
Run sfc in Windows Vista
To run the sfc in Windows Vista, follow these steps:
- Click Start
- Click All Programs
- Click Accessories
- Right-click on Command Prompt
- Click Run as Administrator
- If UAC (User Account Control) appears, click Yes or Continue to continue to open Command Prompt as Administrator
- When the Command Prompt appears, type:
sfc /scannow - Press Enter
If you can’t boot into Windows Vista, use your original installation disc. To do so, follow these steps below.
If you don’t have the installation disc, go to Run sfc in Easy Recovery Essentials. You can burn EasyRE on any CD, DVD or USBs.
- Insert the original Windows Vista DVD in the disc tray
- Boot from the DVD
- Choose a language and keyboard layout
- At the Welcome screen, click on Repair your computer

- Choose your operating system from the list
- Click Next
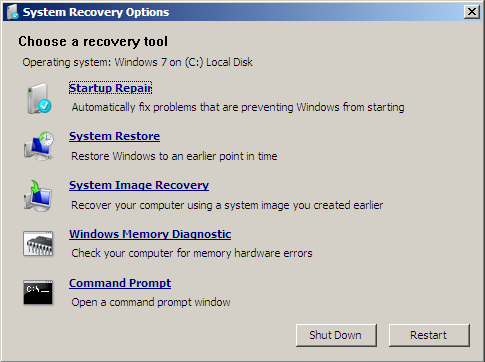
- At the System Recovery Options window, click Command Prompt

- Type the command and press Enter:
sfc /scannow /offbootdir=c:\ /offwindir=c:\windows
Replace
c:with the letter of the drive where Windows Vista is installed.
Run sfc in Windows 7
To run the sfc in Windows Vista, follow these steps:
If you can’t boot into Windows 7, go to Run sfc in Easy Recovery Essentials.
- Click Start
- Type
command promptin search box - Right-click on the first item in search results list: Command Prompt
- Click Run as administrator
- Click Continue or Yes on the UAC warning window to allow this action
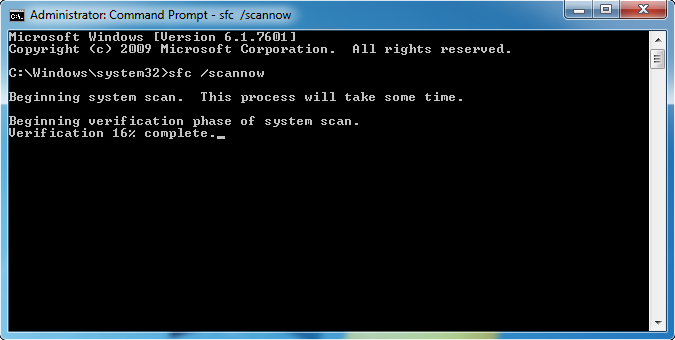
- When Command Prompt appears, type the command:
sfc /scannow
- Press Enter
You can also run the sfc command via the installation disc or the System Recovery Options panel installed on your computer.
Method #1
- Insert the original Windows 7 installation DVD in the disc tray and reboot your computer
- Press any key when it says “Press any key to boot from CD or DVD..”
- Select a language and keyboard option
- Click Repair your computer

- Select your operating system

- Choose Command Prompt
- Type the command and press Enter:
sfc /scannow /offbootdir=c:\ /offwindir=c:\windows
Replace
c:with the letter of the drive where Windows 7 is installed.
Method #2
- Restart your computer
- Press the F8 key several times during booting before the Windows 7 logo appears
- At the Advanced Options screen, select Repair your computer
If Repair your computer option isn’t available, follow Method #1 above.

- Select a keyboard and language
- Select Command Prompt
- Type the command and press Enter:
sfc /scannow /offbootdir=c:\ /offwindir=c:\windows
Replace
c:with the letter of the drive where Windows 7 is installed.
Run sfc in Windows 8 or 8.1
To run the sfc in Windows 8 or Windows 8.1, follow these steps:
- Boot into your system
- Press the
 and C key to open the Charm Bar
 - Type
command promptorcmdin the search field - From the search results list, right-click on Command Prompt

- Select Run as Administrator

- Enter the password
- When Command Prompt loads, type the sfc command and press Enter:
sfc /scannow
You can also run the utility from the Windows installation disc. To do so, follow these steps below.
If you don’t have the installation disc, go to Run sfc in Easy Recovery Essentials. You can burn EasyRE on any CD, DVD or USBs.
- Insert the disc and restart the computer
- Press any key to boot from the DVD
- Choose your keyboard layout, time and language
- Click Next
- Click Repair your computer

- Click Troubleshoot

- Click Advanced options
- Click Command Prompt
- Type the command and press Enter:
sfc /scannow /offbootdir=c:\ /offwindir=c:\windows
Run sfc in Windows 10
To run the sfc in Windows 10, follow these steps:
- Boot into your system
- Press the key to open the Start Menu
- Type
command promptorcmdin the search field - From the search results list, right-click on Command Prompt

- Select Run as Administrator
- Enter the password
- When Command Prompt loads, type the sfc command and press Enter:
sfc /scannow
You can also run the utility from the Windows installation disc. To do so, follow these steps below.
If you don’t have the installation disc, go to Run sfc in Easy Recovery Essentials. You can burn EasyRE on any CD, DVD or USBs.
- Insert the disc and restart the computer
- Press any key to boot from the DVD
- Choose your keyboard layout, time and language
- Click Next
- Click Repair your computer

- Click Troubleshoot
- Click Advanced options
- Click Command Prompt
- Type the command and press Enter:
sfc /scannow /offbootdir=c:\ /offwindir=c:\windows
Troubleshooting
sfc isn’t recognized
If the sfc commands you’re typing in Command Prompt aren’t being recognized, make sure that:
- You’re logged in as an Administrator
- Or you’re logged in as a user of an Administrator group
Windows Resource Protection could not perform
You may receive this error while trying to perform a /sfc scannow:
Windows Resource Protection could not perform the requested operation
This error usually appears if the hard disk has corruptions or bad sectors. To fix this error, you can try any of the following tips:
Tip #1: Boot into Safe Mode
Try to run the sfc /scannow command while in Safe Mode. To boot into Safe Mode, follow these steps:
- Boot your computer
- Press the F8 key before the Windows logo appears
- At the Windows Options screen, use the arrows keys and select Safe Mode
- Press Enter
To get the full instructions on how to boot into Safe Mode, read our guide on Safe Mode with instructions for each Windows version:
Tip #2: Run chkdsk
If Tip #1 doesn’t work, also try to run chkdsk commands to check if your hard disk has bad sector or corruption issues.
To run chkdsk (related guide: chkdsk), follow these steps:
- Insert the original Windows installation CD or DVD
- Go to Command Prompt. Depending on your Windows version, Command Prompt is:
- Windows XP: Go to Recovery Console
- Windows Vista or 7: Go to System Recovery Options
- Windows 8 or 8.1: Go to Troubleshoot > Advanced Options
- When Command Prompt appears, type this command:
chkdsk c: /r
Where
c:is where your Windows is installed.
Press Enter
Windows Resource Protection could not start the repair service
The sfc utility may return the following error when you try to run it:
Windows Resource Protection could not start the repair service
If it returns this error, run the following commands:
-
ren c:\windows\winsxs\pending.xml pending.old
Replace
Cwith the drive’s letter where Windows is installed on. -
sfc /scannow /offbootdir=[c]:\ /offwindir=[c]:\windows
Replace
Cwith the drive’s letter where Windows is installed on.
More Information
Support Links
- Easy Recovery Essentials for Windows – our repair and recovery disk.
It’s an easy-to-use and automated diagnostics disk. It’s available for Windows 8, Windows 7 and Windows Vista. It’s also available for Windows XP and Windows Server.Read more at Windows Recovery Disks.
- The NeoSmart Support Forums, member-to-member technical support and troubleshooting.
- Get a discounted price on replacement setup and installation discs: Windows XP, Windows Vista, Windows 7, Windows 8, Windows 10.
Applicable Systems
This Windows-related knowledgebase article applies to the following operating systems:
- Windows XP (all editions)
- Windows Vista (all editions)
- Windows 7 (all editions)
- Windows 8 (all editions)
- Windows 8.1 (all editions)
- Windows 10 (all editions)