This guide is about Toshiba recovery disks for the following versions of Windows: Windows XP, Vista, 7, and 8.
A recovery disk is also known as a restore disc, repair disc, boot disc or rescue disk.
Looking for a recovery disk for Toshiba? Download Easy Recovery Essentials (our recovery and repair disk for Toshiba).
![]()
Contents
Download alternative recovery disk for Toshiba
If the recovery partition of your Toshiba computer is corrupt or damaged, download Easy Recovery Essentials.
Easy Recovery Essentials works with any Toshiba computer model and it’s compatible with the following Windows versions:
- Microsoft Windows 8 (read more on our Windows 8 Recovery Disk and Repair Disc Download article)
- Microsoft Windows 7 (read more on our Windows 7 Recovery Disk and Repair Disc Download article)
- Microsoft Windows Vista (read more on our Windows Vista Recovery Disk and Repair Disc Download article)
- Microsoft Windows XP (read more on our Windows XP Recovery and Repair Disk article)
- Microsoft Windows Server 2003, 2008 and 2012 (read more on our Windows Server 2008 and 2012 Recovery Discs Download article)

Screenshot of Easy Recovery Essentials
Burn Easy Recovery Essentials directly to a CD, DVD or a USB flash drive and use the Automated Repair function to automatically find and fix boot errors.
Download Easy Recovery Essentials for Toshiba
Note: Easy Recovery Essentials can not be used to install or reinstall Windows.
Create Toshiba recovery disks
The Toshiba Recovery Wizard software presents several options to recover a computer, depending on the current setup available on your computer:
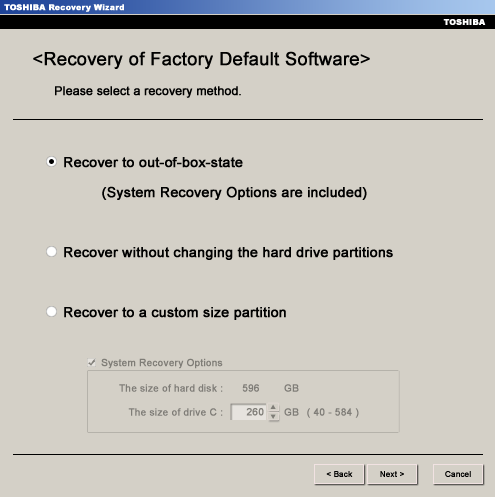
- Recovery of Factory Default Software. This option deletes all partitions available on your hard drive and start with the default factory settings
- Recover without changing the hard drive partitions. This option reformats the main drive, C:\, to recover it to the default settings while keeping the other partitions intact
- Recover to a custom size partition. This options deletes all partitions available on your hard drive
Depending on your computer model, your computer can either have the recovery partition already installed or have a recovery media already created, or both.
Newer models of Toshiba computers usually do not come with a disk, but you can create it at the first install of your system (recommended!).
Create disc for Windows XP
Toshiba computers with Windows XP come with recovery partition instead of a recovery disk (especially for computer models until mid-2007), but you can create the recovery disk using the Recovery Disc Creator software.
If you can’t boot into Windows XP, go to Download alternative recovery disk for Toshiba.
To create the discs using the Toshiba Recovery Disc Creator software, follow these steps:
- Open Windows XP
- Find the Recovery Disc Creator icon on your Desktop or find it in Start > All Programs > Recovery Disc Creator

- Select CD or DVD
- Check what type of files you want to backup: System Recovery Discs or Applications Discs or both
- The software will mention how many DVDs or CDs you need in order to create the disks, under the Information tab
- Click Create
- Insert your first blank disk in the optical drive when prompted
- Follow the next steps on the screen to complete the process
- Label your discs and keep them safe!
Create disc for Windows Vista
Follow these steps to create the recovery disk for Windows Vista.
If you can’t boot into Windows Vista, go to Download alternative recovery disk for Toshiba.
- Boot Windows Vista
- Go to Start, then All Programs, and then find the My Toshiba folder
- Click on Recovery Media Creator
- Under the Media Set list, select DVD or USB for the format you want to use for creating the recovery media. Make sure the DVD is blank and the USB is formatted.
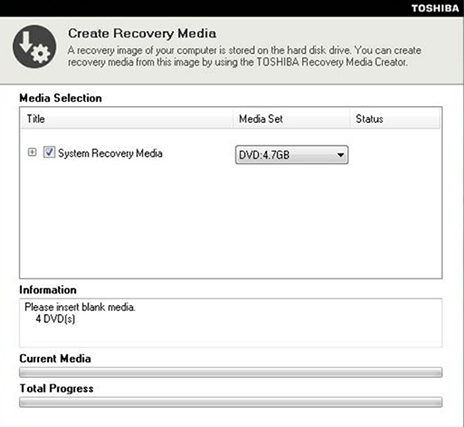
- Check that you have the necessary DVDs under the Information section
- Insert the blank DVD or USB flash drive
- Click Create
- Continue with the next steps to complete the process
Create disc for Windows 7
To create the recovery media for Windows 7, follow these steps:
If you can’t boot into Windows 7, go to Download alternative recovery disk for Toshiba.
- Open Windows 7
- Go to Start
- Go to All Programs
- Go to My Toshiba folder
- Click on Recovery Media Creator. This opens the Recovery Media Creator software
- Select DVD or USB Flash from the Media Set drop down list. Selecting DVD means that you will create the recovery media on a DVD.
- The Recovery Media Creator will mention how many DVDs you need under the Information tab
- Insert the first blank DVD in the optical drive or the blank USB flash drive
- Click Create
- Continue with the next steps to complete the process
- Make sure you label the discs!
Create disc for Windows 8
DVD or USB flash drives are the only supported formats for a recovery media for Windows 8 using the Toshiba Recovery Media Creator.
If you can’t boot into Windows 8, go to Download alternative recovery disk for Toshiba.
The steps to create the disc are:
- Open Windows 8
- At the Start screen, press the Windows and C key to open the Search Charms bar
- Select Search
- Type “recovery” in the Search field
- In the search results list, click on Recovery Media Creator

- Click Yes, if prompted by the system with the following message: “Do you want to allow the following program to make changes to your computer?“
- Select DVD or USB under the Media Set drop down list
- The Information section mentions how many DVDs or USB flash drives you need to create the recovery media
If you choose to use a USB flash drive, you must format it before using it!
- Insert the first blank DVD or the empty formatted USB
- Click Create
- Continue with the next steps to finish the process
- Label the recovery media and keep it safe!
Restore a Toshiba computer
A Toshiba computer can be restored using the built-in recovery partition (called HDD recovery procedure) or the created recovery discs (CDs, DVDs or USBs depending on your Windows version).
Restore Windows XP with partition or disc
You can restore Windows using the recovery disc by following these steps. You can also restore it using the built-in partition (follow the next set of instructions for this).
If you don’t have a recovery media created yet and can’t boot into Windows XP, go to Download alternative recovery disk for Toshiba.
- Insert your first CD or DVD in the optical drive
- Boot Windows XP
- At the boot screen, press F12
- Wait for the boot menu to appear and then select CD/DVD and press Enter
- Wait for the system to boot to the Recovery Wizard software
- Continue with the process
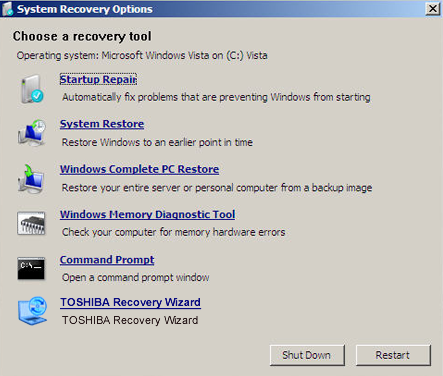
You can use the recovery partition of your Toshiba computer (called Hard Drive Recovery) to restore Windows XP to its factory default settings:
- Turn off your computer
- Press and hold the 0 key available on your keyword and press the Power On button at the same time
- Wait for the Toshiba Recovery Wizard software to appear
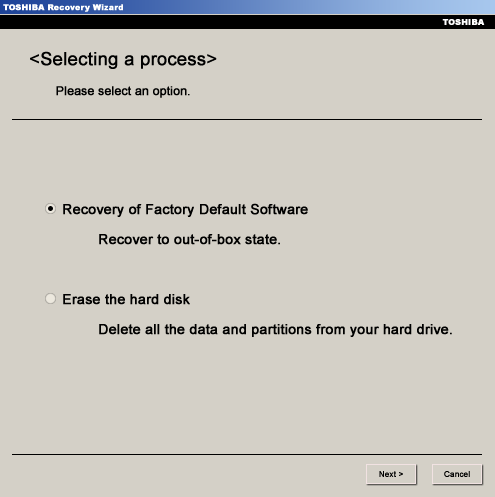
- Select from the available options: Recovery of Factory Default Software or Erase the hard disk
- Select Recovery of Factory Default Software
This procedure erases all your personal files (audio, video, pictures). Backup your files before you continue! You can use Easy Recovery Essentials’ Backup feature
- Select Recover to out-of-box-state
- Click Next
- Click Next again
- Wait for the process to finish and continue with the next steps to restart your computer afterwards.
Restore Windows Vista with partition or disc
You can restore Windows Vista using the HDD recovery procedure (the partition) by following these steps:
This procedure erases all your personal files! Create a backup before you continue (You can use Easy Recovery Essentials’ Backup feature).
- Power on your computer and press the F12 key or the F8 key to open the boot menu
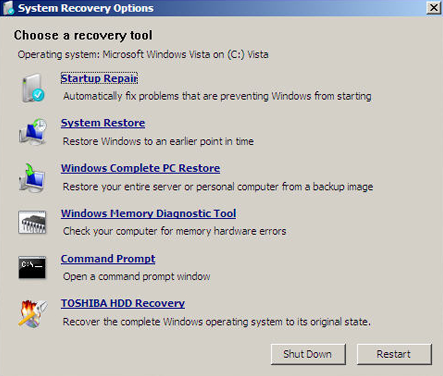
- Choose Repair your computer at the Advanced Boot Options screen
- Select a language and a keyboard language and then log in as an user with administrative rights to the system (the Administrator account)
- Select the HDD Recovery option, the last item from the list
- Click Yes or OK, at the Warning! message
- When the Toshiba Recovery Wizard screen appears, select Recovery of Factory Default Software
- Click Next
- Select Recover to out-of-box state
- Click Next
- Click Next, at the confirmation message
- Wait for the process to finish
- Click Finish
If you have an already created media (CD, DVD or USB) to use, follow these steps:
- Insert the first DVD in the optical drive or the USB flash drive and turn on the computer
- Press the F12 key to boot from the DVD/USB
- Select DVD or USB, depending on what you used to create the media
- At the warning message, click Yes to confirm
- Select Recovery of Factory Default Software
- Click Next
- Select Recover to out-of-box-state to recover the original factory image (the factory default settings)
- Continue with the next steps to complete the process
- Click Finish to restart the computer
Restore Windows 7 with partition or disc
Using the installed partition on your Toshiba, you can restore Windows 7 using these steps:
This procedure erases all your personal files! Create a backup before you continue (You can use Easy Recovery Essentials’ Backup feature).
- Turn off your computer before you continue
- Power on your computer and press the F12 key or the F8 key to open the boot menu
- Wait for the boot menu to appear
- Choose Repair your computer

- Select your language and the keyboard language
- Log in as an user with administrative rights to the system
- Select the Toshiba Recovery Wizard option, the last item from the list. If the last item from the list is HDD Recovery, select this
- Click Yes or OK, at the Warning! message
- When the Toshiba Recovery Wizard screen appears, select Recovery of Factory Default Software
- Click Next
- Select Recover to out-of-box state
- Click Next
- Click Next, at the confirmation message
- Wait for the process to finish
- Click Finish
You can use the recovery DVD or USB to restore Windows 7:
- Insert the first disc in the optical drive: either the DVD or the USB
- Turn on the computer
- When the Toshiba logo appears, press the F12 key on your keyboard
- At the boot menu screen, use your arrow keys and select the DVD option or the USB flash option, if you have the recovery media as a USB flash drive
- Click Yes, at the warning message screen
- At the Selecting a process screen, select Recovery of Factory Default Software
- Click Next
- Select Recover to out-of-box-state to recover the original factory image. For details about the other options presented here, go to Create Toshiba recovery disks.
- Continue with the next steps until a message confirms that your main drive has been recovered
- Click Finish to restart the computer, when prompted
Restore Windows 8
If you can boot your computer, the Windows 8 system can be restored from within Windows 8:
- Open Windows 8
- Open the Charm Bar (press the
 + C keys)
 - Select Settings
- Select PC Settings
- Select General from the left
- Go to the Advanced startup section and select Restart now
- Wait for the Advanced startup screen to show
- Select Troubleshoot
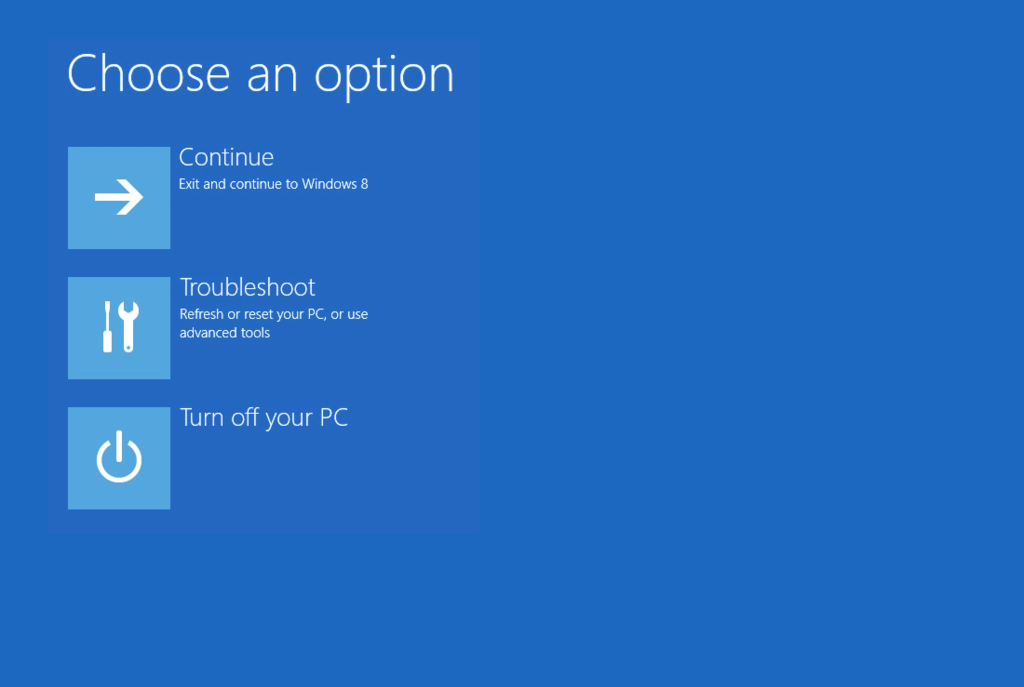
- Select Advanced options
- Select System Restore
- Continue with the next steps to complete the process
If you can’t boot into Windows 8, follow these steps:
- Power on your computer
- Press the F12 immediately to open the Boot menu
- Select HDD Recovery
- Press Enter
- At the warning screen, select Yes
- Wait for the Advanced startup screen to show
- Select Troubleshoot
- Select Advanced options
- Select System Restore
- Continue with the next steps to complete the process
More Information
Support Links
- Easy Recovery Essentials for Windows – our repair and recovery disk.
It’s an easy-to-use and automated diagnostics disk. It’s available for Windows 8, Windows 7 and Windows Vista. It’s also available for Windows XP and Windows Server.Read more at Windows Recovery Disks.
- The NeoSmart Support Forums, member-to-member technical support and troubleshooting.
- Get a discounted price on replacement setup and installation discs: Windows XP, Windows Vista, Windows 7, Windows 8.
Applicable Systems
This Windows-related knowledgebase article applies to the following operating systems:
- Windows XP (all editions)
- Windows Vista (all editions)
- Windows 7 (all editions)
- Windows 8 (all editions)
- Windows 8.1 (all editions)
Applicable Models
This Toshiba-related knowledge base article applies to the following computer models:
- Satellite series: 1130, 1400 (PS140U), 1415 (S105), 1415 (S173), 1600 , 1700, 1800 (PS183U, PS183U), 1805, 2100CDS, 2100CDT, 220CDS, 4030CT, 4060CDT, 4080XCDT, 5105 (S501), 5205 (PS522U), 7200CT, A100 (PSAA0U, PSAA2U, PSAA5U, PSAA8U, PSAANU), A105 (PSAA0U, PSAA2U, PSAA5U, PSAA8U, PSAAKU, PSAANU), A130 (PSAD0U, PSAD6U), A135 (PSAD0U, PSAD6U), A15 (TK119/CL1680), A200 (PSAE3U, PSAF0U, PSAF3U), A205 (PSAE3U, PSAF0U, PSAF3U), A210 (PSAEGU, PSAFGU, PSAFHU), A215 (PSAEGU, PSAFGU, PSAFHU), A300 (PSAG0U, PSAG4U, PSAGCU), A300D (PSAH0U, PSAH8U), A305 (PSAG8U, PSAGCU, PSAG0U, PSAG4U), A305D (PSAH0U, PSAH8U), A35 (PSA30U), A40 (PSA40U, PSA40U), A45 (PSA40U), A50 (PSA50, PSA50U), A500 (PSAP0U, PSAP3U, PSAT0, PSAT3U, PSAT6U, PSAT9U), A500D (PSAQ0U), A505 (PSAP0U, PSAP3U, PSAT0, PSAT0U, PSAT3U, PSAT6U), A505 (PSAT9U), A505D (PSAQ0U), A55 (PSA50, PSA50U), A60, A65 (PSA60U), A65 (S1362), A660 (PSAW0U, PSAW3U), A660D (PSAX0U), A665 (PSAW0U, PSAW3U), A665D (PSAX0U), A70 (PSA70U), A75 (PSA70U), A80, A85, C650 (PSC08U, PSC12U, PSC16U, PSC2EU), C650D (PSC0YU, PSC16U), C655 (PSC08U, PSC12U, PSC16U, PSC2EU), C655D (PSC0YU, PSC16U), C670 (PSC3UU), C670D (PSC4AU), C675 (PSC3UU), C675D (PSC4AU), C850 (PSC72U), C850D (PSC9JU), C855 (PSC72U), C855D (PSC9JU), C870 (PSC8AU), C875 (PSC8AU), E200 (PSE25U), E205 (PSE25U), E300 (PSE30U), E305 (PSE30U), L20 (PSL2XU), L25 (PSL2XU), L30 (PSL33U), L300 (PSL33U, PSLB0U, PSLB8U), L300D (PSLB8U, PSLC0U, PSLC8U, PSLCJU, PSLE8U), L305 (PSL33U, PSLB0U, PSLB8U), L305D (PSLB8U, PSLC0U, PSLC8U, PSLCJU, PSLE8U), L35 (PSL33U), L350 (PSLD0U, PSLD8U), L350D (PSLB8U, PSLE0U), L355 (PSLD0U, PSLD8U, PSLE8U), L355D (PSLB8U, PSLE0U, PSLE8U), L40 (PSL40U, PSL48U), L45 (PSL40U, PSL48U), L450, L450D (PSLY5U), L455D (PSLY0U, PSLY5U), L500 (PSLU0U, PSLU6U), L500D (PSLM0U, PSLV6U), L505 (PSLL0U, PSLU0U, PSLU6U), L505D (PSLM0U, PSLV6U), L555D (PSLP0U, PSLP0U), L630 (PSK00U, PSK60U), L635 (PSK00U, PSK60U), L640 (PSK0GU), L640D (PSK0Qu), L645 (PSK0GU), L645D (PSK0QU), L650 (PSK2CU, PSK2GU), L650D (PSK2LU), L655 (PSK2CU, PSK2GU, PSK2UU), L655D (PSK2LU), L670 (PSK3AU), L670D (PSK3JU), L675 (PSK3AU), L675D (PSK3JU), L740 (PSK0YU), L745 (PSK0YU), L750 (PSK1WU), L750D (PSK32U), L755 (PSK1WU), L755D (PSK32U), L770D (PSK40U), L775 (PSK3SU), L775D (PSK40U), L855 (PSKA8U), L870D (PSKBQU), L875D (PSKBQU), M110 (PSMB0U), M115 (PSMB0U), M15 (PS630U), M30 (PSM30U), M300 (PSMD8U), M300D (PSMDYU), M305 (PSMD8U), M305D (PSMDYU), M30X, M35 (PSM30U, PSM33U), M35X, M40, M45 (PSM40U, PSM42U, PSM43U), M50 (PSM50U, PSM53U), M500D (PSMLYU), M505D (PSMLYU, S4970, PSMLYU), M55 (PSM50U, PSM53U), M640 (PSMPBU), M645 (PSMPBU), MX35X (PSA72U), NB200 (PLL20U), NB205 (PLL20U), P100 (PSPA0U, PSPAGU), P105 (PSPA0U, PSPAGU), P15 (PSP10U), P15-TK130 (CL1642-3), P15-TK131 (CL1746-1), P20 (PSP20U), P200 (PSPB0U, PSPB3U) and P200D (PSPBLU), P205 (PSPB0U, PSPB3U) and P205D (PSPBLU), P25 (PSP20U), P30 (PSP30U), P300 (PSPC0U), P305 (PSPC0U, S8820), P35 (PSP30U), P505D (PSPHJU), P740 (PSMQ1U), P745 (PSMQ1U), P750 (PSAY1U, PSAY3U), P755 (PSAY1U, PSAY3U), P770 (PSBY1U) and P770D (PSBZ1U), P775 (PSBY1U) and P775D (PSBZ1U), P850 (PSPKBU), P855 (PSPKBU), P870 (PSPLAU), P875 (PSPLAU), R10 (PSR10U), R15 (PSR10U), T110 (PST1AU), T115 (PST1AU(, U300 (PSU30U), U305 (PSU30U, PSU34U), X200 (PSPB9U), X205 (PSPB9U)
- Tecra series: 8000, 8100, A8, A8 (PTA83U)
- Qosmio series: G15R
- Portégé series: 7020CT, A600 (PPA60U), A605 (PPA60U), R830 (PT324U), R835 (PT324U)