XP & Win7 Boot Help

jpChris

Member
Hi all,

I've read until my eyes are bleeding, and just when I get to the "aha!" point, the next sentence throws me. I really am a newbie, but we all gotta start someplace.

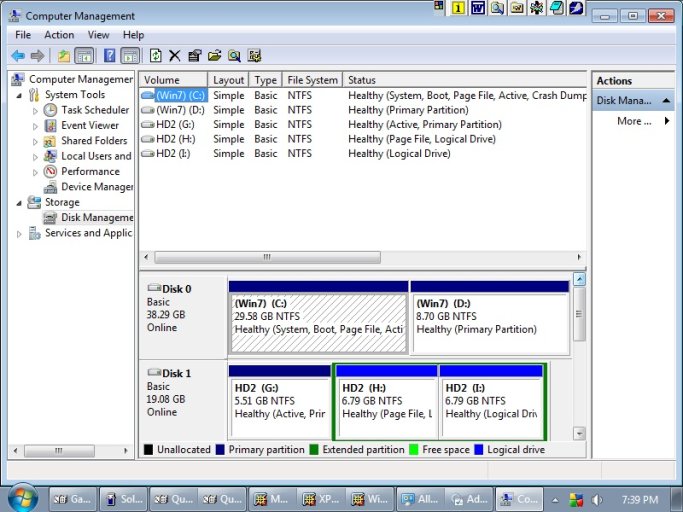
Here's my situation: I have WinXP on my main HDD(0). I have Win7 on my second HDD(1) hooked up as a slave drive. I used to have another copy of WinXP as slave drive and used it as a "break me" for testing, tweaking, etc.

When I had 2 XP's, the bootscreen would come up and I could boot to XP(1) or XP(2).

Now that I have Win7 as my 2nd, slave drive, the only way to get to W7 is to hit F8 and scroll down to HD1, hit enter and W7 boots.

Now, I know that WXP's boot isn't forward compatible and I can't amend the boot.ini to point to W7, and this is where my confusion comes in with EasyBCD. I've downloaded v.2.

Ideally, when the bootscreen comes up I'd like to have the first boot option to be WXP and the second option to be W7.

I have no qualms about changing jumper settings or BIOS settings if necessary. So, what I need is a "for dummies" 1-2-3 steps to take to achieve my "ideal" setup, please.
 
Welcome back Chris,

Easy 2 does a lot more automatically than 1.7.x did. First you should re-install the Vista/W7 bootloader: Manage Bootloader -> Re-install the Vista bootloader -> Write MBR. Now if the dual-boots working than great. Otherwise, add a new entry for W7 and XP and delete the old W7 and XP entries if they were not working: Add/Remove Entries. Now when you add the entry for XP it'll ask if you would like EasyBCD to autoconfigure boot.ini and copy over the correct files. Click yes.
 
Hi Master Mage,

Thanks for the quick reply. And, please forgive me for being so dense, but I know others are going to be in the same boat I am and I want to make sure I've got it right.

Launch EasyBCD: (duh)

1) Click "Manage Bootloader"
2) Click "Reinstall Vista Bootloader
3) Click "Write MBR"

Close out and reboot. I should get a bootscreen with both OS's showing and I can select which one I want?

IF NO JOY:

Launch EasyBCD: (duh, again)

1) Click "Add\Remove Entries"
2) Click on Win7 and click "delete"
3) Click on WinXP and click "delete"
4) In the "Add an Entry" box, click the ▼ arrow and select "Windows Vista\Longhorn"
5) Click "Add Entry"
6) Repeat steps 4 & 5 for "WindowsXP"
7) Let EasyBCD autoconfigure boot.ini and copy over the correct files, and click yes.

Is this correct?

p.s. In "Manage Existing Entries" it has Windows7 listed. Can I just click "Add An Entry" and add XP from there without performing all the above steps? Or will it not work that way?
 
Last edited:
You may do the first steps (1-3) outlined followed by the PS that you wrote.

That's the best way.
 
Hi Guru,

OK! I'm going to close out of everything, do steps 1 to 3, then do my "p.s.".

And, Thanks(!) for the quick reply. I'll post back with the results.
 
It sounds to me like you should leave the XP HDD alone, and just swap the boot sequence in the BIOS, to put the Win 7 disk first. Then just add a normal XP entry to the BCD, from EasyBCD 2.0 Beta, and you will be able to boot either from the Win 7 boot menu. Then just change the order to put the XP entry first in the BCD menu, and adjust the default entry under "Change Settings" to be the XP entry instead.
That would probably be the best way, in case you need to boot directly from the XP disk later on. :wink:
 
Hi guys,

I'm back. No Joy.

I did steps 1-2-3, then I clicked "Add Entry" and selected XP.

On reboot, my XP bootscreen came up and showed "XP" as first and "XP(2)" as second, like it normally does.

I let it boot to XP and everything was OK. Then I rebooted and selected "XP(2)" thinking I just had to amend the boot.ini wording. No joy: all I got was a gray progress bar that when it went solid gray, it just froze.

Rebooted, pressed F8 until I got the option to boot to HDD1, which I did and I got a bootscreen that said Windows Vista (not Windows7) and XP.

So I followed the "NO JOY" instructions and it made no difference. Plus, the Windows7 boot screen is gone; it's now just black with a little progress bar near the bottom (I kinda like the W7 boot screen).

Evidently I did something wrong? In my BIOS I have 3 options: 1st boot = Floppy; 2nd boot = CDROM; 3rd boot = HDD-0. However, when I hit the F8 key, my boot options are (in order): Floppy, HDD-0, CDROM, HDD-1, and LAN. I do need the Floppy enabled because there's been times when I've had to boot to the W98 boot disk to fix stuff (I fool around a lot); and I definitely need the CDROM enabled. (maybe I could\should burn the W98 disk to a CD?)

Here's what I'm thinking: Follow Coolname007's advice and make the 3rd boot to HDD-1. Or, in your opinion, what would happen if I made the 1st boot = CDROM, 2nd boot = HDD-0, 3rd boot = HDD-1 (or vice-versa on 2nd and 3rd)?

Also, I'd like Win7 back and get rid of the Vista stuff. Is there a way to do that? Is there an "undo"?

Thanks.
 
You definitely need to put your Win 7 HDD first in the boot sequence in the BIOS. That should solve your current problem, as well as get the Win 7 boot screen back. :wink:
 
Hi Coolname007,

<snip> . . . put your Win 7 HDD first in the boot sequence in the BIOS.

I put CDROM first because, well, if anything happens, you need to boot to a Floppy or CD to recover, repair, etc.

That should solve your current problem, as well as get the Win 7 boot screen back. :wink:

Nope! Still had the Vista Screen. So, I thought I'd start over again by uninstalling the Vista Bootloader and letting W7 boot to itself.

WRONG!!! I got the gray bar again and it froze. I shut down, restarted and I got a black screen saying "invalid boot.ini". :S Shut down again, rebooted and this time I got "ntldr is missing". (another :S) So I thought a "repair" was in order and put in the W7 disk, shut down and restarted hit F8 and got the usual list of: Safe Mode, Last Known, Restore, Repair, etc., etc.

Nothing worked: It said there was no OS installed! Finally, after 2 hours of fooling around and my 8th attempt, it finally showed the OS and, unfortunately, I don't remember which one I hit, either Repair or Restore, it worked! :tongueout:

I looked at the info after it was done and it said, "Restore - Administrator:X; win\sys32\cmd; Boot Sector Code for Disk Partition is corrupt; Repair Action - Boot Sector Repair - Repair completed successfully."

Which it did; it booted normally with the W7 bootscreen, etc. Now, in the info section, it says, "Default: Windows 7 Ultimate (recovered)." I'll have to dummy out how to get rid of the "(recovered)", but not for a while yet.

IMNSHO, it was a mistake to Reinstall the Vista Bootloader as this isn't Vista - it's Win7. And, it was an even bigger mistake to Uninstall the Vista Bootloader as it appeared to mung the Boot Sector.

Anyway, what I'm going to try, since W7 is working again, is to just add WinXP to the Add\Remove Entries list and see what happens when I boot and if there's an option to boot to XP.

I'll post back with the results.

Addendum:

Well, so far nothing has worked. After setting the BIOS to HDD-0(Win7) as 2nd boot device and HDD-1(XP) as 3rd boot device; no joy. I re-jumpered the XP & W7 drives (Master, Slave, Cable Select); no joy. Re-changed the boot order in the BIOS to HDD-0 first and HDD-2 second (along with re-jumpering all 3 ways); no joy. Did it all over again using the Master and Slave plugs on the cable (along with re-jumpering all 3 ways and resetting the BIOS); no joy.

I've tried every configuration I could think of (except the right one?) and the results were always the same: The Win7 bootscreen shows Win7 and XP Pro. When I boot to Win7, it boots up OK (extremely slow, though). When I reboot and opt for XP, I get a black window with, "Invalid boot.ini; booting to C:\Windows", then the gray bar and freeze. Or, when after changing things about, the XP screen shows normal, but when I try to opt for HDD-1, I get the gray bar and freeze. So I reset everything back to the original configuration.

By the by, where in W7 does EasyBCD put the XP boot.ini configuration? Maybe that needs to be amended? Or does EasyBCD just put the standard XP boot.ini in there?

Like I said in my first post, ideally I'd like to have a choice to boot to XP or W7 and actually be able to boot to either one.

I'm willing to try anything at this point as the only way I can access W7 is when booting to hit the F8 key until the "boot to" screen comes up and I select HDD-1.
 
Last edited:
When Jake said put W7 first in the BIOS, he meant first of your HDDs. The order of Floppy and CD is irrelevant when the drives are empty.
You're right to have them at the top for install and recovery purposes, but the 1st HDD must be the one you want to control the boot and that has to be the newer system.
If you've got the wrong HDD first, the MBR will go to the active partition on that disk to start the boot, and all the messing about you've been doing is probably putting things on that hard disk too because it's marked "system".

You need to make sure that W7 is set "active",
disconnect the non-W7 HDD,
repair the boot on the W7 HDD with your W7 DVD (so that you know it's putting the W7 boot on your W7 disk),
put W7 before the other HDD in the BIOS HDD sequence,
reconnect the 2nd HDD,
Install EasyBCD 2.0 to W7 if it's not already there
Add an entry to W7 for XP, letting it configure the XP boot for you.
 
Last edited:
Hi Terry,

. . . the 1st HDD must be the one you want to control the boot and that has to be the newer system.

Yes, that's what I did in the BIOS, set HDD-1 (W7) as second boot device and HDD-0 (XP) as the third boot device. Or, do you mean that W7 should be set, jumpered and connected as Master, and in the BIOS set to HDD-0? Then hook up the XP disk as Slave? I think I already tried that.

You need to make sure that W7 is set "active" . . .

I'm in XP now and in Disk Management it shows W7 as "Active" healthy and happy.

disconnect the non-W7 HDD, repair the boot on the W7 HDD with your W7 DVD (so that you know it's putting the W7 boot on your W7 disk) . . .

Done and done. W7 was hooked up as the only drive and I did a sfc /scannow 3 times and no problems showed up. Plus, no matter which configuration I used, when I got the W7 screen, it always booted.

. . . put W7 before the other HDD in the BIOS HDD sequence,
reconnect the 2nd HDD . . .

That's what I did to begin with; I changed the BIOS to boot to HDD-1 (W7) second and HDD-0 (XP) to third. Doing that I got the W7 boot screen, let it time out, and it booted to W7. When I rebooted, I selected XP (W7 was the first boot choice) and I got the gray bar freeze. Rejumpering to Master and Slave, as well as switching the connectors got me the same results.

Install EasyBCD 2.0 to W7 if it's not already there Add an entry to W7 for XP, letting it configure the XP boot for you.

That's the first thing I did when W7 was hooked up as the only drive. I added an entry for XP, clicked on OK to let it configure and exited. And, when I'm in W7, in the EasyBCD 2.0 box it shows W7 as the first entry and XP as the second.

Anyway, according to your post, tomorrow (I'm burned out now) I should take a handful of Prozac and wash it down with a quart of tequila first. :?? Then: 2) Set the BIOS to boot to HDD-0; 3) Shut it down and hookup the W7 HDD jumpered as Master and on the black cable connector; 4) Hookup the XP HDD and jumper to Slave on the gray plug. Is that correct?

One final thing, when in W7, should I delete the XP entry in EasyBCD 2.0, close out and\or reboot back to W7 and re-add the entry for XP? Or is that necessary?

Thanks, Terry.
 
One final thing, when in W7, should I delete the XP entry in EasyBCD 2.0, close out and\or reboot back to W7 and re-add the entry for XP? Or is that necessary?

Thanks, Terry.
No, you don't need to do those extra steps. Just delete and re-add so EasybCD's auto-configurator can run.
 
Hi Coolname007,

When I launched EasyBCD 2.0 and tried to add Windows XP, the program froze and I noticed the temp of my CPU up in the 135+ range. I did a Task Mangler and it showed bootgrabber.exe was using 99% of my CPU.

And now I noticed in your post you said, " just copy over the files BOOT.INI, NTLDR, and NTDETECT.COM into the root of your Vista partition . . . "

:wtf:

After all the brain damage I've gone through with EasyBCD trying to get W7 and XP to play nice and give me a choice of which to boot to, I read your post. Are you saying that all I really needed to do was to copy the BOOT.INI, NTLDR, and NTDETECT.COM into the root of my Vista partition (or in my case W7)???

And then open the boot.ini file in W7 and amend it to read:
multi(0)disk(0)rdisk(1)partition(1)\Windows="Microsoft Windows XP Professional" /fastdetect ???

Wasn't EasyBCD supposed to do this? The only things that were in the root of "C" were: ntdetect.com and ntldr. There is no boot.ini anywhere in W7 and both are dated yesterday, not today when I tried to add XP to the Add\Remove section.

What's going on? Should I just copy over the files from XP and amend the boot.ini and forget about "EasyBCD"???
 
Hi Coolname007,

Nothing has worked so far. When I launch EasyBCD and try to add an Entry, bootgrabber uses 99% of my CPU and EBCD freezes. Then when I "End Task" in Applications for EBCD, I also have to "End Process" in Processes. On restart of EBCD, XP shows in the window with W7.

And, I still can't dual boot. Please see your\my post about "grabber crashing".
 
Yes, EasyBCD 2.0 is supposed to do all that for you, but obviously not if something about your HDD layout is freaking-out bootgrabber.
(I've merged your other post back into this thread - it's too confusing to have the same problem being discussed in different places.)
Up until the most recent builds, this always had to be done manually.
It still can be if EasyBCD and your system are incompatible for some as-yet undiagnosed reason.

Read the wiki on the subject if you want the detail.

Please post a screenshot of your disk management to aid CG in debugging the failure you're experiencing.
 
Hi Terry,

Thank you for moving my post. :smile: And, thanks for the link. I read it and that's why I requested a "for dummies" instructions. And as far a bootgrabber goes, the W7 installation was on a clean, formatted (512 cluster size), 20GB drive with 2 partitions, hookedup as the only drive when I installed. Why it would freak out or not install the boot.ini, I'm stumped.

Anyway, when I looked at the root of W7, there was a ntdetect.com and ntldr put there by EBCD. However, they were 45kb each larger than on the XP disk. I copied both of the files from XP and pasted them in W7.

So, I need to know: 1) Should the EBCD files *or* the original XP files be used? I can always delete the old ones and put the new EBCD ones in there.

And: 2) Is the boot.ini config in my earlier post the way it should be? I've already figured out I'll have to manually add the XP boot.ini since EBCD doesn't want to.

Anyway, I'm attaching the pic of Disk Management.

Thanks, again, Terry.
 

Attachments

  • W7.jpg
    W7.jpg
    175.3 KB · Views: 11
I take it that G:\ is your XP system (as W7 sees it).
Slight confusion when you say you installed W7 to the 20Gb drive, and your screenshot shows it on the other ? but assuming that's just a typo, all you need to do is assure that copies of the 3 boot files are dragged from G:\ to C:\, and then just change the rdisk() value in the boot.ini you just copied, from (0) to (1)
(0 is the 1st HDD in the BIOS, so that's correct if you're booting directly from the XP HDD, but when you put W7 first, the XP HDD automatically becomes rdisk(1).
Leave the boot.ini on the XP disk at (0). It's not used during the dual-boot process, but it means you can always do a stand-alone XP boot by just putting the XP disk first in the BIOS again, should you ever need to (when W7 expires for instance.)
Make sure that the XP entry in the BCD is pointing to C: (where the boot files have been copied) not to G:

I'm wondering whether the bootgrabber problem is anything to do with your IDE master/slave jumpering. Weird things can happen if you get it wrong.
A better strategy is to jumper both drives "cable select", then whichever one is on the end is master, and the one in the middle is slave, and you can swap the order by reconnecting without needing to change the jumper settings, and risking forgetting or making an error.
 
Hi Terry,

Yes, it was a typo. Win7 is the 40GB drive and XP is the 20GB drive. It's one of the drives I use to experiment or tweak before I do anything on my main XP 120GB drive.

Anyway,
I take it that G:\ is your XP system (as W7 sees it).
Yes. That's where I got the ntdetect.com and ntldr files. All I need to do now is copy\paste the boot.ini file. Unless you think I should use EBDC's NTDETECT.COM AND NTLDR files???

Here's my BIOS setup now: 1st boot device is Floppy; 2nd boot device is CDROM; 3rd boot device is HDD-0 (I reset it back to the original configuration). Win7 is set to Master (jumpered and cabled), and XP is jumpered and cabled as Slave — as this appears to be the only way to dual-boot because XP isn't forward compatible (yet).

So, next step after copying the boot.ini file to W7's root directory is to change what's there to:
[boot loader]
timeout=15
default=multi(0)disk(0)rdisk(0)partition(1)\WINDOWS
[operating systems]
multi(0)disk(0)rdisk(0)partition(1)\WINDOWS="Microsoft Windows XP Professional" /fastdetect
multi(0)disk(0)rdisk(1)partition(1)\WINDOWS="Microsoft Windows XP Professional(2)"
/fastdetect (NOTE: I have 2 XP HDD; like I said: one for "work" and one to "break".)

To:
multi(0)disk(0)rdisk(1)partition(1)\WINDOWS="Microsoft Windows XP Professional" /fastdetect

Is this the correct configuration?

I'm wondering whether the bootgrabber problem is anything to do with your IDE master/slave jumpering. Weird things can happen if you get it wrong.
Amen to that, brother! Since 1996 I've had a card listing all the HDD I've got\had and all the jumper settings for them. However, as far as "the bootgrabber problem" goes, it was very consistent in that no matter what the BIOS or jumper or cable setting were, it always froze.

Thanks, Terry.
 
Hi Terry,

Yes, it was a typo. Win7 is the 40GB drive and XP is the 20GB drive. It's one of the drives I use to experiment or tweak before I do anything on my main XP 120GB drive.

Anyway,
Yes. That's where I got the ntdetect.com and ntldr files. All I need to do now is copy\paste the boot.ini file. Unless you think I should use EBDC's NTDETECT.COM AND NTLDR files???
You will need to copy over NTLDR and NTDETECT.COM from XP's partition, in addition to boot.ini.
Here's my BIOS setup now: 1st boot device is Floppy; 2nd boot device is CDROM; 3rd boot device is HDD-0 (I reset it back to the original configuration). Win7 is set to Master (jumpered and cabled), and XP is jumpered and cabled as Slave — as this appears to be the only way to dual-boot because XP isn't forward compatible (yet).

So, next step after copying the boot.ini file to W7's root directory is to change what's there to:
[boot loader]
timeout=15
default=multi(0)disk(0)rdisk(0)partition(1)\WINDOWS
[operating systems]
multi(0)disk(0)rdisk(0)partition(1)\WINDOWS="Microsoft Windows XP Professional" /fastdetect
multi(0)disk(0)rdisk(1)partition(1)\WINDOWS="Microsoft Windows XP Professional(2)"
/fastdetect (NOTE: I have 2 XP HDD; like I said: one for "work" and one to "break".)

To:
multi(0)disk(0)rdisk(1)partition(1)\WINDOWS="Microsoft Windows XP Professional" /fastdetect

Is this the correct configuration?
No, your boot.ini file will need to look like this:

[boot loader]
timeout=15
default=multi(0)disk(0)rdisk(1)partition(1)\WINDOWS
[operating systems]
multi(0)disk(0)rdisk(1)partition(1)\WINDOWS="Microsoft Windows XP Professional" /fastdetect
 
Last edited:
Hi 007,

TA DA!!! :grinning:

Simply copying the files and amending the boot.ini did the trick. I really wish I'd been told that that's all I needed to do instead of wasting mine and everyone else's time on this.

But, Thank You! I'll pass this along.
 
Back
Top