Get the fix to “0x00000109: selected entry could not be loaded” error for Windows Vista, 7, 8, or 8.1 operating systems.
Contents
About the “0x00000109” error
The following information on this error has been compiled by NeoSmart Technologies, based on the information gathered and reported by our global network of engineers, developers, and technicians or partner organizations.
Description and Symptoms
The error messages, alerts, warnings, and symptoms below are tied to this error.
Symptom 1: 0x00000109 error screen
This error is usually triggered by an unauthorized kernel data modification by a device driver. While this is the most common cause for the error, other causes can trigger this error too:
- A virus tried to modified kernel data
- Incorrect use of a kernel debugger tool
- Hardware memory may be corrupted

A problem has been detected and Windows has been shut down to prevent damage
to your computer.

Modification of system code or a critical data structure was detected.

If this is the first time you've seen this Stop error screen,
restart your computer. If this screen appears again, follow
these steps:

Check to make sure any new hardware or software is properly installed.
If this is a new installation, ask your hardware or software manufacturer
for any Windows updates you might need.

If problems continue, disable or remove any newly installed hardware
or software. Disable BIOS memory options such as caching or shadowing.
If you need to use Safe Mode to remove or disable components, restart
your computer, press F8 to select Advanced Startup Options, and then
select Safe Mode.

Technical Information:

*** STOP: 0x00000109 (0x00000001, 0x00000001, 0x00000000, 0x00000000)

Collecting data for crash dump ...
Initializing disk for crash dump ...
Beginning dump for physical memory.
Dumping physical memory to disk: 100
Physical memory dump complete.
Contact your system admin or technical support group for further assistance.
Causes of this Error
This error has been known to occur as a result of one or more of the following:
Cause 1: Virus infection
The most common cause of this error is a virus that modifies system kernel data. If that’s the case, then it is advised to make a clean boot and scan the system for viruses.
Cause 2: System memory is malfunctioning
Another common cause is a RAM memory module that works incorrectly. A module may become faulty after a power outage or simply as the time passes, so it is recommended to check the system memory periodically to make sure that it works correctly.
Cause 3: System drivers are outdated
Sometimes after a system reinstall or a Windows Update, the system drivers are installed incorrectly and the system is unable to boot as a result.
Cause 4: File system integrity compromised
The last cause for this error is a corrupt file system. This may happen because of disk read/write errors, power outages or virus attacks.
Fixing “0x00000109” on Windows
Windows Setup CD/DVD Required!
Some of the solutions below require the use of the Microsoft Windows setup CD or DVD. If your PC did not come with a Windows installation disc or if you no longer have your Windows setup media, you can use Easy Recovery Essentials for Windows instead. EasyRE will automatically find and fix many problems, and can also be used to solve this problem with the directions below.
Fix #1: Scan for viruses
If the 0x00000109 error is caused by a virus that might modify kernel data, run a virus scan and delete all infected files found.
If system files are infected and you delete these infected files, your Windows may not run properly afterwards.
Open an antivirus software and perform a scan. If you don’t have an antivirus, use Easy Recovery Essentials’ built-in Antivirus Scanner that runs outside Windows (it’s bootable from a CD/DVD or USB drive) and can deep scan your computer for viruses:
The Professional Edition of Easy Recovery Essentials for Windows features a powerful antivirus and rootkit scanner that can normally resolve this and similar errors caused by viruses, rootkits, trojans, or spyware. EasyRE is currently available for Windows XP, Vista, 7 and 8 and can be downloaded and created on any PC.
- Download Easy Recovery Essentials. Make sure to note your Windows version (XP, Vista, 7 or 8) before you download EasyRE. This guide can help you identify what version of Windows you have installed. For the purposes of this guide, you will need to obtain the Professional Edition of EasyRE.
- Burn the image. Follow these instructions on how to burn the bootable ISO image very carefully, as making a bootable CD can be tricky! Alternatively, these instructions explain how to create a bootable EasyRE recovery USB stick/drive.
- Boot up your PC from the Easy Recovery Essentials CD or USB you created.
- Once EasyRE is running, choose the “Virus Scanner” option and click Continue.

Choose “Virus Scanner” in Easy Recovery Essentials
- After EasyRE scans your computer’s drives, identify and select the drive letter for your Windows installation from the list, and then click on the Scan button to begin.

Choose the drive associated with the Windows installation you’re trying to repair.
- EasyRE will begin scanning the drive for viruses, rootkits, trojans, spyware, and other unwanted malware on your machine. No intervention is required, and EasyRE will repair viruses as it finds them, reporting its progress as it goes along:

Easy Recovery Essentials searches for viruses and cleans infections on the selected Windows installation.
- Once the process is complete, EasyRE will report its findings. Click on the Restart button to reboot your PC and test the changes.


You can download Easy Recovery Essentials from here.
Fix #2: Run Windows Memory Diagnostic
The Windows Memory Diagnostic tool can check your memory for corrupt data.
To run this tool, follow these steps:
- Start Windows
- Click Start
- Type
windows memory diagnosticin the search box - Click Windows Memory Diagnostic from the search results list
- Follow the tool’s wizard steps to complete the process. After the process is done, you can determine if your memory is corrupt.

Windows Memory Diagnostic screen
If you’re not able to boot into Windows and run Windows Memory Diagnostic, you can also run Easy Recovery Essentials’ Automated Repair process that has a built-in testing process for RAM Memory and HDD drives:
- Download Easy Recovery Essentials. Make sure to note your Windows version (XP, Vista, 7, 8, 10, or Windows 11) before you download EasyRE. This guide can help you identify what version of Windows you have installed.
- Burn the image. Follow these instructions on how to burn the bootable ISO image very carefully, as making a bootable CD can be tricky! Alternatively, these instructions explain how to create a bootable EasyRE recovery USB stick/drive.
- Boot up your PC from the Easy Recovery Essentials CD or USB you created.
- Choose “Automated Repair” option and click Continue.

Choose “Automated Repair” in Easy Recovery Essentials
- After EasyRE scans your computer’s drives, identify and select the drive letter for your Windows installation from the list, and then click on the Automated Repair button to begin.

Choose the drive associated with the Windows installation you’re trying to repair.
- Easy Recovery Essentials will start analyzing the selected drive for problems. EasyRE will test for and attempt to automatically correct errors with the disk, partition, bootsector, filesystem, bootloader, and registry.
No intervention is required, as EasyRE’s repair is fully automated:

Easy Recovery Essentials searches for errors and makes corrections to the selected Windows installation.
- Once the process is complete, EasyRE will report its findings. Click on the Restart button to reboot your PC and test the changes.
- Your PC begins to boot again:

Windows, booting up successfully.


Download Easy Recovery Essentials by clicking this link.
Fix #3: Install updates
It’s important that your Windows version – either Vista, 7 or 8 – has the latest updates installed. A missed update might fix the 0x00000109 error.
- Open Windows Updates by typing
updatein the search box - Click Update and Recovery
- Click “Choose how updates get installed:
- Select “Install updates automatically” at the Important updates section
- Check Give me recommended updates the same way I receive important updates check box under Recommended updates
- Click OK

Windows updates screen
Fix #4: Update device drivers
If the error is caused by a corrupt or problematic device driver, updating your drivers manually might fix the error.
To do so, and update your drivers manually, open Device Manager by following these steps:
- Click Start
- Type
devmgmt.mscin the search box - Click on devmgmt or Device Manager from the search results list

Device Manager in Windows Vista
- Right-click on each third-party device driver you’d like to update. Make sure your device manufacturer has the latest version available for your Windows version.
- Click Update
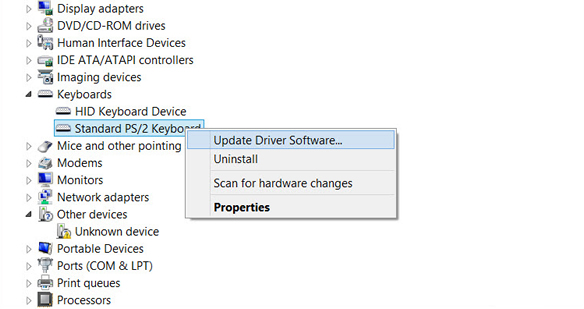
Device Manager: Update Driver Software
If you’d like to update the drivers automatically, follow these steps instead:
- Click Start
- Type
devices and printersin the search box - Right-click on your computer’s name from the list
- Click Device Installation Settings
- Select Yes, do this automatically
- Click Save Changes

Device installation settings screen
Fix #5: Run chkdsk
Running the chkdsk utility tool can output any issues found with your HDD driver. If the 0x00000109 error is caused by a corrupt HDD, chkdsk should let you know.
Here are the steps to run CHKDSK:
- Boot from your Windows install disc
- Click on Repair your computer after selecting proper language, time and keyboard input.
- Select the Windows installation drive, which is usually
C:\, and click Next - Choose Command Prompt when the System Recovery Options box appears
- Write the following command and press Enter afterwards:
chkdsk C: /f
Replace C: with the letter of the driver where Windows is installed.
Here is an example of what the PC’s console output should look like once the chkdsk.exe is complete:

Chkdsk utility results screen
More Information
Linked Entries
Support Links
- Easy Recovery Essentials for Windows – our repair and recovery disk.
It’s an easy-to-use and automated diagnostics disk. It’s available for Windows 8, Windows 7 and Windows Vista. It’s also available for Windows XP and Windows Server.Read more at Windows Recovery Disks.
- The NeoSmart Support Forums, member-to-member technical support and troubleshooting.
- Get a discounted price on replacement setup and installation discs: Windows Vista, Windows 7, Windows 8, Windows 10.
Applicable Systems
This Windows-related knowledgebase article applies to the following operating systems:
- Windows Vista (all editions)
- Windows 7 (all editions)
- Windows 8 (all editions)
- Windows 8.1 (all editions)
- Windows 10 (all editions)