This article is about the System Recovery Options set of tools available in these Windows versions: Windows Vista, 7, 8, 8.1 and 10.
For Windows XP systems, please see the Recovery Console article instead.
Contents
These tools, grouped as System Recovery Options, can help you recover the Windows system from errors or restore your computer to a previous restore point.
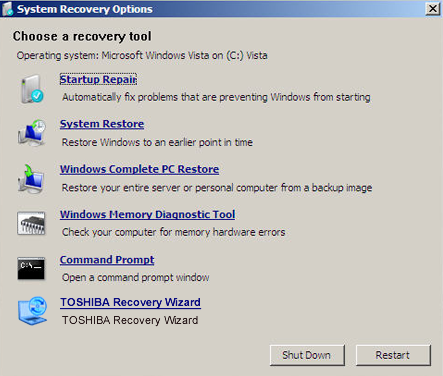
System Recovery Options contains the following tools available:
- Startup Repair. Startup Repair automatically scans your hard disk for errors and tries to fix the errors.
- System Restore. System Restore can restore your computer to a previous restore point, if System Restore was enabled and a restore point was created.
- Complete PC Restore or System Image Recovery. Complete PC Restore is available for Windows Vista systems (except the Windows Vista Home editions) and System Image Recovery is available for Windows 7 systems.
- Windows Memory Diagnostic Tool. This tool scan your computer’s memory for errors.
- Command Prompt. System Recovery Options allows you to access Command Prompt and run various command-line specific commands, such as bootrec or diskpart.
Depending on your Windows version, System Recovery Options can already be installed on your computer.
If these tools aren’t installed, you can access System Recovery Options with the original installation CD/DVD or USB (the media you used to install Windows). On most Windows 7 systems, these tools are already installed, while on Windows Vista systems are not.
To check if you have System Recovery Options installed, follow these following steps:
- Restart the computer
- As soon as your computer stars, press the F8 key before the Windows logo appears
- When the Advanced Boot Options menu appears, check if you have a Repair your computer option listed:
- To continue, select Repair your computer and press Enter
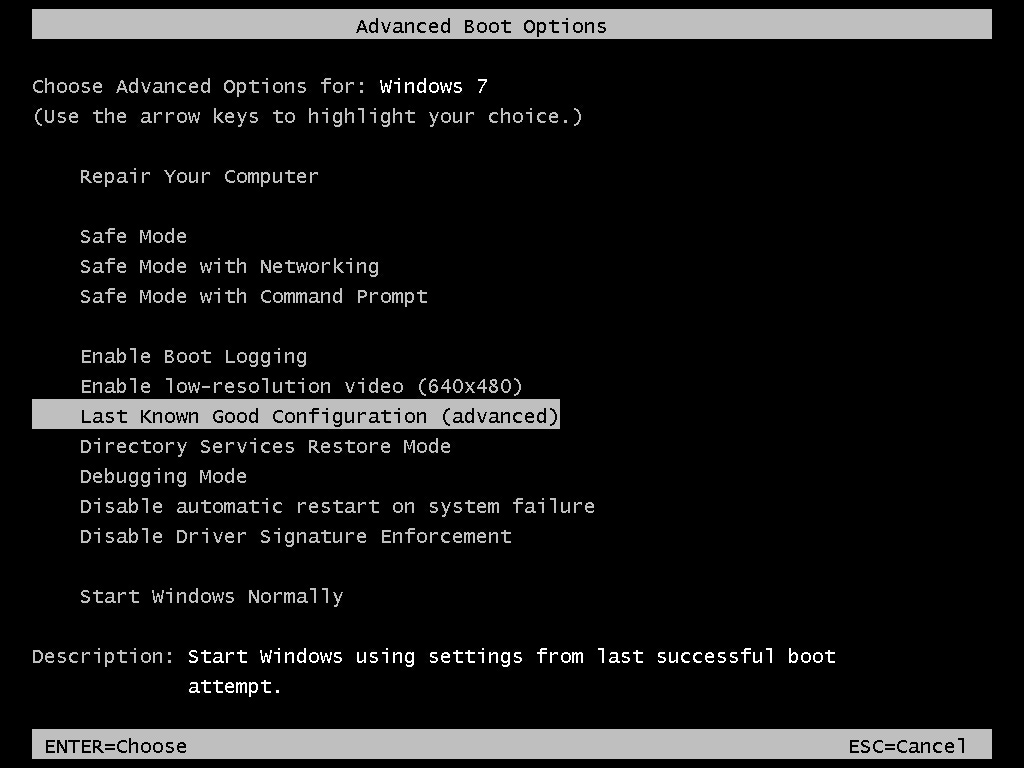
Advanced Boot Options on Windows 7
The System Recovery Options screen can also have manufacturer-specific tools that can help you recover or restore your computer.
For example, computers from Dell can have the Dell Backup and Recovery Manager tool installed:

Toshiba users can have the TOSHIBA Recovery Wizard tool:
System Recovery Options in Windows Vista
Similarly to Windows 7, System Recovery Options can be accessed on a Windows Vista system with any of the following options:
- From Advanced Boot Options, if the tools are already installed
- From the original installation CD/DVD
Using Advanced Boot Options
To boot into the Advanced Boot Options menu, follow these steps:
- Restart your computer
- Press F8 as soon as your computer starts to boot, but before the Windows Vista logo appears
- The Advanced Boot Options menu should now appear
- Select the Repair your computer option
- Press Enter
- System Recovery Options should now be available (You may need to select your time, keyboard and language preferences before the list of tools is displayed)
Using the installation disc
If you still have the original Windows Vista disc, you can use it to access System Recovery Options:
- Restart the computer
- Insert the Windows Vista installation disc
- At the “Press any key to boot from CD or DVD…” screen, press any key to boot from the DVD
- Click Repair your computer at the Install Windows Vista screen

- Choose the operating system from the list
- System Recovery Options is now available: (You may need to select the operating system from the presented list and click Next before the list of tools appears on your screen.)
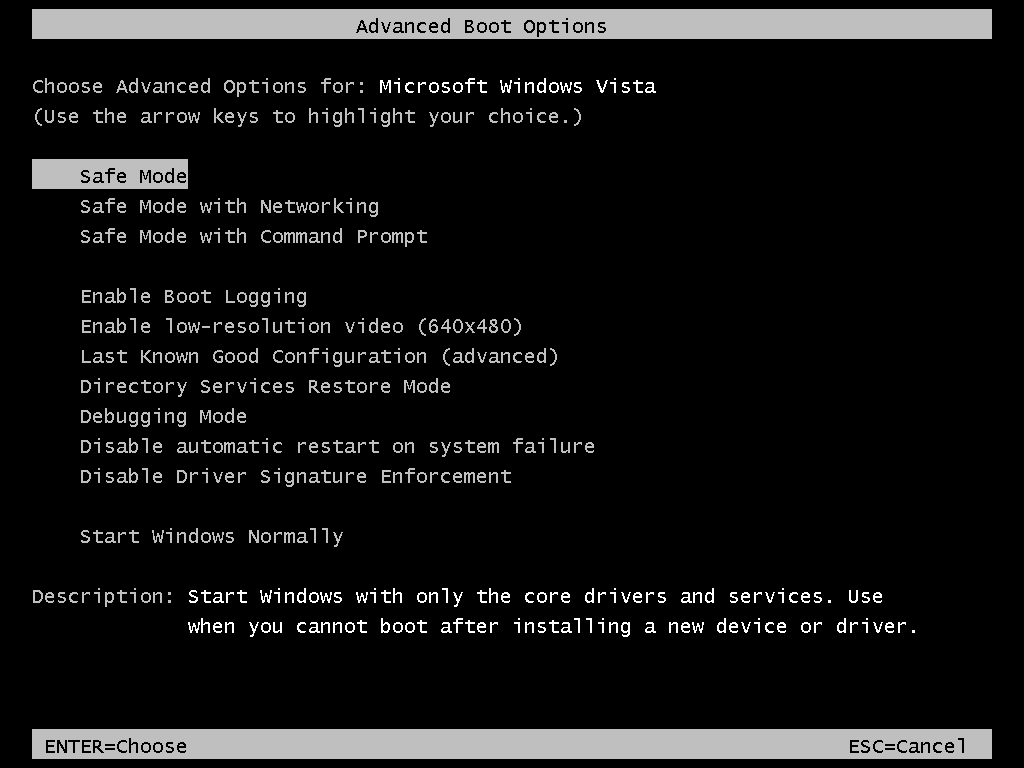
Windows Vista Advanced Boot Options screen
System Recovery Options in Windows 7
To access System Recovery Options on a Windows 7 system, you have the following options:
- If the tools are installed on your PC, boot into Advanced Boot Options
- If you have the original installation CD/DVD, access the tools from the CD/DVD
Using Advanced Boot Options
To access System Recovery Options using Advanced Boot options, you need to have the tools installed on your hard disk. Follow these steps:
- Restart your computer
- Press F8 before the Windows 7 logo appears
- At the Advanced Boot Options menu, select the Repair your computer option
- Press Enter
- System Recovery Options should now be available
Windows 7 Advanced Boot Options screen
Using the installation disc
To access System Recovery Options using the original disc (installation CD or DVD), follow these steps:
- Boot from the Windows 7 installation DVD
- At the “Press any key to boot from CD or DVD…” message, press any key to boot from the DVD
- At the Install Windows screen, select a language, time and keyboard
- Click Next
- Click Repair your computer or press R
- System Recovery Options is now available

Windows 7 Setup screen
System Recovery Options in Windows 8
On Windows 8 and 8.1, the System Recovery Options set of tools is no longer called System Recovery Options. The recovery tools are available under the Troubleshoot > Advanced Options panel.

Windows 8 Advanced Startup screen
You can perform these 2 actions that can help you recover the computer:
Other tools available, under the Advanced Options panel are:
- System Restore
- Command Prompt
- System Image Recovery
- Automatic Repair
- UEFI Firmware Settings
- Windows Startup Settings
If you can’t boot into Windows 8 to perform a Refresh or Restore, you need to use the original installation DVD or USB key:
- Insert the disc and restart your computer
- At the Windows Setup screen, click Next
- Click Repair your computer or press R

Windows 8 Setup screen
If you don’t have the installation media, you can try the following (note that these methods can work on some computer models, not all computers with Windows 8):
- Press F11 as your computer boots
- Press F8 or Shift + F8 as your computer boots
Refresh
Refreshing your Windows 8 will not delete any of your personal files.
To perform a Refresh, follow these steps:
- Go to Settings either by swiping in from the right edge of the screen or by pointing the mouse in the upper-right corner of the screen so that the Settings panel appears
- Click Change PC Settings
- Click Update and recovery
- Click Recovery
- At the Refresh your PC without affecting your files section, click Get started
- Follow the instructions on the screen
If you can’t open the Settings panel, you can try this alternative:
- Log in Windows 8
- Hold the Shift key
- Click Restart to restart the computer
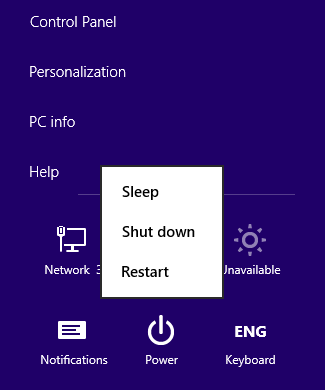
Windows 8 Restart Menu
Reset
Reseting your Windows 8 will delete all your personal files.
To perform a Reset, follow these steps:
- Go to Settings either by swiping in from the right edge of the screen or by pointing the mouse in the upper-right corner of the screen so that the Settings panel appears
- Click Change PC Settings
- Click Update and recovery
- Click Recovery
- Under the Remove everything and reinstall Windows section, click Get started
- Follow the instructions on the screen

Windows 8 Recovery Screen
If you can’t open the Settings panel, you can try this alternative:
- Log in Windows 8
- Hold the Shift key
- Click Restart to restart the computer
Windows 8 Restart Menu
Automatic Repair
To open Automatic Repair on a Windows 8 system, follow these steps:
- Boot into the recovery mode
- Click Troubleshooting
- Click Advanced Options
- Click Startup Repair
- Select the operating system
- Select the Administrator account, if prompted to do so
- Wait for the Automatic Repair process to finish
- Click Shut down or Advanced options, once the process is complete
Windows 8 Advanced Startup screen
System Recovery Options in Windows 10
Just like in Windows 10, the recovery tools in Windows 10 are available under the Troubleshoot > Advanced Options panel.
Windows 10 Advanced Startup screen
You can perform these 2 actions that can help you recover the computer:
Other tools available, under the Advanced Options panel are:
- System Restore
- Command Prompt
- System Image Recovery
- Automatic Repair
- UEFI Firmware Settings
- Windows Startup Settings
If you can’t boot into Windows 10 to perform a Refresh or Restore, you need to use the original installation DVD or USB key:
- Insert the disc and restart your computer
- At the Windows Setup screen, click Next
- Click Repair your computer or press R

Windows 10 Setup screen
If you don’t have the installation media, you can try the following (note that these methods can work on some computer models, not all computers with Windows 10):
- Press F11 as your computer boots
- Press F8 or Shift + F8 as your computer boots
Refresh
Refreshing your Windows 10 will not delete any of your personal files.
To perform a Refresh, follow these steps:
- Go to Settings either by swiping in from the right edge of the screen or by pointing the mouse in the upper-right corner of the screen so that the Settings panel appears
- Click Change PC Settings
- Click Update and recovery
- Click Recovery
- At the Refresh your PC without affecting your files section, click Get started
- Follow the instructions on the screen

Windows 10 Recovery Screen
If you can’t open the Settings panel, you can try this alternative:
- Log in Windows 10
- Hold the Shift key
- Click Restart to restart the computer

Windows 10 Restart Menu
Reset
Reseting your Windows 10 will delete all your personal files.
To perform a Reset, follow these steps:
- Go to Settings either by swiping in from the right edge of the screen or by pointing the mouse in the upper-right corner of the screen so that the Settings panel appears
- Click Change PC Settings
- Click Update and recovery
- Click Recovery
- Under the Remove everything and reinstall Windows section, click Get started
- Follow the instructions on the screen
Windows 10 Recovery Screen
If you can’t open the Settings panel, you can try this alternative:
- Log in Windows 10
- Hold the Shift key
- Click Restart to restart the computer

Windows 10 Restart Menu
Automatic Repair
To open Automatic Repair on a Windows 10 system, follow these steps:
- Boot into the recovery mode
- Click Troubleshooting
- Click Advanced Options
- Click Startup Repair
- Select the operating system
- Select the Administrator account, if prompted to do so
- Wait for the Automatic Repair process to finish
- Click Shut down or Advanced options, once the process is complete
Windows 10 Advanced Startup screen
More Information
Support Links
- Easy Recovery Essentials for Windows – our repair and recovery disk.
It’s an easy-to-use and automated diagnostics disk. It’s available for Windows 8, Windows 7 and Windows Vista. It’s also available for Windows XP and Windows Server.Read more at Windows Recovery Disks.
- The NeoSmart Support Forums, member-to-member technical support and troubleshooting.
- Get a discounted price on replacement setup and installation discs: Windows Vista, Windows 7, Windows 8, Windows 10.
Applicable Systems
This Windows-related knowledgebase article applies to the following operating systems:
- Windows Vista (all editions)
- Windows 7 (all editions)
- Windows 8 (all editions)
- Windows 8.1 (all editions)
- Windows 10 (all editions)