
Three days ago, I wrote a post about stumbling across uncensored/unredacted plain-text content in the DOJ Epstein archives that could theoretically be reconstructed and reversed to reveal the uncensored originals of some of the files. Last night, I succeeded in doing just that, and was able to extract the DBC12 PDF file from the Epstein archive EFTA00400459 document. Don’t get too excited: as expected, the exfiltrated document (available for download here) turned out to be nothing too juicy and is “just” another exemplar of the cronyism and the incestuous circles of financial funding that Epstein and his colleagues engaged in.
There is a lot I could say in this post about the different approaches I took and the interesting rabbit holes I went down in trying to extract valid base64 data from the images included in the PDF; however, I am somewhat exhausted from all this and don’t have the energy to go into it all in as much detail as it deserves, so I’ll just post some bullet points with the main takeaways:
Properly extracting the PDF images
I had made a mistake in how I converted the original PDF into images for processing. u/BCMM on r/netsec reminded me of a different tool from the poppler-utils package that could extract the images as originally embedded in the PDF, whereas my approach with pdftoppm was unnecessarily re-rasterizing the PDF and possibly reducing the quality (as well as increasing the size).
It turns out I had rasterized the PDF at a high enough resolution/density that it made little to no visual difference, but it did get rid of the Bates numbering/identification at the bottom of each page and was definitely the correct approach I should have used from the beginning. Funnily enough, when I started typing out pdfima— in my shell, a history completion from the last time I used it (admittedly long ago) popped up, so I can’t even claim to have been unaware of its existence.
I re-uploaded the images (of the redacted emails) from EFTA00400459 to a new archive and you can download it here.
OCR is a no-go for base64 text
I learned much more than I ever wanted to1 about OCR. Some takeaways that I plan on turning into a proper post sometime soon (famous last words, I know):
- I had assumed OCR would be less prone to “hallucinations” than an LLM because the traditional OCR tools are all heuristic/algorithm-driven. This is true, and they do not hallucinate in the same sense that an LLM does, but they are not meant to be used for faithful reconstructions where byte-for-byte accuracy is desired. It turns out they all (more or less) work by trying to make sensible words out of the characters they recognize at a lower level (this is why OCR needs to understand your language, not just its script/alphabet, for best results). This obviously doesn’t work for base64, or anything else that requires context-free reconstruction of the original.
- Tesseract supposedly has a way to turn off at least some of these heuristics, but that did not improve its performance in any measurable way, though there’s always the chance that I was holding it wrong:
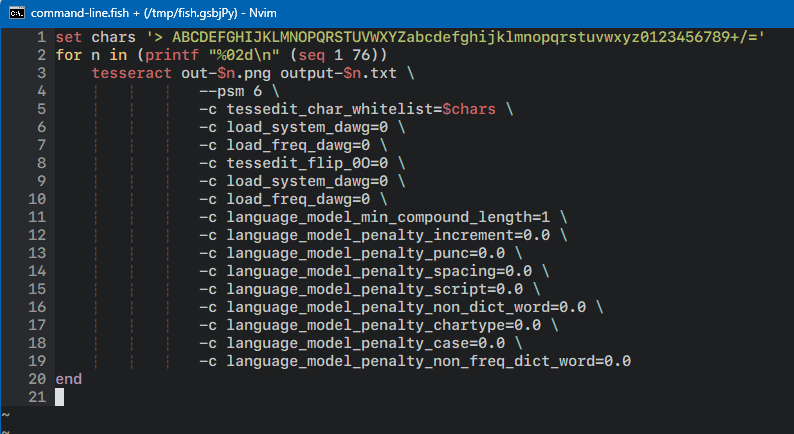
The tesseract(1) tunables I tried using to get it to work better with images containing base64 data.
- The vast, vast majority of OCR usecases and training corpora are done with proportional fonts (the opposite of a monospace font). In my experience, all the engines ironically performed better at recognizing images with the much less regularly spaced (and, therefore, harder to algorithmically separate) proportional fonts than they did with monospace fonts.
- Adobe Acrobat OCR is terrible. Just terrible. Don’t pay for it.
Trying a data science approach
My first idea for tackling this without OCR was to identify the bounding boxes for each character on the page (in order, of course) and cluster them using kmeans with k set to 64 (or 65 if you want to consider the = padding). Theoretically, there’s no reason this shouldn’t work. In practice, it just didn’t.
I’m sure the approach itself is sound, but the problem was trying to get regular enough inputs. However hard I tried, I was unable to get the characters sliced regularly and perfectly enough to get scikit-learn to give me even remotely sane results with the KMeans module. I tried feeding it the images thresholded to black-and-white, greyscaled, and even as three-dimensional color inputs (essentially the lossless data). Every time it would create repeated buckets for some letters while sticking the actually different characters into other buckets.
Instead of letting kmeans decide the buckets for me, I decided to try seeding the buckets myself, rendering each letter of the base64 alphabet in Courier New at the right scale/point size to match the scans, then using different methods to bucket the letters into the right bins. But despite these being monospaced fonts, perhaps as an artifact of the resolution the images were captured at, I couldn’t get some glyphs to include a hint of the letter that came before/after, and tweaking it one way (adding a border on one side) would solve it for some inputs but break others (e.g. if you clip even one pixel from the righthand side of the box surrounding the letter O at the font size and DPI the images were captured/rendered in, it turns into a C).
A note from the author I do this for the love of the game and in the hopes of hopefully exposing some bad people. But I do have a wife and small children and this takes me away from my work that pays the bills. If you would like to support me on this mission, you can make a contribution here.
I turned to an LLM for help, but they are really bad at deriving things from first principles even when you give them all the information and constraints beforehand. Gemini 3 kept insisting I try HOG to handle the inputs and would repeatedly insist on trying a connected components approach to weed out noise (some on r/netsec were insisting that these images were 100% noise-free and without any encoding artifacts – this is patently not true), despite the fact that that absolutely destroys the recognition even if you apply the same algorithm to your seed buckets.
This approach with seeding the buckets yielded ~fair results, but it was completely stymied by the l vs 1 conundrum discussed in the previous post. Subpixel hinting differences between the ClearType algorithm used on the PCs the DoJ was using to originally render these emails and the font rendering engine used by OpenCV might look like nothing, but when the difference between an l and a 1 is 3 pixels at most, it adds up. Also, it didn’t help that my bounding box algorithm to draw a grid around the text and isolate each letter wasn’t perfect – I think there was a fractional-pixel mismatch everywhere in the 2x (losslessly) upscaled sources I was using, and that threw everything off (while using the 1x sources made it hard to slice individual characters, though I know the algorithm could have been tweaked to fix this).
Image kernels can’t solve bad typography
A number of people in the comments and on social media kept suggesting applying various kernels to the input in order to get better OCR results. But OCR wasn’t just getting 1 vs l wrong, it was making up or omitting letters altogether, giving me 75-81 characters per line instead of the very-much-fixed 78 monospaced characters I was feeding it. And using them to try and improve the situation with the classifier I wrote turned out to also be futile: if you darken pixels above a certain threshold, you make the difference between the 1 and the l more noticeable, but at that threshold you also darken the subpixel hinting around the lowercase w turning into a capital N.2 The kernels to make one pair of letters distinguishable from another would ultimately hurt the recognition of another pair, unless you knew in advance which to apply them to and which not to… which would imply you had already figured out which letter was which!
Except that’s not true: of course you could make a multi-level classifier to first just identify the ambiguous pairs like l and 1 and then feed those into a secondary classifier that applied the kernels, then tried bucketing these separately. But you know what? I didn’t think of that at the time. Mea culpa!
CNNs really are powerful dark magic
With the traditional image processing/data science classification approach not working too well, I decided to try another approach and see if I could train a CNN to handle both the discrepancies with the imperfect slicing around each character/cell, noise from adjacent cells abutting into the cell being analyzed, and the difference between 1 vs l. And you know what? I think I’m going to have to start using CNNs more!
They really are a powerful answer to a lot of this stuff. After just typing out two lines of base64 data from the first page of the PDF3 and training the CNN on those as ground truth, it was able to correctly identify the vast majority of characters in the input corpus, or at least the ones I could visibly tell it had gotten right, meaning I couldn’t be sure if it had handled l vs 1 correctly or not.
It turns out the alignment grid was off by a vertical pixel or two by the time it reached the end of the page, so tweaking the training algorithm to train against the top x lines and the bottom x lines of the page separately got rid of the remaining recognition errors… or at least, it did for the first page.

It’s really hard to see, but while the grid is almost identically placed around the characters at the top-left vs bottom-right, the subtle difference is there.
But alignment issues with how the bounding box was drawn on subsequent pages pushed the error rate well above the necessary zero, and it wasn’t until I realized that since these pages weren’t scanned but rather rendered into images digitally, I could just have the training/inference script memorize the grid from the first page and reuse it on subsequent pages was I able to get rid of all the recognition errors on all pages. (As an interesting sidebar, despite augmenting the training data with artificially generated inputs introducing randomized subtle (-2px to +2px) vertical/horizontal shifts, that wasn’t enough to address the grid drift.)
Well, all except the same pesky 1 vs l which still plagued the outputs and led to decode errors.
I admit I wasted a lot of time here barking up the wrong tree: I spent hours tweaking the CNN’s layout, increasing the kernel size of the first layer, getting rid of the second MaxPool, playing with further augmenting the input samples, trying denoising and alignment techniques, and much more trying to figure out how to induce the CNN into correctly recognizing the two pixel difference between the ones and the ells, all to no avail. I kept trying to increase the training data, meticulously typing out line after line of base64 (becoming thoroughly sick and tired of zooming and panning) to see if that’s what it would take to nudge the error rate down further.
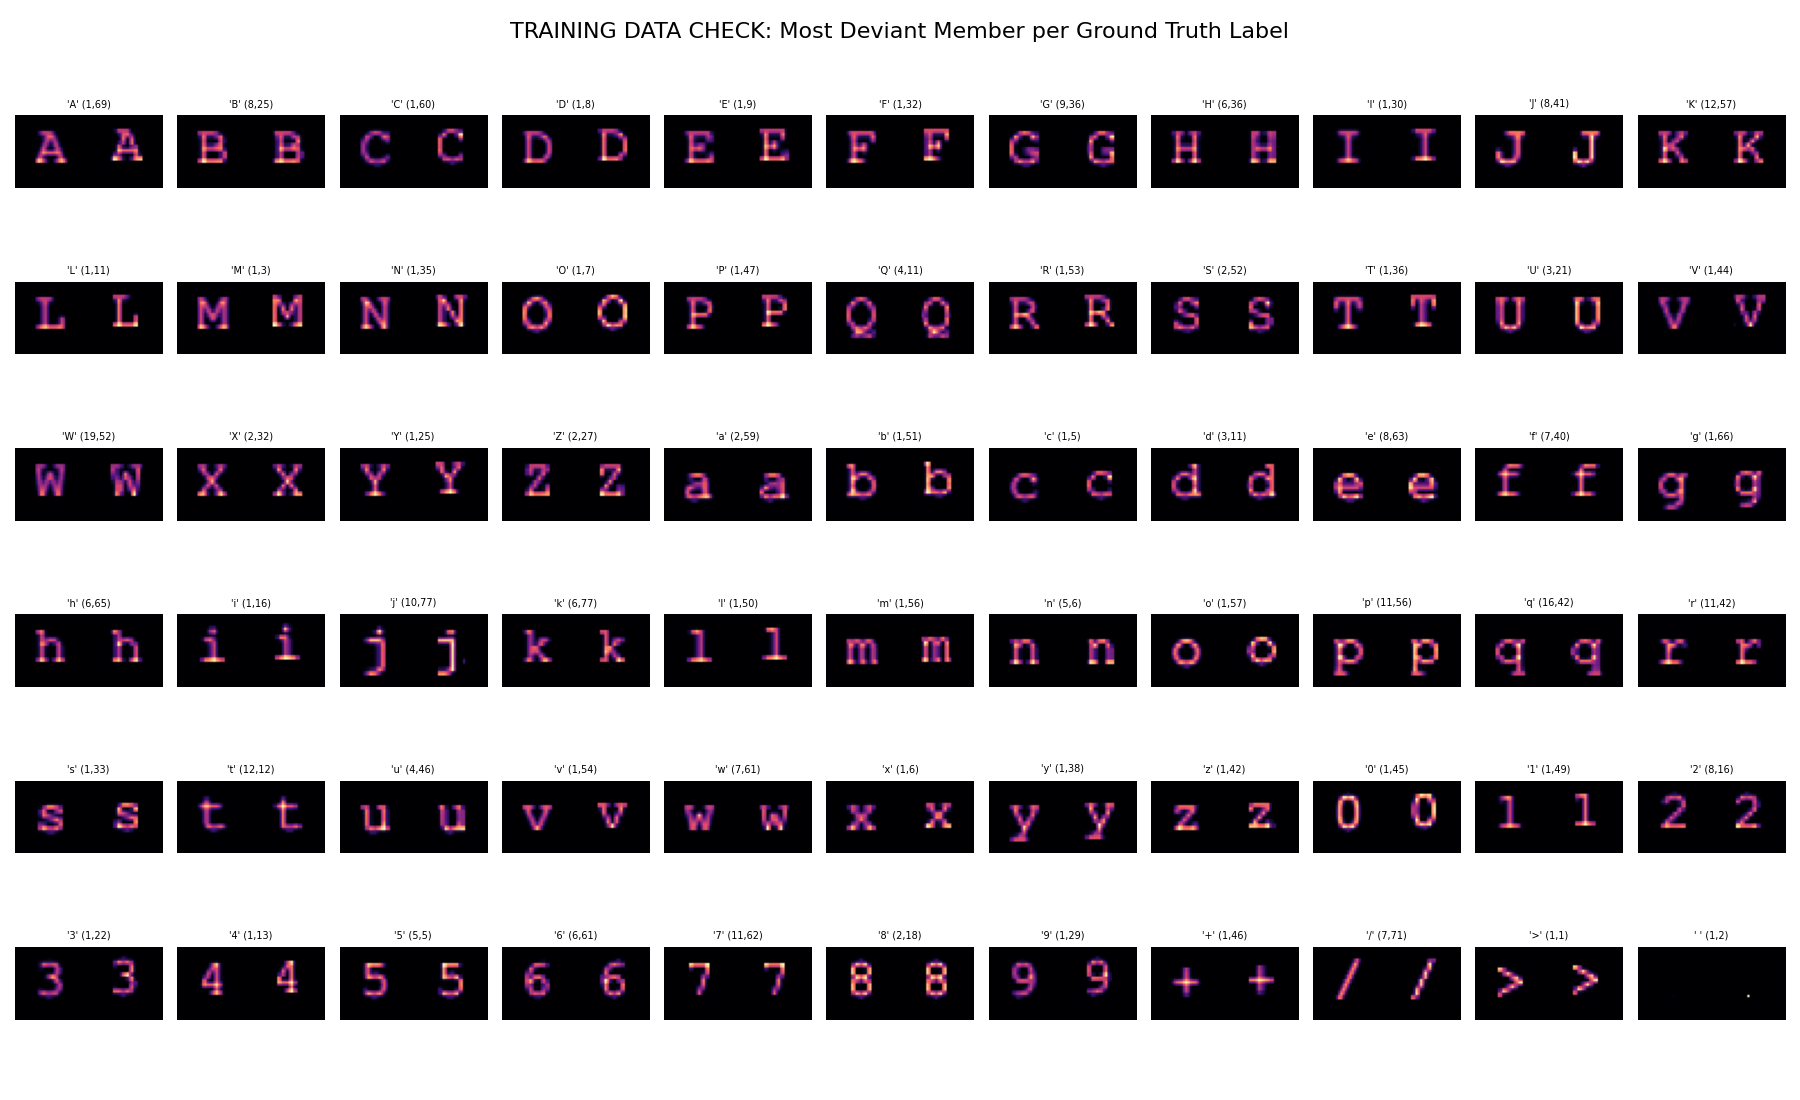
A debug view I added to the training script after I mistyped a character one time too many. It displays the greatest deviation between the average shape of all characters in each training-provided “ground truth” bucket and the max outlier in the same.
It was only after I took a break for my sanity and came back to doggedly tackle it again that I realized one of the errors qpdf reported for the recovered PDF never changed no matter how much I tweaked the CNN or how much additional training data I supplied that I realized the problem: despite zooming in and taking a good 5 or 10 seconds on each 1 vs l I was entering into the training data, I had still gotten some wrong! A second email forward/reply chain with the same base64 content was included in the DoJ archives (EFTA02154109) and while it wasn’t at a much better resolution or quality than the first, it was still different and the 1s and ls were distinguished with different quirks. After I spotted one mistake I had made, I quickly found a few more (and this was even with zooming in on the training corpus debug view pictured above and verifying that the ones and ells had the expected differences!), and lo and behold, the recovered PDF validated and opened!
I posted the code that solved it to GitHub, but apologies in advance: I didn’t take the time to make the harness scripts properly portable. Everything works and they should run on your machine as well as they run on mine, except they’re using a very idiosyncratic mix of tooling. The scripts are written in fish instead of sh or even bash, use parallel (which I actually hate), and have some WSL-isms baked into them for (my) practicality. The README was rushed, and some of the (relative) paths to input files are baked in instead of being configurable. Maybe I’ll get to it. We’ll see.
As to what’s next, well, there are more base64-encoded attachments where this one came from. But unfortunately I cannot reuse this approach as the interesting-looking ones I’ve found are all in proportional fonts this time around!
Follow me at @mqudsi or @neosmart for more updates or to have a look at the progress posts I’ve shared over the past 48 hours while trying to get to the bottom of this.
Thanks for tuning in!
A note from the author I do this for the love of the game and in the hopes of hopefully exposing some bad people. But I do have a wife and small children and this takes me away from my work that pays the bills. If you would like to support me on this mission, you can make a contribution here.
Okay, that’s not true. I love learning about random stuff and I don’t know why people say this about anything. ↩
If I remember correctly! I wasn’t taking notes (I wish I had, and more screenshots, too) and it could have been two different characters. ↩
Well, second page, actually. The first page is mostly just the correspondence with one line of base64, but the second page onwards are 100% base64 content. ↩
EFTA00382108 is easily decoded as well. Air Travel Details.
Hey TripleT, yes that one is sitting in my queue! Thanks!
YOU ARE AMAZING. Thank you to your wife and kids for letting you do this for the world
Thank you for this write-up. I would love to start working through decoding some other files. I’ve been looking for files with these unrecovered base64 images. It seems that they all come from data set 9, is this true or have others been found in sets 10 and 11?
Here’s one I found that seems to have monospacing –
EFTA00754462 from data set 9.
Do you think the code you posted on github would work with this? I would love to try it but fear I may be a little out of my depth at this moment. I would love if there were clear instructions I could follow, but I understand you have already spent so much time and uncovered so much. Thank you again
Really interesting write-up — especially the CNN results. I think it’s really cool that you asked publicly for ideas on the original post, and that the CNN approach came out of that discussion. Mentioning that origin would add a nice bit of context to an already strong post. Nice work pushing it through all the edge cases.
Also works on EFTA00434905 – quick looks it’s basically the mail exchange of EFTA00434887 but without the censoring…
Absolute banger of an writeup. Great job. Wish I had the energy for these kinds of sideprojects.
You deserve applause. Can’t wait to see where this work leads.
Best regards
Is there a centralized place where people can see all of the decoded documents?
I was inspired by your tweets and blogposts, thanks for documenting all of this
As well as the invitation PDF this post is about, I’ve decoded 11 additional documents containing mono-spaced base64 encodings using rudimentary techniques (EFTA00751637, EFTA00751644, EFTA00751650, EFTA00751656, EFTA00754398, EFTA00754462, EFTA00754474, EFTA00756928, EFTA00756935, EFTA00756958, EFTA00756980), which in total contain four email threads between JE and two individuals (irinairina22@yahoo.com and Peter Mandelson) from 2010.
I’m not really sure what to do with this (unredacted/possibly new) information, but it was an interesting technical challenge and I hope to tackle some others soon. Feel free to share with or without attribution. Here’s my code/repo:
https://github.com/davidpendergast/ghast-ocr
Added a few decoded files (EFTA00382083, EFTA00382108, EFTA00434905) to a fork of Ghast’s repo.
Awesome, thanks for the contribution Avron7, I pulled in your commits.
For anyone wanting to contribute, please do feel free to create your own forks and/or open pull requests. My goal is to curate an up-to-date (and eventually complete), collection of the 40ish decoded files here, regardless of who cracked them.
Glad to contribute, Ghast!
Not sure if this will be helpful to anyone, but I manually transcribed/decoded all of the *variable font* base64 in page 1 of EFTA02343171.pdf. Hopefully, people more skilled than I can make something that handles variable text.
This has EFTA02343171.pdf and my work (in .pdf and .docx):
https://www.dropbox.com/scl/fo/cevyaosyku8sz6br9yuuo/AEC1t_FcRttAzKizVOaKjtA?rlkey=nhpuc2q40jnn5yjg21dx3f54n&st=4c7ug6i0&dl=0
Nice. Yeah, the variable-width ones are actually pretty clean and decipherable by eye, with the notable exception of I (uppercase i)s and l (lowercase L)s which are pretty much identical…
I think if it weren’t for that, it would be pretty feasible to scrape the text using pixel-pattern matching like I did for the monospace ones, but for variable-width I’m not sure if that will work.
I think there’s several plausible mechanisms for distinguishing Is and ls in general:
– l (ell)s are ever so slightly taller than I (eye)s in some fonts (e.g. Calibri), so although they may rasterize to the same height in the PDFs, there could be slight color variations at the top of the glyph that can be used to distinguish them. ells may be slightly thinner in some fonts too.
– l (ell)s have less horizontal kerning than I (eye)s in most fonts, meaning there’s going to be slightly more whitespace around I (eye)s. The kerning depends on the neighboring character too though so you’d need to know the exact font and its kerning logic to use this effectively, I think.
In general I think this is possible to do though, and it seems like most of the more recent documents are formatted this way so it’s worth trying~
@Ghast: nice work! I’m currently training a different model to handle the proportional width fonts (starting with Times New Roman) and it’s been a nightmare.
@Avron7: Be careful – that one is in Arial (or Helvetica, if taken on a Mac) and I think it uses identical glyphs for capital I and lowercase l. (I need to find a better font for this textarea because it currently uses Helvetica Neue/Arial and even switching it to
system-uiisn’t a great improvement because Segoe UI is like Calibri and uses only a slight difference in height to distinguish between the two).The best way to figure out these is if they decode to something other than a random sequence of bytes, in which case you can intuit what it’s supposed to be, at least in a few of the places.
PS @Ghast: much of the kerning you mention will depend on the system configuration (ClearType, etc) and the app rendering the text. Office currently uses the OTF GPOS tables for this, but I’m not sure what version (or even what app) the screenshots are from.
@Mahmoud Al-Qudsi Yeah differentiating between “I” and “l” was pretty hard.
I agree with the distinguishing mechanisms @Ghast mentioned, but I still had to figure it out via trial and error in most cases. Since the output actually makes sense, I’m pretty sure I got it (at-least mostly) correct, but it took a long time.
Hey all!
I’m way above my pay grade coding wise. Really impressed by what yall are doin. Found this link between Mount Sinai Medical Center, Dr. Ashutosh (Ash) Tewari & Epstein. I can’t find any reporting on it. Below is the link to his CT results that he FWD to someone July 2016…
https://www.justice.gov/epstein/files/DataSet%209/EFTA00823220.pdf
Help?
So Arial is a bit of a nightmare… over the past few days I’ve been trying to decode EFTA00658682 (scroll down past the fake Pinterest stuff), with little success, and more broadly, build a flexible solution I can use on other documents too.
My clever idea was basically, for each line, to try to programmatically render some text, align it to the text in the PDF, and then just iterate over each possible character (a-zA-Z1-9) and select the best match, and repeat. And then the kerning would sort of naturally distinguish the Is vs ls, and I could be confident in the solution.
Unfortunately, no matter what I try I can’t make the lines match up very well. It seems like the version of Arial used in the document is different from the versions I can find online (notably “=” and “+” signs have weird lengths, and certain letters like capital Fs have unusual left-side kerning). I’m not sure if this is a property of the font or as @Mahmoud Al-Qudsi said, a property of the system rendering it (I hope not, as this is difficult to compensate for…).
My next idea, which is more complicated and therefore less appealing is to align the letters individually (using some kind of image-alignment algorithm), which needs to be quite accurate, calculate the kerning between all adjacent letters, and hopefully use that information to distinguish Is vs ls. Since like, if you see several “IK”s in the document with two distinct kernings, you know the wider ones are “eye K” and the narrower ones are “ell K”. I think this principle could work on longer documents where there’s a lot of kerning data to extract.
I’m experimenting with trying a mix of font rendering/kerning stacks right now; using DirectWrite (via skia, on Windows) gets me closest to the kerning in the document but apparently there are still subtle differences possibly introduced by using Windows 11 instead of Windows 7 or whatever, specifically in how closely specific pairs of letters are kerned to one another. I was previously using the FreeType stack before (via PIL/pillow) but that was considerably off (though easier to train against, due to the looser kerning in general).
Here’s a comparison between DirectWrite (top), FreeType (bottom), and the original PDF (in the middle):
Do note that (for the top and bottom rows) I guessed at whether characters were ls or 1s, and the choice of which can affect spacing/kerning.