
This article shows you how to create a recovery disk for Windows XP, if you have the original CD (can be used as a recovery disk) or, if not, how to create a recovery diskette (floppy disk).
It also shows you how to download our recovery disk for Windows XP, if you don’t have the original CD available or can’t boot into Windows XP.
Download recovery disk for Windows XP
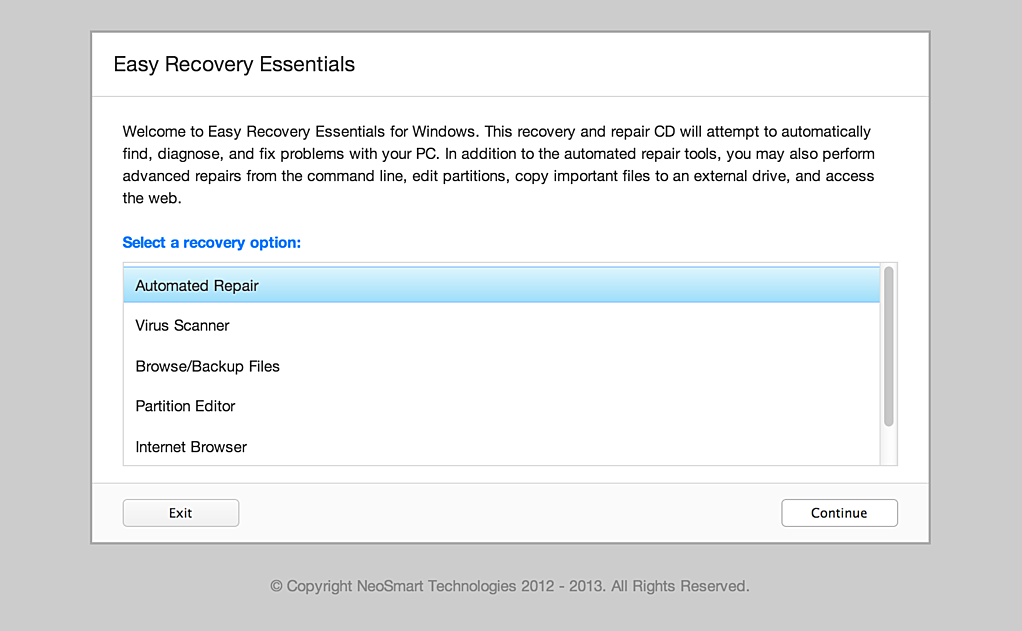
If you aren’t able to boot into Windows or don’t access to the recovery partition to create a system recovery disk, you can use our recovery and repair disk Easy Recovery Essentials to repair your Windows XP.
Download Easy Recovery Essentials
Features of Easy Recovery Essentials include:
- Automatically find and fix boot errors and blue screens
- Works even when you can’t get into Windows
- Recover from virus infections
- Restore your PC to a working state
- Access and backup your important data
- Advanced tools for IT experts
Easy Recovery Essentials is an ISO download image ready to be burned directly to a CD, DVD or a USB flash drive.
Easy Recovery Essentials can be used as a recovery disk for computers with Windows XP installed to repair the computer, including the full list of Windows XP editions with Service Packs installed:
- Microsoft Windows XP SP1 (Service Pack 1)
- Microsoft Windows XP SP2 (Service Pack 2)
- Microsoft Windows XP SP3 (Service Pack 3)
It’s compatible with both the Home and Professional editions of Windows XP:
- Microsoft Windows XP Home
- Microsoft Windows XP Professional
It’s compatible with newer versions of Windows, up to Windows 8.1:
- Our recovery disc for Windows 8 computers
- Our recovery disk for Windows 7 computers
- Our recovery disc for Windows Vista computers
It’s also compatible with Windows Server editions:
Create a recovery disk for Windows XP
Before you continue, check if you still have the original Windows XP installation CD.
That original installation CD can act as a recovery disk that you can use to run Recovery Console (Command line utility) to repair your computer with.
From Recovery Console, you can run the bootcfg, chkdsk, and more commands.
If you have the original CD
If you have the disk, follow these steps to open Recovery Console:
- Insert the CD in the optical drive
- Restart your computer
- At the Welcome to Setup screen, press R to load Recovery Console
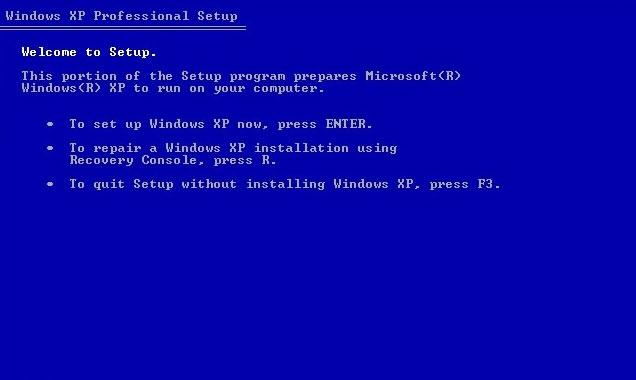
- You’ll need to log in as an Administrator or with any user that has administrative rights to the system. Do so and enter the password.
- Press Enter
- The Recovery Console should now be available
To read more about bootcfg, read the Bootcfg guide. To read more about chkdsk (check disk), read the chkdsk guide.
If you don’t have the original CD
If you don’t have the original CD with Windows XP, you can create a bootable floppy diskette.
It’s required that you can boot into Windows XP to create the bootable diskette. Otherwise, if you can’t boot into Windows XP, go to Download recovery disk for Windows XP.
You’ll need to make sure your computer’s floppy disk is working properly first. Your computer with Windows XP must have the floppy disk functioning.
To create the bootable diskette for Windows XP, follow these steps:
- Boot into Windows XP
- Insert the diskette in the floppy disk
- Go to My Computer
- Right-click on the floppy disk drive. This is usually the
A:\drive. - Click Format
- Check the Create an MS-DOS startup disk option at the Format options section
- Click Start
- Wait for the process to finish
- Once it’s completed, safely remove the diskette for the floppy disk
Once the recovery diskette is created, follow these instructions everytime you need to use it:
- Check if the diskette is in write-protect mode
- Insert the diskette in the floppy disk
- Restart the computer
- Follow the instructions on the screen after you’ve booted your sytem from the diskette
More Information
Linked Entries
Support Links
- Easy Recovery Essentials for Windows – our repair and recovery disk.
It’s an easy-to-use and automated diagnostics disk. It’s available for Windows 8, Windows 7 and Windows Vista. It’s also available for Windows XP and Windows Server.
Read more at Windows Recovery Disks.
- The NeoSmart Support Forums, member-to-member technical support and troubleshooting.
Applicable Systems
This article applies to the following operating systems:
- Windows XP (all editions)

 InfoWorld has an article out today wherein Randall Kenney of the “Windows Sentinel” team (a program used to monitor system settings and performance to provide aggregate data for analysis) trashes end-user uptake of Windows Vista by revealing that 35% of surveyed PCs that ship with Vista