Star Trek DS9 and the Color Kindle

I’ve been watching Star Trek reruns (thank you, Netflix!) for a while now, and something that caught my eye once I finished TNG and moved on to DS9 was the prevalence of “eBook readers” that have an uncanny resemblance to Amazon’s Kindle.

The devices in DS9 appear to undergo both heavy and subtle changes each time they make an appearance, but one edition of the eBook reader in Star Trek DS9: Profit and Loss bore an incredible resemblance to the (previous gen) Kindle Touch, down to the same gray polymer material, rounded edges, almost exactly the same thickness and dimensions – with the exception of being in color.

Continue reading

Windows Server 2008 and 2012 Recovery Discs Download

This article shows you how to create a recovery disk for Windows Server 2003, Server 2008 and Server 2012 or where to download our disk – Easy Recovery Essentials. We also have versions for Windows Server 2016 and Windows Server 2022 now available for download.

Contents

Download recovery disk for Windows Server

If you’re not able to create a recovery disk for your Windows Server edition (2003, 2008 or 2012), you can download our recovery and repair disk, Easy Recovery Essentials, to repair your Windows Server edition.

Download Easy Recovery Essentials

Features of Easy Recovery Essentials include:

  • Automatically find and fix boot errors
  • Works even when you can’t get into Windows
  • Recover from virus infections
  • Restore your PC to a working state
  • Access and backup your important data
  • Advanced tools for IT experts

Easy Recovery Essentials is an ISO download image ready to be burned directly to a CD, DVD or a USB flash drive.

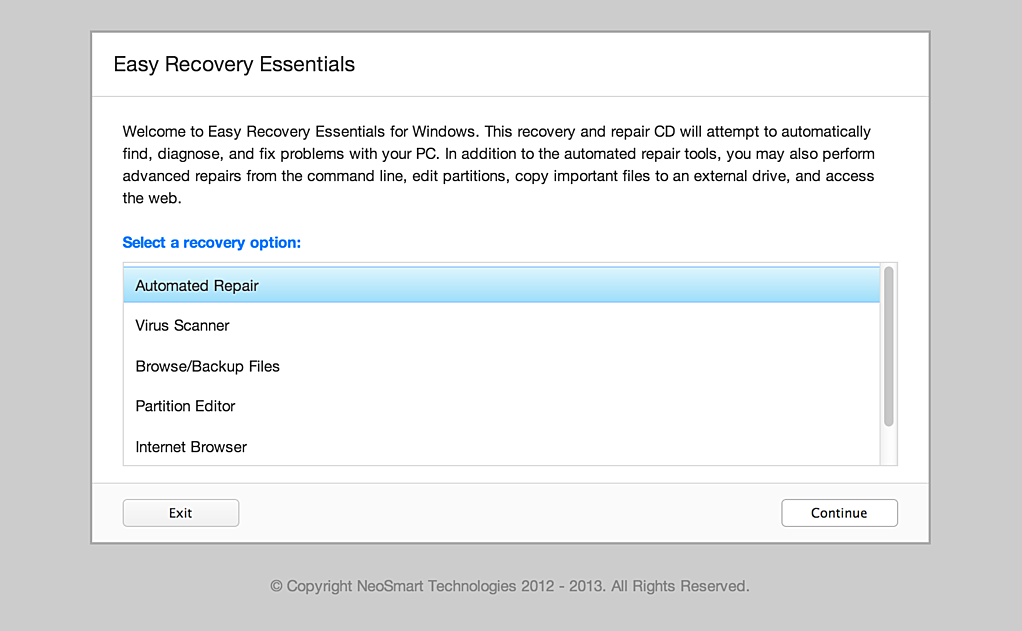
Easy Recovery Essentials Screenshot

It’s compatible with newer versions of Windows, up to Windows 8.1:

It’s also compatible with Windows XP:

Create recovery disk for Windows Server 2003

To recover a Windows Recovery 2003 system you’ll need to boot into the Recovery Console (similar to Windows XP steps).

You need to have your original Windows Server 2003 installation CD to access Recovery Console, if you don’t have it installed on your computer.

If you’re not able to access Recovery Console, go to Download recovery disk for Windows Server.

Follow these steps to access the Recovery Console:

  1. Insert the CD in the optical drive
  2. Restart your computer
  3. At the Welcome to Setup screen, press R to load Recovery Console
  4. Select the Windows installation you want to access with Recovery console
  5. You’ll need to log in as an Administrator or with any user that has administrative rights to the system. Do so and enter the password.
  6. Press Enter
  7. The Recovery Console should now be available

In Recovery Console, you can now run the bootcfg or chkdsk commands.

Create recovery disk for Windows Server 2008

Your original Windows Server 2008 installation CD can be used a recovery disk.

If you already created a bare metal restore image using the Windows Server backup utility, you can restore your computer from that image.

Restoring Windows Server 2008 from a bare metal image will delete all personal files and replace your system with the backup image.

If you haven’t created a bare metal image (required to restore your computer) and can’t boot into Windows to do so, go to Download recovery disk for Windows Server.

Follow these steps to create a bare metal restore image that you can restore later using the installation CD:

  1. Boot into your Windows Server 2008
  2. Click Start
  3. Click Administrative Tools
  4. Click Windows Server Backup
  5. Select Backup once…
  6. Select Different options at the Backup options screen
  7. Click Next
  8. Select Custom
  9. Click Next
  10. Click Add Items
  11. Select Bare metal recovery
  12. Click OK
  13. Click Next
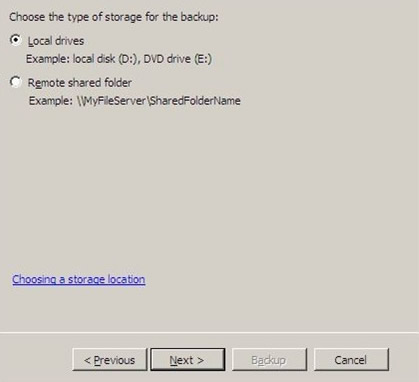
  14. Select Local drives from the Specify Destination Type screen

    Windows Server 2008 - Local Drives

  15. Click Next
  16. Select your backup destination from the Backup destination field
  17. Click Next
  18. At the Confirmation screen, click Backup
  19. Wait for the backup process to finish
  20. At the Backup Progress screen, you should see the Status: Completed text

In order to restore your Windows Server 2008 from this created bare metal image, follow these steps.

You need your original installation CD for the steps below. If you don’t have it, go to Download recovery disk for Windows Server.

  1. Insert the Windows Server 2008 CD in the disc tray
  2. Boot your computer
  3. Boot from the CD
  4. At the Install Windows screen, select a language, time and keyboard
  5. Click Next
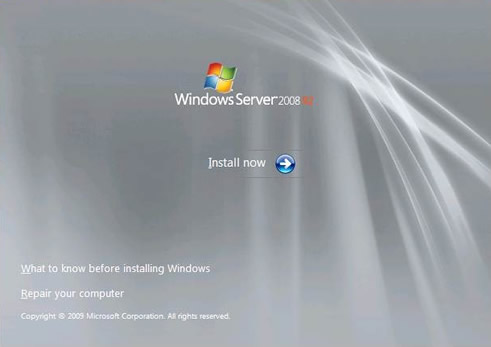
  6. Click Repair your computer

    Windows Server 2008 - Repair your computer

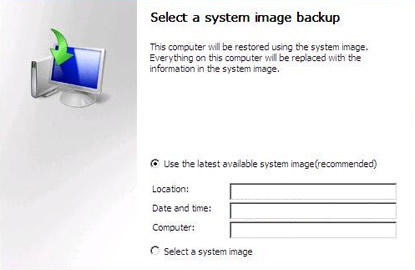
  7. At the System Recovery Options screen, select Restore your computer using a system image that you created earlier

    Windows Server 2008 - Select system image backup

  8. Click Next
  9. At the Select a system image backup, select Select a system image
  10. Click Next
  11. At the Choose additional restore options screen, you can choose to format and repartition the disks
  12. Click Next
  13. Click Finish
  14. Click Yes at the warning message

    Windows Server 2008 - Warning Message

  15. Wait for the process to finish

Create recovery disk for Windows Server 2012

Windows Server 2012 uses the Windows Server Backup utility, just as Windows Server 2008 does, which lets you create a bare metal image that you can use later to restore from.

Restoring from a bare metal image will delete all personal files and will be replaced with the image you are restoring from.

If you haven’t created a bare metal image (required to restore your computer) and can’t boot into Windows to do so, go to Download recovery disk for Windows Server.

Follow these steps to create a bare metal restore image:

  1. Boot into your Windows Server 2012
  2. Click Start or search for the Windows Server Backup software
  3. Load Windows Server Backup
  4. Select Backup once…
  5. Continue with the wizard instructions until you can select the Bare metal recovery option
  6. Click Next
  7. Continue with the wizard instructions to create the image

Once you’ve created the bare metal image, you can restore it using your original Windows Server 2012 installation DVD:

  1. Insert the DVD in the optical drive
  2. Boot from the DVD
  3. At the Windows Setup screen, click Repair your computer
  4. Select Troubleshoot
  5. Select System Image Recovery
  6. Select the Windows system, e.g. Windows Server 2012
  7. At the Re-image your computer screen, you can begin to select what image to restore from
  8. Click Next and follow the instructions to continue with the process

More Information

Linked Entries

Support Links

Applicable Systems

This article applies to the following operating systems:

  • Windows Server 2003
  • Windows Server 2008
  • Windows Server 2012

SystemDiscs.com Cyber Monday Sale

We’re pleased to announce that we’ll be joining in the Cyber Monday fun: this year, all our system recovery and repair CDs at SystemDiscs.com are 15% off for Cyber Monday!

This one-day only sale is your chance to grab a copy of a system recovery CD and prepare for a rainy day. Protect against future damage with our powerful repair and recovery CDs, and burn a copy of Easy Recovery Essentials for Windows to keep handy for the next time your system won’t boot because of a virus, failed Windows update, or other unfortunate incident.

Continue reading

Tools to help manage and recover your new Windows 8 installation

Today’s the big day: Windows 8 has hit the shelves and customers are flocking to buy the latest version of Microsoft’s operating system. In the back of everyone’s mind is the big question: what do I do to properly set up my Windows 8 installation, and in the (hopefully unlikely) situation of disaster, if I can no longer get into my Windows 8 PC, what can I do about it?

All of NeoSmart Technologies products are 100% Windows 8 ready. They’ve all been vetted and heavily tested against the latest version of the Windows OS and have been updated with all the features you require for peace of mind. They’ll help you get your system working the way you want it, and then God forbid something bad happen, get you back on your feet as soon as possible.

Continue reading

A most-miserable Apple TV unboxing experience

Yesterday, while at the Apple Store for a free replacement clamshell/LCD for my 15″ MacBook Pro Retina (sudden-onset ghosting issues, to use a medical term), I caved-in and got an Apple TV. It’s something I’d given plenty of thought to in the past, but was never really sold on. In the end, the $99 price tag and my growing frustration at streaming Netflix shows and movies from my desktop to my plasma HDTV won me over.

The initial experience was pretty much par for the course: beautifully packaged, incredible attention to detail, sexy product, and gorgeous cabling. I made sure to tuck the box away somewhere safe, because Apple boxes are too beautiful to throw away.

But that was where the bliss ended and the agony began. Because of the sheer tinyness of the Apple TV compared to all my other media products, and because lag is not a primary concern as it would be with a gaming device, this was the first time that I decided to connect one of my media products via wifi instead of over ethernet (XBox, HDTV, printers, and more – all connected to a gigabit router).

Continue reading

Windows 8 Recovery Disk and Repair Disc Download

Download our recovery and repair disk for Microsoft Windows 8 and Windows 8.1 (also available for Windows Vista, 7, XP or Server editions) that can be used to access system recovery tools, giving you options of using an antivirus, System Restore, document and picture backup and recovery, automated system repair, and a command-line prompt for manual advanced recovery.

Download recovery disk for Windows 8/8.1
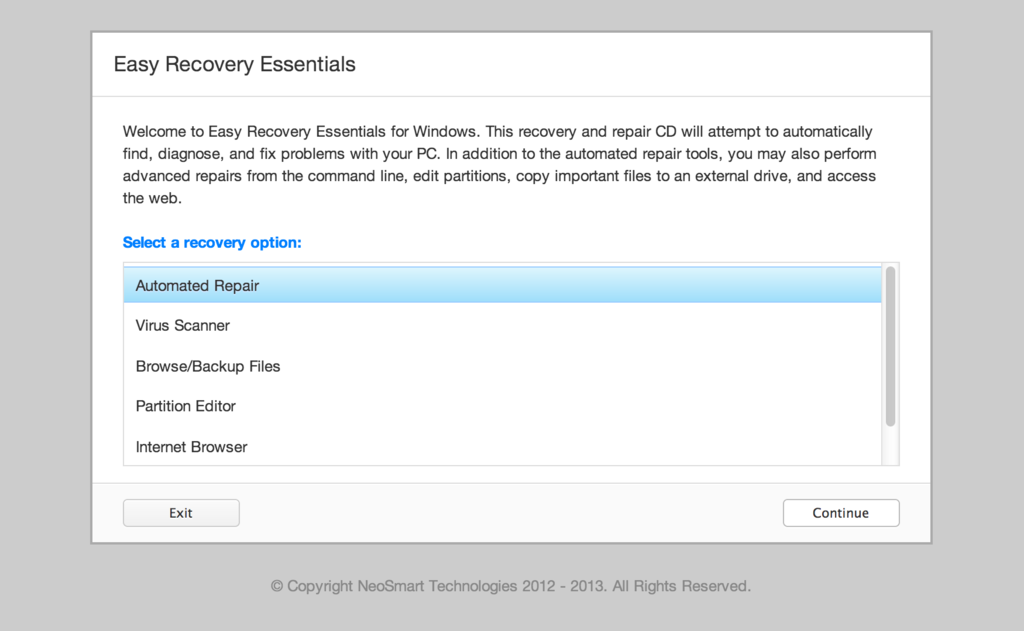
Easy Recovery Essentials for Windows 8

Our recovery disk is compatible with desktops, workstations, laptops, notebooks, netbooks, ultrabooks and servers from Dell, HP, Acer, Asus, Samsung, Lenovo, IBM, Toshiba, Compaq, Gateway or eMachines that have Windows 8 or 8.1 installed.

The disk is compatible with 32-bit and 64-bit editions of Windows 8 or Windows 8.1. It supports x86 and x64 platforms and works with EFI and MBR configurations.

Easy Recovery Essentials – or EasyRE – is a 50 to 135 MB ISO image that you can download and burn to any CD, DVD or USB drives.

With Easy Recovery Essentials you can recover and repair your computer.

About our recovery and repair disk
Windows 8 LogoIt has become harder and harder to get recovery or installation disks for your computer as major PC manufacturers no longer distribute a recovery or repair CD/DVD with your purchase.

A Windows 8 or Windows 8.1 installation DVD can be used to recover your computer. You can use it to access many recovery options, use System Restore and automatically fix boot errors or blue screens.

But instead of giving customers real recovery CDs and DVDs with their purchase of a computer (like notebooks, laptops, desktop computers etc.), PC manufacturers (like Dell, HP, Samsung, Acer, Lenovo, Toshiba and others) usually require you to make the recovery media by yourself.

If you can’t boot into Windows or your PC isn’t working, only a bootable recovery and repair CD/DVD/USB can save you.

Our recovery disk, called Easy Recovery Essentials, is an ISO image that you can download today and burn to any CDs, DVDs or USB drives.

You can boot from our disk to recover or repair your broken computer.

We provided instructions on how to do this below, see Burn to CDs, DVDs or USB drives.

With Easy Recovery Essentials you can:

  • Find and fix errors automatically with Automated Repair
  • Recover your PC from infections with the built-in antivirus
  • Restore your PC to a working state
  • Access and backup your most important data (like documents, pictures, music, videos and so on)

Easy Recovery Essentials is used by computer technicians and IT experts for its many features:

  • Fully-featured visual partition editor
  • Scriptable command line
  • Advanced recovery options
  • Web browser

Read more about EasyRE for computer repair professionals here.

Download recovery disk for Windows 8 and 8.1

Our recovery and repair disk uses a non-destructive repair process that can recover your PC without formatting your hard drive or reinstalling Windows.

Easy Recovery Essentials comes with:

  • Powerful Automated Repair feature
  • Antivirus scanner built-in
  • Ability to access System Restore
  • Web browser to browser the Internet
  • Ability to backup your most important files (documents, videos, pictures, music and so on)
  • Memory diagnostics and a command-line tools for advanced options

Update: Please note that this disk is no longer free, due to licensing restrictions imposed upon us.

Download Easy Recovery Essentials for Windows 8 and Windows 8.1

Our recovery disk supports x86 and x64 platforms and all Microsoft Windows 8 editions:

  • Windows 8 (32-bit and 64-bit editions)
  • Windows 8.1 (32-bit and 64-bit editions)

Our disk is in ISO image format. You can burn the image to any CDs, DVDs or USB drives and then use it as a bootable recovery media.

You cannot use a recovery or repair disk to install or reinstall Windows 8.

Burn to CDs, DVDs or USB drives

We published a guide on how to burn an ISO image to CD or DVD. Our recovery ISO image can be burnt to any CDs or DVDs and USB drives.

You can burn it with your favorite burning program. We published step-by-step instructions and guides on how to do this for any CDs or DVDs:

You can opt for a recovery USB instead: follow our guide on how to make a EasyRE recovery USB drive here.

Compatibility

Our recovery and repair disk works with any desktop computers, workstations, laptops, notebooks, ultrabooks, netbooks or servers computers from all major PC manufacturers:

  • Dell
  • HP
  • Asus
  • Acer
  • Lenovo
  • Samsung
  • Toshiba

It’s also compatible with older or no longer available PC brands, such as:

  • IBM
  • Compaq
  • Gateway Computers
  • eMachines

If your computer runs Windows 8 or Windows 8.1, you can download Easy Recovery Essentials.

Dell

Our recovery disk is compatible with Dell computers:

  • Dell Adamo
  • Dell Inspiron
  • Dell Studio
  • Dell Vostro
  • Dell XPS
  • Dell Latitude

Do you have a Dell computer running Windows 8? Read our recovery and restore guide for Dell.

HP

Easy Recovery Essentials work with your HP computer. It’s compatible with the following series of HP PCs:

  • HP ENVY
  • HP EliteBook
  • HP Essential Home
  • HP Pavilion
  • HP x2 models

Do you have a HP computer running Windows 8? Read our recovery and restore guide for HP.

Asus

Easy Recovery Essentials is compatible with Asus computers.

Do you have an Asus computer running Windows 8? Read our recovery and restore guide for Asus.

Acer

Our recovery disk can be downloaded by Acer customers. The disk is compatible with all Acer series and models:

  • Aspire M and T, Aspire X and Predator G
  • Aspire R, Aspire V3 and Aspire E
  • Aspire S7, Aspire S5, Aspire S3, Aspire P, Aspire M, Aspire V7, Aspire V5
  • Aspire One

Do you have an Acer computer running Windows 8? Read our recovery and restore guide for Acer.

Lenovo

Easy Recovery Essentials is compatible with Lenovo computers:

  • Lenovo ThinkPad
  • Lenovo IdeaPad
  • Lenovo Thinkcentre
  • Lenovo Ideacentre

Do you have a Lenovo computer running Windows 8? Read our recovery and restore guide for Lenovo.

Samsung

Easy Recovery Essentials is compatible with any Samsung laptops or desktops:

  • Samsung ATIV Book, Gaming and Business PC series for laptops
  • Samsung ATIV One for All-in-One desktops

Toshiba

Easy Recovery Essentials is compatible with all Toshiba series and models:

  • Toshiba Satellite
  • Toshiba Qosmio
  • Toshiba Portege
  • Toshiba Tecra
  • Toshiba Kira family series
  • Toshiba All-in-One desktop series

Do you have a Toshiba computer running Windows 8? Read our recovery and restore guide for Toshiba.

IBM, Compaq, Gateway, eMachines

These PC manufacturers were either acquired by another company or they are no longer on the market. Our recovery disk is compatible with these PCs, if your computer runs the supported Windows versions:

  • Windows 8 and Windows 8.1
  • Windows 7 (all editions)
  • Windows Vista (all editions)
  • Windows XP
  • Windows Server 2003, Server 2008, Server 2012

IBM

Lenovo acquired IBM’s personal computer division in 2005.

Easy Recovery Essentials is compatible with IBM computers and laptops (like the ThinkPad series) and Lenovo computers (see Lenovo).

Compaq

HP acquired Compaq in 2002.

Easy Recovery Essentials is compatible with Compaq desktops and laptops (including the Presario series) and HP computers (see HP).

Gateway and eMachines

eMachines was acquired by Gateway Computers in 2007. In 2007, Gateway Computers was acquired by Acer. The eMachines brand was used until 2012.

Easy Recovery Esssentials is compatible with Gateway computers:

  • Series SX, DX and One ZX
  • NE and NV series
  • LT series

Do you have a Gateway computer running Windows 8? Read our recovery and restore guide for Gateway.

Easy Recovery Esssentials is compatible with eMachines PCs and Acer computers (see Acer).

Disk for Windows 7, Windows Vista, Windows XP or Server editions

You can download Easy Recovery Essentials for other versions of Windows, such as Windows 7, Windows Vista, Windows XP or the Windows Server editions.

Windows 7

Read more about our recovery disk for Windows 7.

Our recovery disk supports Windows 7 (32-bit and 64-bit) and its editions: Ultimate, Enterprise, Professional, Home Premium, Home Basic and Starter.

Download the disk for Windows 7.

Windows Vista

Read more about our recovery disk for Windows Vista.

Easy Recovery Essentials supports Windows Vista (32-bit and 64-bit) and its editions: Ultimate, Enterprise, Professional, Home Premium, Home Basic and Starter.

Download the disk for Windows Vista.

Windows XP or Server editions

If your computer runs Windows XP or Windows Server, you can download Easy Recovery Essentials.

Our disk supports Microsoft Windows XP, including the Service Pack updates:

  • Windows XP Service Pack 1 (SP1)
  • Windows XP Service Pack 2 (SP2)
  • Windows XP Service Pack 3 (SP3)

Download the disk for Windows XP.

You can download the disk for any of the following Windows Server editions:

  • Windows Server 2003
  • Windows Server 2008
  • Windows Server 2012

Download the disk for Windows Server.

Support

Please don’t ask for help below, it’ll get real cluttered real soon!

Open a support thread at https://neosmart.net/forums/ and we’ll help you resolve your problem ASAP.

Windows Recovery Essentials Officially Released!

SystemDiscs logoEasy Recovery Essentials for Windows, the ultimate and easiest-ever Windows system repair CD that automatically finds and fixes problems with your Windows PC, has been officially released!
Back in April, we first announced the beta of Windows Recovery Essentials: our software to automatically detect, diagnose, and repair a multitude of common and uncommon issues that could prevent Windows from running or cause a BSOD on boot. It’s been a little longer than we originally anticipated, but over the months the Windows Recovery Essentials has been renamed to Easy Recovery Essentials (EasyRE for short), graduated out of beta going to a soft release, and is now being officially announced as grown up and ready to help everyone out of a tight spot!

EasyRE is available for Windows XP, Windows Vista, and Windows 7, for all editions and platforms. We are working hard on making a Windows 8 version available ASAP – we are expecting to see that version released sometime in the next week or two.

Continue reading

Announcing EasyBCD 2.2: Windows 8 dual-booting and more!

New EasyBCD logoQuick: what takes 5 years, two failed attempts, and thirteen contributors? Answer: EasyBCD with multilanguage support!

Who knew it would be this hard to release a version of EasyBCD that supports languages from English to Arabic and from Korean to Russian? We certainly had no idea it would take this long and this much work back in June of 2007 when we first attempted this gargantuan task! It turns out it’s not such an easy thing to organize and manage the translation of a medium-sized software project – and that no good tools existed to make it possible.

We were expecting to find (this late into the game) a plethora of .NET localization tools and resources that would make the job ridiculously easy, but it turns out all the existing solutions were terrible for one reason or another: too hard for non-developers to grasp, no versioning support, no on-the-fly deployment (i.e. requires recompilation), no unicode support, text-only interfaces, and the list goes on and on. We had to develop our own complete end-to-end translation and globalization framework and associated utilities (xml-based, text-editable, translation interface, versioning support, unicode support, on-the-fly deploy, string aliasing, derivable strings, language cleanup, outdated/missing string search, and more!), which we’ve open sourced to save others the trouble in the future.

Now that we have the excuses out of the way, let us introduce EasyBCD 2.2, complete with 13 languages from around the globe. With much thanks to the following people, we have been able to provide these languages out-of-the-box with EasyBCD 2.2:

Continue reading

Windows XP Recovery and Repair Disk

This article shows you how to create a recovery disk for Windows XP, if you have the original CD (can be used as a recovery disk) or, if not, how to create a recovery diskette (floppy disk).

It also shows you how to download our recovery disk for Windows XP, if you don’t have the original CD available or can’t boot into Windows XP.

Download recovery disk for Windows XP

If you aren’t able to boot into Windows or don’t access to the recovery partition to create a system recovery disk, you can use our recovery and repair disk Easy Recovery Essentials to repair your Windows XP.

Easy Recovery Essentials Screenshot

Download Easy Recovery Essentials

Features of Easy Recovery Essentials include:

  • Automatically find and fix boot errors and blue screens
  • Works even when you can’t get into Windows
  • Recover from virus infections
  • Restore your PC to a working state
  • Access and backup your important data
  • Advanced tools for IT experts

Easy Recovery Essentials is an ISO download image ready to be burned directly to a CD, DVD or a USB flash drive.

Easy Recovery Essentials can be used as a recovery disk for computers with Windows XP installed to repair the computer, including the full list of Windows XP editions with Service Packs installed:

  • Microsoft Windows XP SP1 (Service Pack 1)
  • Microsoft Windows XP SP2 (Service Pack 2)
  • Microsoft Windows XP SP3 (Service Pack 3)

It’s compatible with both the Home and Professional editions of Windows XP:

  • Microsoft Windows XP Home
  • Microsoft Windows XP Professional

It’s compatible with newer versions of Windows, up to Windows 8.1:

It’s also compatible with Windows Server editions:

Create a recovery disk for Windows XP

Before you continue, check if you still have the original Windows XP installation CD.

That original installation CD can act as a recovery disk that you can use to run Recovery Console (Command line utility) to repair your computer with.

From Recovery Console, you can run the bootcfg, chkdsk, and more commands.

If you have the original CD

If you have the disk, follow these steps to open Recovery Console:

  • Insert the CD in the optical drive
  • Restart your computer
  • At the Welcome to Setup screen, press R to load Recovery Console

  • You’ll need to log in as an Administrator or with any user that has administrative rights to the system. Do so and enter the password.
  • Press Enter
  • The Recovery Console should now be available

To read more about bootcfg, read the Bootcfg guide. To read more about chkdsk (check disk), read the chkdsk guide.

If you don’t have the original CD

If you don’t have the original CD with Windows XP, you can create a bootable floppy diskette.

It’s required that you can boot into Windows XP to create the bootable diskette. Otherwise, if you can’t boot into Windows XP, go to Download recovery disk for Windows XP.

You’ll need to make sure your computer’s floppy disk is working properly first. Your computer with Windows XP must have the floppy disk functioning.

To create the bootable diskette for Windows XP, follow these steps:

  • Boot into Windows XP
  • Insert the diskette in the floppy disk
  • Go to My Computer
  • Right-click on the floppy disk drive. This is usually the A:\ drive.
  • Click Format
  • Check the Create an MS-DOS startup disk option at the Format options section
  • Click Start
  • Wait for the process to finish
  • Once it’s completed, safely remove the diskette for the floppy disk

Once the recovery diskette is created, follow these instructions everytime you need to use it:

  • Check if the diskette is in write-protect mode
  • Insert the diskette in the floppy disk
  • Restart the computer
  • Follow the instructions on the screen after you’ve booted your sytem from the diskette

More Information

Linked Entries

Support Links

Applicable Systems

This article applies to the following operating systems:

  • Windows XP (all editions)

OS X Mountain Lion 10.8.2 finally unifies iMessage messaging

iMessage fragmentation across devices has been a common complaint ever since iMessage was first released, and although Apple has taken steps to mitigate the issue, it hasn’t yet been truly solved. The problem was exacerbated with the release of Mountain Lion which brought iMessage to the desktop (or to the laptop, depending on what you use), where users of OS X would be allowed to join in the iMessaging fun – but with a very important caveat: the iChat (now rechristened “Messages”)  messaging software would only register with the iMessage email account, so iMessages sent to your phone number would not be received.

This meant that users would have to explicitly take care to send and receive messages from their iMessage-enabled email addresses; but while you can always select where and how you initiate conversations, you can’t very well choose how and where perfectly random strangers will choose to contact you. This limitation also applied to the iPad, however iOS 6 beta seeds included a fix for that, adding the option to initiate and receive messages from the phone number associated with your iMessage account.

It pleases us to inform you that with Mountain Lion 10.8.2 (as of the latest developer seed, 12C50) this feature has been extended to Messages on OS X, and in the future, your iMessages will be synchronized across all platforms. Here is a screenshot of how your iMessage account looks in iMessage on 10.8.2:

Continue reading